Best 3D Printers Under $300

Not sold on 3D printers under $200?
Move on to the best 3D printers under $300 and experience a jump in product quality while still staying in the budget category. If you’re serious about taking up 3D printing as a hobby, spending $50-100 more on a better product will go a long way.
| Budget |
|---|
 |
| Monoprice Select Mini V2 |
| 4.4/5.0 |
| 9.9 lb |
| Easy to use for beginners and responsive interface. |
| Check Amazon |
| Best Value |
|---|
 |
| XYZprinting da Vinci Jr. 1.0 |
| 4.5/5.0 |
| 26.5 lb |
| Low noise level and includes auto-feeding filament system. |
| Check Amazon |
| Top Pick |
|---|
 |
| Monoprice Maker Select V2 |
| 4.7/5.0 |
| 22 lb |
| Includes heated build plate and supports standalone printing. |
| Check Amazon |
Here, we introduce you to cheap 3D printers that you can get for less than $300 – or more specifically, 3D printers priced between $200 and $300 (note: prices are accurate at the time of writing). So don’t expect to see super-cheap 3D printers that retail for $150, even though they are technically under $300.
6 Best 3D PRINTERS UNDER $300 Comparison Table
| Make and Model | Weight | Connectivity | Price |
|---|---|---|---|
| Monoprice Maker Select V2 | 22 lb | USB, SD card | Check Price |
| Monoprice Select Mini V2 | 9.9 lb | Wi-Fi, USB, SD card | Check Price |
| XYZprinting da Vinci Jr. 1.0 | 26.5 lb | USB, SD card | Check Price |
| RepRap Guru DIY Prusa i3 V2 | 12 lb | USB, SD card | Check Price |
| Anycubic Kossel 3D Printer (Pulley) | 12.8 lb | USB, SD card | Check Price |
| Jgaurora A-3 | 22 lb | USB, SD card | Check Price |
Difference Between $300 3D Printers and $200 3D Printers
So what do you get for spending $100 more on a budget 3D printer?
Build Quality
Build Size
Heated Print Bed
Print Quality
Hello, Delta
Now, without further ado, here are our 6 picks for the best 3D printers under $300.
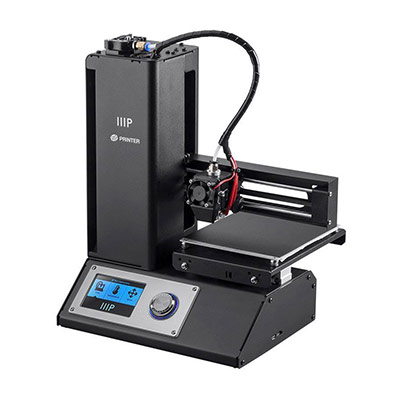
1. Monoprice Maker Select V2
Editor’s Rating: 4.7/5
If you want a low-cost starter 3D printer that you can play around with while you learn the ins and outs of 3D printing, the Monoprice Maker Select V2 is for you. It’s a reliable entry-level 3D printer that brings excellent value to the table.
It’s basically a plug-and-play 3D printer. The printer is already assembled right out of the box. All you need to do is tighten a few screws and it’s ready to go. In less than 30 minutes, you can already start printing some of the test models included in the SD card (the package also includes a starter filament). For beginners, this hassle-free initial setup is definitely a huge plus.
The Maker Select V2 includes a generous maximum build volume, though the advertised 7.1-inch vertical space is misleading. In reality, you can only print up to approximately 6 inches because of how the hot end is positioned. The build plate is heated, allowing for reliable processing of ABS and other filaments that need higher temperatures in order to work properly.
The print quality is impressive for a 3D printer that retails for under $300. It’s polished and accurate, complemented by a fairly fast printing speed. But like other 3D printers, the level of detail and size of the project affects the speed – the bigger and more detailed, the longer the completion time.
The Maker Select V2 has an active community where you can get helpful pointers on how to get the most out of your machine. It’s really worth diving into the forums, especially since the included instruction manual only covers the basics and contains no info on how to optimize the printer.
The exposed structure of the Maker Select V2 means it’s perfectly open for modding – which is actually recommended in order to get the most out of it. Modding means spending more money. Including modding costs, expect to cough up around $500 in total. But what you get is a 3D printer capable of outworking 3D printers triple the price. It’s not a bad investment if you ask us.
Of course, the Maker Select V2 works just fine in the default configuration. All in all, it’s an excellent starter 3D printer for those who are serious about 3D printing. It includes a heated bed, can work standalone via SD card, and produces impressive results for a budget 3D printer. It’s far from a perfect machine, but you’d be hard-pressed to find a better product available for $300 or less.

| Tech Specs |
|---|
| Resolution: 100 microns |
| Volume: 7.9 x 7.9 x 7.1 in |
| Filament: 1.75 mm |
| Type: ABS, PLA, PVA, and others |
| Weight: 22 lb |
| Connect: USB, SD card |
| The Pros |
|---|
| Extremely easy to assemble |
| Includes heated build plate |
| Supports standalone printing |
| Open for modding |
| Large build size |
| Great print quality |
| Includes starter filament and test models |
| The Cons |
|---|
| Unreliable customer support |
| No auto-leveling technology |
| No touchscreen interface |
2. Monoprice Select Mini V2
Editor’s Rating: 4.4/5
For our best budget pick, we have another product from Monoprice, one of the most popular brands in the economic 3D printers department. The Monoprice Select Mini V2 is available in two colors: black and white, with the former giving off a more professional look.
Fully assembled, the Select Mini V2 is ready to start printing right out of the box. Just go through the initial setup, which should take less than 30 minutes, and you’re good to go. The knob-operated built-in interface is easy to use and responsive, though it feels rudimentary – a touchscreen interface would’ve been better.
Lightweight and compact, the Select Mini V2 is designed for desktop use. It looks great on any work desk, and the fairly quiet printing operation makes it less distracting while you work on other stuff. But in exchange for the compact build, you get a small build plate, which limits you to only small, often non-functional items.
On the plus side, the build plate is heated, which is uncommon for a budget 3D printer. In most cases, you need to modify a budget 3D printer and install it with a heated build plate. The heated build plate means you can use ABS for printing, although we suggest sticking to PLA during the first few weeks while you go through the learning curve.
In terms of printing speed, the Select Mini V2 is noticeably slower than the Maker Select V2. It’s not turtle-slow but you need to be patient with it. If you want a fast 3D printer, then you’re in the wrong category – budget 3D printers are not exactly known for their printing speeds.
Built for both recreational and educational use, the Select Mini V2 is a reliable workhorse capable of printing for hundreds of hours with minimal issues, provided you subject it to regular maintenance. It’s a great piece of equipment that can grow with you until you’re ready to move on to higher-end 3D printers sitting above $1,000.
Overall, the Select Mini V2 is one of the best budget 3D printers that you can get for less than $300. It’s reliable, easy to use, and comes fully assembled – three reasons why it’s a recommended 3D printer for newbies.
| Tech Specs |
|---|
| Resolution: 100 microns |
| Volume: 4.7 x 4.7 x 4.7 in |
| Filament: 1.75 mm |
| Type: ABS, PLA |
| Weight: 9.9 lb |
| Connect: USB, SD card |
| The Pros |
|---|
| Easy to use for beginners |
| Compact enough for desktop placement |
| Fully assembled right out of the box |
| Includes heated build plate |
| Sturdy construction |
| Responsive interface |
| The Cons |
|---|
| Small maximum build volume |
| Unreliable customer support |
| No touchscreen |
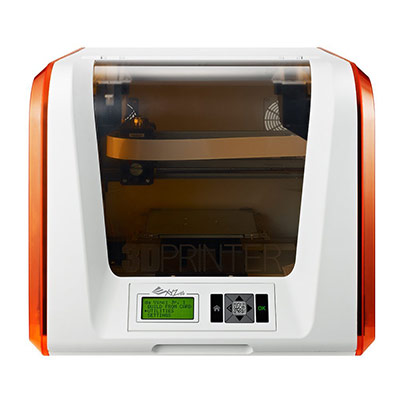
3. XYZprinting da Vinci Jr. 1.0
Editor’s Rating: 4.5/5
The XYZprinting da Vinci Jr. 1.0 is a fully enclosed 3D printer that offers amazing value for a price so low you might think there’s some kind of mistake in the product listing. It’s originally available for over $300. Now, you can get it for $250, which is a steal.
Housed in an attractive white-and-orange case, the da Vinci Jr. 1.0 arrives in a neat packaging that immediately tells you the manufacturer cares about its products. It’s a plug-and-play 3D printer that only requires a few minutes of calibration before you can start printing. More specifically, you need to make sure the extruder and the print bed have the right distance between them.
Designed for both home use and classroom use, the da Vinci Jr. 1.0 includes a small built-in interface operated by a set of buttons. It’s very easy to use. Even the technically challenged will have little trouble operating it. The included software is also easy to learn, although it’s not the most comprehensive when it comes to design options.
Adding to the ease of use is the inclusion of two neat features: the auto-feeding filament system and the quick-release extruder. The former means the machine takes care of everything once the filament is loaded. The latter allows for quick removal of the extruder for maintenance (or for extruder replacement).
Performance-wise, the da Vinci Jr. 1.0 is slow and quiet. The former isn’t really surprising from a budget 3D printer. The low noise level means you don’t have to worry about the printer distracting you while you attend to other things on your work desk. In terms of print quality, the da Vinci Jr. 1.0 is in the same league as the da Vinci Mini and the da Vinci miniMaker. It has the right level of precision to produce detailed items with little issues.
Our biggest complaint is the way XYZprinting forces you to buy proprietary filament. It’s like owning a photocopier that only works with a specific type of ink sold by the photocopier manufacturer. Furthermore, XYZprinting filaments are significantly more expensive than other products. Make sure you’re perfectly okay with this issue before making the purchase.
In summary, the da Vinci Jr. 1.0 is a nice little machine that pulls off the “starter 3D printer” role with great success. It’s easy to set up and use, includes a decent build volume, and is safe to use around kids, courtesy of the fully enclosed construction.
| Tech Specs |
|---|
| Resolution: 100 microns |
| Volume: 5.9 x 5.9 x 5.9 in |
| Filament: 1.75 mm |
| Type: PLA |
| Weight: 26.5 lb |
| Connect: USB, SD card |
| The Pros |
|---|
| Fully enclosed |
| Easy to set up and calibrate |
| Low noise level |
| Includes auto-feeding filament system |
| Extruder removes easily for maintenance |
| Decent build volume |
| The Cons |
|---|
| Requires proprietary filament |
| No heated build plate |
| Limited to PLA |
| Slow printing speed |
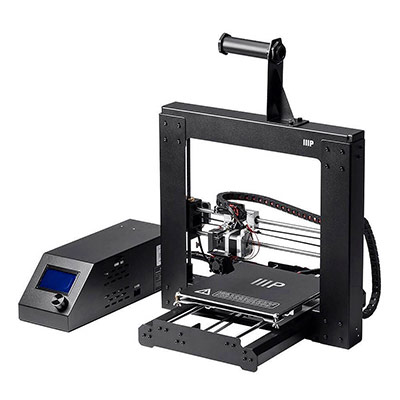
4. RepRap Guru DIY Prusa i3 V2
Editor’s Rating: 4.3/5
There are two kinds of people when it comes to buying a starter 3D printer: those who want a pre-built or fully assembled 3D printer and those who prefer to build their own 3D printer with a DIY kit. If you belong to the latter group, then the RepRap Guru DIY Prusa i3 V2 is for you.
The kit arrives in a neatly packaged box. Figuring out which is which is easy since all the parts and pieces are labeled accordingly. The hard part is putting everything together. The included instruction manual is straightforward and easy to understand. However, the manual is for the older version of the printer, the V1, so it doesn’t cover some of the upgrades present in the V2.
Expect to spend around 10 hours for the assembly and the calibration, which includes watching instructional videos on the internet. If you’re good with technical stuff or have a background in electronics or machinery, you can probably finish everything in 6-8 hours. That said, the RepRap Guru DIY Prusa i3 V2 is only recommended for those who love tinkering with machines and don’t mind getting their hands dirty.
Once everything is set up, using the printer is straightforward. It’s easy to use and can run non-stop for days and weeks with minimal issues. It’s got a generous build volume, significantly expanding the type of items that you can print, and includes a heated print bed. The latter feature means you can print with other materials if you feel like PLA is too mainstream for you.
Most budget 3D printers don’t come with a reliable customer support, which can be a deal-breaker for some people. That’s not the case for this 3D printer. RepRap Guru provides excellent customer service, responding to inquiries in a timely manner and promptly sending out replacements for defective parts.
Be wary of some reviews claiming that RepRap Guru “bribes” consumers to leave stellar reviews in exchange for a complimentary filament. It’s not entirely true. The manufacturer merely asks for reviews in exchange for a free spool of filament – the actual rating still depends on the consumer. Still, the questionable method does skew the numbers.
If you’re up for a challenge and want to start your 3D printing career by building your own 3D printer, check out the RepRap Guru DIY Prusa i3 V2. It’s a solid 3D printer that gets the job done in a reliable manner. It’s got good print quality, supports various filament types, and can do standalone printing via SD card.
| Tech Specs |
|---|
| Resolution: 100 microns |
| Volume: 8 x 8 x 7 in |
| Filament: 1.75 mm |
| Type: ABS, PLA, Wood, PVA, TPE |
| Weight: 12 lb |
| Connect: USB, SD card |
| The Pros |
|---|
| Generous build size |
| Good print quality |
| Includes heated print bed |
| Supports various filament types |
| Capable of untethered printing |
| Excellent customer support |
| 30-day money back guarantee |
| The Cons |
|---|
| Outdated instruction manual |
| Not recommended for beginners |
| Assembly and calibration takes a while |
| No main power switch |
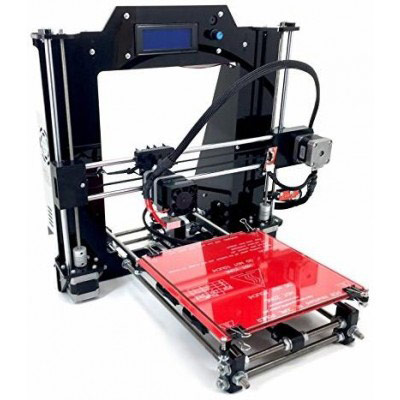
5. Anycubic Kossel 3D Printer (Pulley)
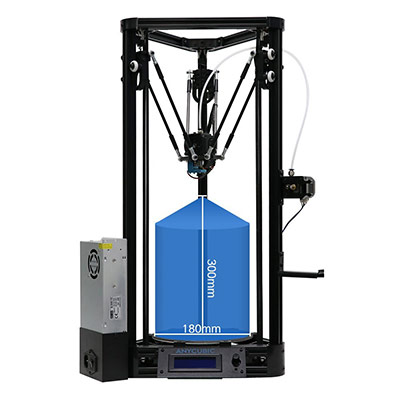
Editor’s Rating: 4.1/5
The Anycubic Kossel 3D Printer is something we wouldn’t recommend to 3D printing beginners, mainly because delta 3D printers are more complicated. It’s ideal for hobbyists who already know the basics of 3D printing and have a lot of patience when tinkering with electronics.
Note that the product included here is the “Pulley” version – the “Linear Plus” version sits above $300, making it ineligible for inclusion. The most noticeable difference between the two is that the “Pulley” comes with a smaller build space. In terms of performance, the “Linear Plus” has the edge, but not by much.
Made in China, the Anycubic Kossel 3D Printer arrives in a well-protected packaging. It’s not fully assembled right out of the box, so you’ll need to free up some time to put it together. Depending on your experience with 3D printers, and electronics in general, the assembly and initial calibration process can take anywhere from 3 hours to 10 hours.
Low-end DIY 3D printers are notorious for having confusing instruction manuals that only make the situation worse. This delta printer from Anycubic is different. The assembly is straightforward and hassle-free, courtesy of the well-written instruction manual. It’s easy to understand, thanks to the surprisingly good English texts (remember, the manufacturer is Chinese) and helpful images.
Everything you need to assemble the machine is included in the package – all you need is the patience to get the job done. If you’re having trouble during the assembly process, or feel like there’s a missing piece or two, you can contact Anycubic and ask for help; the customer support is incredible.
This Anycubic delta 3D printer works really well for a budget machine. It works with precision and produces impressive results that are way better than those created by other cheap 3D printers. The specified build size is misleading, though. It’s smaller than advertised, so make sure you get the settings right to avoid potential printing errors.
The advertised supported materials are also not entirely accurate. Out of the box, the Anycubic Kossel 3D Printer can only print PLA filaments. In order to print the advertised ABS, HIPS, and Wood filaments, you need to make the necessary modifications – like installing a heated print bed, for one. We’re not dumping on the printer by pointing out this issue; we’re just making sure you know what you’re getting.
Overall, the Anycubic Kossel 3D Printer is the best entry-level delta 3D printer that you can get for $300. Again, it’s a machine that’s ideal for those who are already well-versed in 3D printing mechanics. If you still want it even though you have zero 3D printing experience, make sure you have the patience and perseverance to deal with the complex assembly and calibration process.
| Tech Specs |
|---|
| Resolution: 100 microns |
| Volume: 7.1 x 11.8 in |
| Filament: 1.75 mm |
| Type: PLA |
| Weight: 12.8 lb |
| Connect: USB, SD card |
| The Pros |
|---|
| Outstanding instruction manual |
| Supports standalone printing |
| Includes starter filament |
| Great print quality |
| Lightweight |
| Excellent customer support |
| Neat packaging |
| The Cons |
|---|
| Build size smaller than advertised |
| Not ideal for beginners |
| Manual bed leveling can be a pain |
| No heated build plate |
6. Jgaurora A-3
Editor’s Rating: 4.5/5
Similar to the RepRap Guru DIY Prusa i3 V2, the Jgaurora A-3 is a DIY 3D printer that arrives disassembled and requires hours of manual labor to get it up and running. In fact, the two machines share a lot of similarities, which is hardly surprising considering both are based on the original Prusa i3. The most notable difference is that RepRap Guru is based in the US while Jgaurora is based in China.
For the assembly and calibration process, make sure you can spare at least 8 hours. The less experience you have with electronics and machinery, the more hours you’ll need. To guide you through the process, Jgaurora supplies you with a series of instructions in both written form and video form.
Everything you need to know about how to put the printer together can be found on the SD card. However, since the product is Chinese, the instructions can be hard to follow due to the level of English, which is understandable. All in all, the assembly and initial calibration process should take about 8-12 hours, depending on your experience with electronics and ability to follow instructions communicated in less-than-stellar English.
In regard to print quality and machine performance, the Jgaurora A-3 will surprise you. It’s accurate, works relatively quiet for an open-structured 3D printer, supports various filament types, and can run continuously for weeks with little to no issues at all. It’s definitely a reliable workhorse that you can count on for mass printing.
The built-in interface is user-friendly, making it easy for beginners (assuming they survive the daunting assembly process) to operate the machine. The package includes a starter filament and a number of test models saved in the SD card. This allows you to immediately start printing once you get it up and running.
The Jgaurora A-3 includes a large build volume, which means you’re not confined to small items. The print bed is heated, allowing for reliable processing of ABS and other high-temperature filaments. Overall, the Jgaurora A-3 is a recommended product for tinkerers and those who have the patience to go through a lengthy assembly process.
| Tech Specs |
|---|
| Resolution: 100 microns |
| Volume: 7.9 x 7.9 x 7.1 in |
| Filament: 1.75 mm |
| Type: ABS, PLA, Wood, TPU |
| Weight: 22 lb |
| Connect: USB, SD card |
| The Pros |
|---|
| Sturdy and stable construction |
| Low noise level |
| Supports standalone printing via SD |
| Top-notch customer service |
| Easy to use built-in interface |
| Large build volume |
| Supports various filaments |
| The Cons |
|---|
| Intimidating assembly and initial calibration process |
| Instruction manual and videos can be confusing |
| No auto-leveling technology |
Before you commit to a purchase, make sure that you understand what your chosen product brings to the table. It’s not fair to expect a budget 3D printer to have the same quality as high-end 3D printers that retail for $2,000. Hopefully, with our guide on the best 3D printers under $300, we were able to help you set your expectations to a realistic level.
Contents
- 6 Best 3D PRINTERS UNDER $300 Comparison Table
- Difference Between $300 3D Printers and $200 3D Printers
- Build Quality
- Build Size
- Heated Print Bed
- Print Quality
- Hello, Delta
- 1. Monoprice Maker Select V2
- 2. Monoprice Select Mini V2
- 3. XYZprinting da Vinci Jr. 1.0
- 4. RepRap Guru DIY Prusa i3 V2
- 5. Anycubic Kossel 3D Printer (Pulley)
- 6. Jgaurora A-3