5 Best DIY 3D Printers of 2019

Most people kick off their 3D printing hobby by picking up a pre-assembled 3D printer. But if you want a more hands-on experience, then a DIY 3D printer is the better and cheaper option for you.
Here, we talk about the best DIY 3D printers currently available on the market. We also tell you about the pros and cons of DIY 3D printers and the difference between DIY kits and 3D printers that you build literally from the scratch.
| Budget |
|---|
 |
| Jgaurora A-3 |
| 4.5/5.0 |
| USB, SD card |
| 22 lb |
| Sturdy and stable construction and relatively quiet while printing. |
| Check Amazon |
| Best Value |
|---|
 |
| Creality CR-10S |
| 4.4/5.0 |
| USB, SD card |
| 22.7 lb |
| Includes filament monitor and lots of mod options readily available. |
| Check Amazon |
| Top Pick |
|---|
 |
| Original Prusa i3 MK3 |
| 4.9/5.0 |
| USD, SD card |
| 14 lb |
| Fast printing speed and power outage resume feature. |
| Check Amazon |
Here’s a quick look at the products that you will encounter in this guide.
5 Best DIY 3D Printers Comparison Table
| Make and Model | Weight | Connectivity | Price |
|---|---|---|---|
| Original Prusa i3 MK3 | 14 lb | USB, SD card | Check Price |
| Jgaurora A-3 | 22 lb | USB, SD card | Check Price |
| Creality CR-10S | 22.7 lb | USB, SD card | Check Price |
| Flsun Delta 3D Printer | 15.4 lb | USB, SD card | Check Price |
| RepRap Guru Prusa i3 V2 | 12 lb | USB, SD card | Check Price |
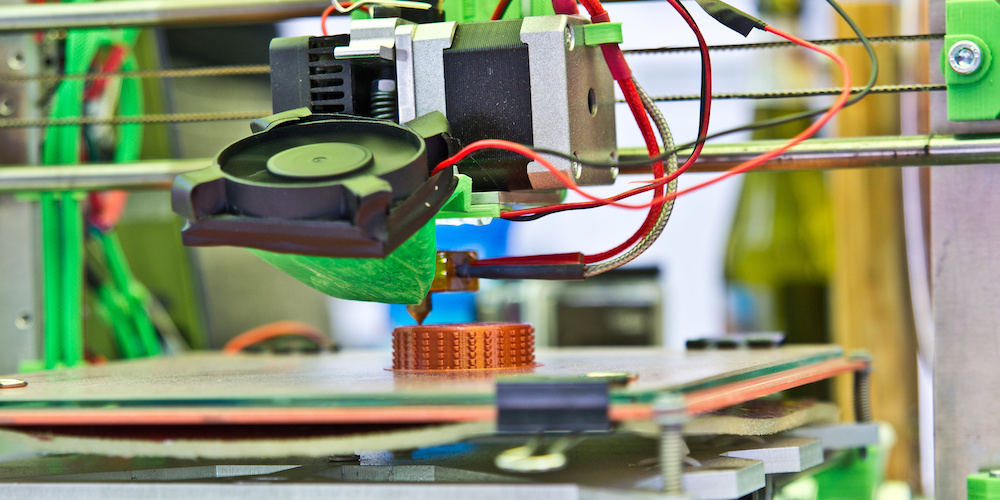
5 Things You Need to Know About DIY 3D Printers
Before we go down to our individual descriptions of each product, let’s talk about the five important things about DIY 3D printers that you need to be aware of.
1. What are DIY 3D Printers?
DIY 3D printers can refer to two things: 3D printers that you build from scratch using separate parts that you can buy from hardware stores and 3D printers that you build from a DIY kit prepared by a manufacturer.
The former is the more time-consuming option. But it’s also the more intimate approach in which you learn about all the little things that make a 3D printer work. DIY kits save you a lot of time because someone already did the parts-shopping for you – all you need to do is put all the parts together. For beginners, a DIY kit is the recommended option.
2. How long does assembly take?
DIY 3D printers can take hours, even days, to assemble, depending on your familiarity with electronics and ability to follow often below-average instruction manuals. Before you start the assembly process, make sure that you can spare at least 8 hours. Some products, like the Original Prusa i3 MK3, take less than that. Most DIY 3D printers also require additional hours for the initial setup and tinkering.
3. 3D Printer Kit Modifications
DIY 3D printers are open to a lot of modifications. This is the chief reason why tinkerers love them. You can upgrade DIY 3D printers with readily available parts on the market – and there are lots of them out there. In fact, most DIY 3D printers need a fair amount of modifications in order to produce the best results, which is actually a con if you look at it from a certain angle.
4. DIY 3D Printer Limitations
DIY 3D printers don’t have enclosures – they’re all open-framed. Meaning, they are more exposed to dust and are not the best at regulating temperature, which is necessary for ABS and other types of filaments. The good news is that you can easily build your own enclosure.
5. Learning with DIY 3D Printing
DIY 3D printers are better suited for learning about 3D printers than pre-built ones. Since they need to be put together from the ground up, you get an up-close look at the mechanisms. The more you know about the inner workings of 3D printers, the more prepared and capable you will be at troubleshooting problems. Let’s face it, you will run into lots of problems along the way, which is only natural for a technical hobby such as 3D printing.
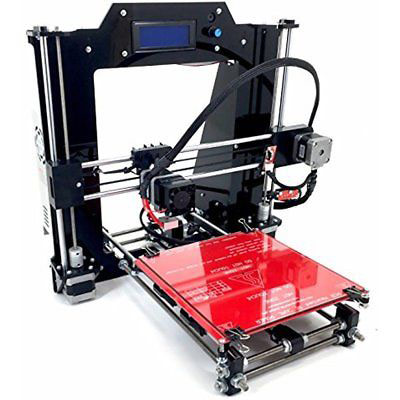
1. Original Prusa i3 MK3
Editor’s Rating: 4.9/5
Nobody does it better than the original. The recently released Original Prusa i3 MK3 is not only the best DIY 3D printer, it’s one of the best 3D printers available on the market, regardless of price range or category. It takes everything that’s good about the award-winning MK2S and raises it to another level.
The MK3 is easy to assemble, which is something that you don’t normally say about DIY 3D printers. Everything you need to put it together is included in the package. No need to go out and buy extra stuff from the hardware store. Uncommon to DIY 3D printers, the MK3 includes a well-detailed and comprehensive manual that makes the entire assembly process beginner-proof. It takes about 6 hours to assemble the MK3, with Prusa claiming that the current record is 4 hours, which is mind-boggling considering all the parts involved.
Among DIY 3D printers, the MK3 is probably the most plug-and-play. As soon as you finish assembling it, you can start printing right away with the default factory settings. In contrast, other DIY 3D printers need a fair amount of tinkering before you can start your first print. Some even take several days of trial and error before you can even produce a successful print.
The MK3 is so loaded with features that we don’t even know where to begin. But let’s start with the extremely useful power outage resume feature. The MK3 can detect a power loss and has the ability to resume from where it left off, which means you don’t have to start all over again if someone trips over the machine’s plug and accidentally shuts it down. All 3D printers should have this feature.
The MK3 alerts you if it’s about to run out of filament. The moment it detects the filament is fully consumed, it pauses operation and waits for you to pop in a new spool. It’s also capable of detecting a clogged filament and gives you the chance to clean the nozzle during mid-print (while it’s paused, of course). Like the power outage resume feature, the filament run-out and clogging detectors should be staples in all 3D printers.
Let’s move on to performance. The MK3 produces some of the most detailed and smoothest prints you will ever see from a DIY 3D printer. It’s outrageous that you can get the MK3 for less than $1,000. Most 3D printers in the $2,000 – 3,000 range can only dream about the MK3’s phenomenal print quality. It’s accurate and consistent regardless of the type of filament being used.
DIY 3D printers are known for being noisy. Not the MK3. It’s one of the quietest 3D printers around. It’s so quiet that you probably won’t even notice that it’s done printing unless you religiously check the progress every 10 minutes or so. It works fast, too, which means you get to print more stuff every week.
The MK3’s build size is the same as the MK2S’s. It’s generous enough to allow you to expand your options and take on larger and more ambitious projects. The build plate is removable, which allows for easy removal of finished 3D models, and has great adhesion right off the bat.
The MK3 is hands down the best DIY 3D printer that you can buy right now. Seriously, the only “negative” that we can think of is that the machine is not enclosed. Okay, the LCD interface feels rather outdated in today’s world of fancy touchscreens. But other than that, the MK3 is rock-solid. The expensive price isn’t really a significant drawback considering everything the MK3 brings to the party.

| Tech Specs |
|---|
| Resolution: 50 microns |
| Volume: 9.8 x 8.3 x 8.3 in |
| Filament: 1.75 mm |
| Type: ABS, PLA, HIPS, and others |
| Weight: 14 lb |
| Connect: USD, SD card |
| The Pros |
|---|
| Easy to assemble (compared to other DIY kits) |
| Extremely detailed and comprehensive manual |
| Fantastic print quality |
| Fast printing speed |
| Unbelievably quiet |
| Can detect filament run-out and nozzle clogging |
| Large build volume |
| Automatic bed leveling |
| Power outage resume feature |
| Excellent customer support |
| The Cons |
|---|
| Non-enclosed |
| Expensive |
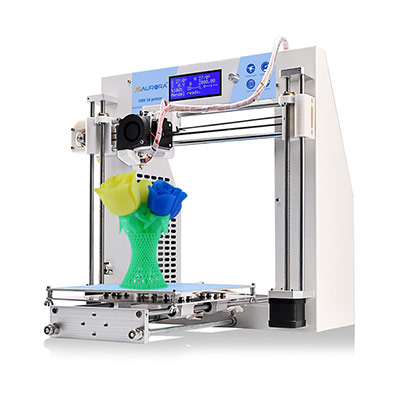
2. Jgaurora A-3
Editor’s Rating: 4.5/5
If we’re talking about the cheapest DIY 3D printer out on the market, the CoLiDo DIY would win our wallet’s approval in a heartbeat. However, we don’t want to simply point you to the most affordable product – you can find that yourself just by adjusting the filters on Amazon.
So for our best budget pick, we have the Jgaurora A-3, the most capable DIY 3D printer that you can get for less than $300. It’s a Prusa i3 clone held together by metal frames, making it more stable and sturdier than other similar products. Because of its clean, nearly all-white finish, it can be easily distinguished from most other Prusa i3 clones.
Everything you need to get started is on the SD card. The assembly instructions are in video format, although there’s no audio that explains what’s going on. Instead, you’re treated to subtitles in “Engrish,” which clearly show that the A-3 is from a Chinese manufacturer. But don’t worry, the instructions are coherent enough to allow you to piece together your machine without resorting to a lot of guesswork.
If you have prior experience with DIY 3D printers or consider yourself a techie, assembling the A-3 should take about 5-8 hours; otherwise, expect to spend 8-12 hours for the assembly. In either case, make sure you double-check everything after every step. It pays to be meticulous when assembling your own 3D printer.
In case something goes wrong during the assembly, or you think you may have gotten a defective machine, contact Jgaurora immediately. The manufacturer stands out among other Chinese companies for having one of the most helpful and competent customer services in the business – and we’re not exaggerating here. Expect nothing but first class customer service from Jgaurora.
Though lacking in flashy features, the A-3 delivers in areas that count. It’s a reliable workhorse that you can count on to print non-stop for days, requiring only minimal maintenance. The print quality is surprisingly good for a cheap 3D printer, and the build size is generous – one of the largest in the under-$300 price range. It’s also relatively quiet for an open-framed 3D printer.
The A-3 includes a heated build plate, which means you’re not limited to PLA, the most basic filament used in 3D printing. But in order to print other types of materials with consistently good results, you need to play around with the settings. In some cases, you may even need to mod your machine to get the best output. If you’re new to 3D printing, we recommend you stick to PLA until you have a full grasp of the ins and outs of 3D printing.
A recommended 3D printer for tinkerers, the A-3 is the best budget DIY 3D printer currently available on the market. It’s got good print quality, runs relatively quiet, prints different types of filaments, has a large build volume, and is backed by excellent customer service. Not many Prusa i3 clones can claim all of those, and the ones that do are sitting way above $300.
| Tech Specs |
|---|
| Resolution: 100 microns |
| Volume: 7.9 x 7.9 x 7.1 in |
| Filament: 1.75 mm |
| Type: ABS, PLA, TPU, and others |
| Weight: 22 lb |
| Connect: USD, SD card |
| The Pros |
|---|
| Good print quality |
| Excellent customer service |
| Sturdy and stable construction |
| Easy-to-use LCD interface |
| Large build volume |
| Includes heated build plate |
| Relatively quiet while printing |
| The Cons |
|---|
| Bed leveling can be tricky |
| No audio in video instructions |
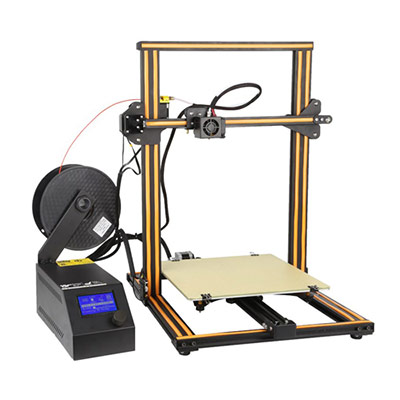
3. Creality CR-10S
Editor’s Rating: 4.4/5
Most DIY 3D printers offer a large build volume. But if you want one of the largest of them all, look no further than the Creality CR-10S. It’s a 3D printer with a massive build size, towering over all the other products listed here – and the fact that you can get it for less than $1,000 is almost too good to be true.
The CR-10S is different from lots of other DIY 3D printers in that it arrives already halfway assembled. Some people might even argue that it doesn’t really belong here. But since it still requires you to connect all the other parts, it’s still a DIY 3D printer, technically speaking.
In total, the initial setup should only take about one hour, and that includes the tricky bed leveling process and software installation. Even with the poorly written instruction manual (seriously, it sucks), assembling the CR-10S shouldn’t be much of problem. If you need help, just watch instructional videos on the internet, which are way more useful than the instructions provided by the manufacturer.
The CR-10S needs a fair amount of tinkering before it can start producing quality results. So if you went in expecting top-notch prints right from the get-go, you’re going to be disappointed. It’s crucial that you check out guides on how to optimize the CR-10S to boost your success rate during your first few prints.
Once fully optimized, the CR-10S takes on the form of a reliable 3D printer that you can count on for consistent and accurate results with minimal issues. It’s got a fantastic print quality and, as mentioned, a massive build volume that allows you to print more ambitious projects. It can be really loud while printing, though, but not because of the printing mechanisms – the real culprit is the noisy fan.
The CR-10S includes a filament monitor that immediately alerts you once the loaded filament has been fully consumed, allowing you to swap in a new one in a timely manner. It’s a really neat feature, especially if you’re printing a large 3D model that’s scheduled to take several days to finish.
Speaking of which, the massive build volume is the main reason why we went for the CR-10S for our best value pick. For less than $600, you get a large 3D printer that lets you bypass the size limitations of other 3D printers in the same price range. The CR-10S’s compatibility with various filament types is also a big plus, although if you plan to play around with ABS, we highly recommend that you build your own enclosure for better and more consistent temperature regulation.
If you want a large DIY 3D printer, the CR-10S is the best product you can get right now. But before you commit to it, make sure that you’re fully aware of what it brings to the table. It’s a 3D printer that needs a fair amount of adjustments and a bit of modification in order to truly shine.
| Tech Specs |
|---|
| Resolution: 100 microns |
| Volume: 11.8 x 11.8 x 15.8 in |
| Filament: 1.75 mm |
| Type: ABS, PLA, PETG, and others |
| Weight: 22.7 lb |
| Connect: USB, SD card |
| The Pros |
|---|
| Easy to assemble |
| Enormous maximum build volume |
| Sturdy construction |
| Includes filament monitor |
| Heated build plate |
| Lots of mod options readily available |
| The Cons |
|---|
| Useless instruction manual |
| Can be really loud |
| Needs a fair amount of modifications for best results |
4. Flsun Delta 3D Printer
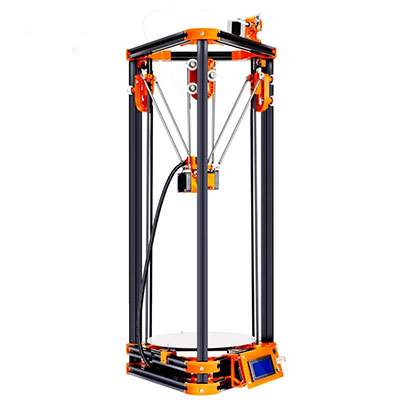
Editor’s Rating: 4.1/5
The Flsun Delta 3D Printer is one of those DIY 3D printers that need more time than usual to get up and running. It requires lots of patience, perseverance, and the ability to not throw something at the wall in case everything goes south during the assembly. Even if you have prior experience with DIY kits, the Flsun Delta 3D Printer will still pose a challenge.
It’s important for DIY 3D printers to have clear and well-detailed instructions to make the assembly a bit more bearable, especially for non-tinkerers. But it appears Flsun missed that memo because this delta 3D printer’s documentation is below-average at best. It’s not clear in a lot of areas, so you need to turn to more detailed videos on the internet to get everything right.
On the other hand, Flsun has outstanding after-sales and technical support. If you prefer a more hands-on help during the initial setup, feel free to contact the manufacturer and ask for one-on-one support through Skype. Flsun is one of those rare companies who genuinely care about their products and really go out of their way to make sure every customer is satisfied with his or her purchase.
In general, DIY 3D printers take about 6-10 hours to assemble and calibrate. Flsun’s delta 3D printer can take up to 12 hours of assembly time, and then a couple more for the initial tinkering. Maybe more than that if you’re not particularly good at electronics and machinery. Set aside an entire day for the assembly if you can.
It feels extremely rewarding once you get this delta 3D printer up and running. It’s a total workhorse that you can rely on for consistent results, provided you have the right settings. The print quality will definitely surprise you and might cause you to double-check the price tag. It’s also relatively fast for a delta 3D printer, although don’t expect it to be on the same level as high-end ones.
The heated build plate means you can print different types of filaments. But make sure you have the right settings for the filament you’re using; otherwise, you’ll just end up with crappy results. Oh, and speaking of filaments, this 3D printer doesn’t come with a spool holder, so you should print one as soon as you get your printer properly tuned up.
Like the Creality CR-10S, this DIY delta 3D printer from Flsun is on the noisy side. It’s got a noticeable sound that pretty much guarantees you won’t be anywhere near it while it’s working – unless you have a thing for the sound of machinery.
If you’re up for a challenge and want to learn all about delta 3D printers, Flsun’s delta 3D printer is one of the best DIY 3D printers out on the market. It has good print quality, supports offline printing, prints relatively fast, and is compatible with most commercial printing software. It’s incredibly affordable, too, which is a big deal for those on a strict budget.
| Tech Specs |
|---|
| Resolution: 100 microns |
| Volume: ø 7.1 x 11.8 in |
| Filament: 1.75 mm |
| Type: ABS, PLA, PVA, and others |
| Weight: 15.4 lb |
| Connect: USB, SD card |
| The Pros |
|---|
| Comes in a neat package |
| Good print quality |
| Heated build plate |
| Relatively fast printing speed |
| Generous build volume |
| Outstanding after-sales and technical support |
| User-friendly default software |
| The Cons |
|---|
| Poorly written instruction manual |
| No spool holder |
| Noisy while printing |
5. RepRap Guru Prusa i3 V2
Editor’s Rating: 4.3/5
The RepRap Guru Prusa i3 V2 is probably the Prusa i3 equivalent of the Flsun Delta 3D Printer. It’s a DIY 3D printer that needs a lot of work at the onset, producing the best results only after you’ve made significant adjustments to the base machine. If you want to learn the ins and outs of 3D printing but don’t want to spend over $500, this affordable 3D printer is for you.
Setting up the V2 can be a real pain, regardless of your experience with electronics. The kit arrives in a well-packed box, with all the parts, big and small, secured in an organized manner. Take your time admiring the neat packaging because what follows next will hardly make you feel optimistic.
The entire assembly takes about 8-10 hours, depending on your familiarity with electronics and your ability to follow confusing instructions. The V2’s instruction manual, while better-written than most manuals produced by Chinese manufacturers, is outdated. It’s actually for the machine’s older version, so some of the steps don’t really make sense.
Once you’re done with the assembly, you move on to calibrating your machine and tinkering with the print settings. Both of which can eat up a few more hours, most especially the latter. But you need to go through both steps to up your machine’s success rate and print quality. There are no shortcuts in this hobby. Even pre-assembled 3D printers need a fair amount of tinkering in the beginning.
Now, let’s talk about performance. The V2 is one of the best DIY 3D printers under $300. It’s easy to use and produces consistent results with good print quality and decent printing speed. It includes a heated build plate, allowing it to print ABS and other filaments apart from PLA. It’s open-framed, though, so you need to build your own enclosure for better results when printing with ABS.
Similar to most other Prusa i3 clones, the V2 features a large build size, which is roughly the same size as the Jgaurora A-3’s. The generous build size allows you to take on larger and more complex projects, although you need to be absolutely sure that you have the right settings for the job.
It’s worth pointing out that RepRap Guru’s quality control seems a bit poor. Some customers have reported missing and/or defective parts in the package, so make sure you have everything before you even start assembling your machine. But on the plus side, RepRap Guru has excellent customer support. If you have issues with your package or need help with the assembly and initial setup, just send the company a message and they will be more than happy to assist you.
Ideal for tinkerers, the V2 is a 3D printer that you shouldn’t really consider for your starter machine unless you want to learn the ins and outs of 3D printing in a more hands-on approach. It’s a 3D printer that requires lots of tinkering and adjustments and is not something you just plug in and hit “Print.”
| Tech Specs |
|---|
| Resolution: 100 microns |
| Volume: 8 x 8 x 7 in |
| Filament: 1.75 mm |
| Type: ABS, PLA, Nylon, and others |
| Weight: 12 lb |
| Connect: USB, SD card |
| The Pros |
|---|
| Low price |
| Easy to use |
| Large maximum build volume |
| Decent print speed |
| Good print quality |
| Includes heated build platform |
| Excellent customer service |
| The Cons |
|---|
| Instruction manual is outdated |
| Poor quality control |
| Needs heavy dose of modifications |
Contents
- 5 Best DIY 3D Printers Comparison Table
- 5 Things You Need to Know About DIY 3D Printers
- 1. What are DIY 3D Printers?
- 2. How long does assembly take?
- 3. 3D Printer Kit Modifications
- 4. DIY 3D Printer Limitations
- 5. Learning with DIY 3D Printing
- 1. Original Prusa i3 MK3
- 2. Jgaurora A-3
- 3. Creality CR-10S
- 4. Flsun Delta 3D Printer
- 5. RepRap Guru Prusa i3 V2
Amazing 3d printer. I am finding to buy the 3d printer that set my budget. Reading your article, I got it that set my budget with excellent features and specifications. I like to buy Flsun Delta 3D Printer because it has comfortable with any type of filaments. So, I want to buy one this.
Amazing 3d printer. I am finding to buy the 3d printer that set my budget. Reading your article, I got it that set my budget with excellent features and specifications. I like to buy Flsun Delta 3D Printer because it has comfortable with any type of filaments. So, I want to buy one this.