Monoprice Maker Select v2 Review

The Monoprice Maker Select v2 is a budget 3D printer that sits between a DIY kit and a fully assembled 3D printer. It’s a solid option for those who want an affordable product but prefer to stay away from DIY kits and their often daunting initial setup, which can take anywhere between four hours and an entire day.
If the design looks familiar to you, that’s because this 3D printer is a rebranded Wanhao Duplicator i3, coming in with identical technical specifications and a similar setup. But unlike the Duplicator i3, this 3D printer is easier to get your hands on. It’s readily available at online stores and is not limited to just a few distributors in the US. In most places, it’s available for around $300-350, but there are days the price dips below $300, making it even more attractive.
Since this 3D printer is a rebranded Duplicator i3, it has easy access to almost all the parts and upgrades currently available for that product – and there are lots of them. In addition, the two products have a shared community, so it’s easy to find solutions to problems you might encounter down the line.
On the official side, Monoprice isn’t the most reliable company when it comes to customer support. There are some customers who got treated well in the past, but for the most part, Monoprice has a bad habit of not attending to inquiries and requests in a timely manner, especially when it involves refunds. The Maker Select v2 has a one-year warranty. But as soon as that warranty passes, Monoprice no longer cares about your problems.
But don’t let Monoprice’s less-than-stellar reputation discourage you from buying this budget 3D printer. It’s an excellent 3D printer that offers long-term value as long as you’re willing to put in the effort and tinker with it.
The Design
The Maker Select v2 is based on the Original Prusa i3 MK2. It has an open structure, which makes it easy to supplement with upgrades – a necessary aspect if you want to get the most out of your 3D printer. Compared to the original Maker Select, this current model has a more stable build and comes with better parts.
Some Prusa-based 3D printers, like the Zonestar P802QR2, have dual extruders out of the box. That’s not the case for this product. Monoprice does not offer a dual extruder setup for the Maker Select v2. If you want a dual extruder setup, you will have to make the upgrade yourself. The default extruder works well with PLA filaments. But as soon as you move on to more advanced materials, its limitations become exposed.
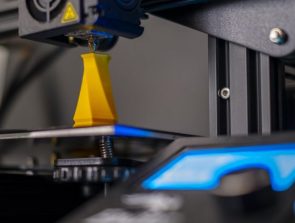
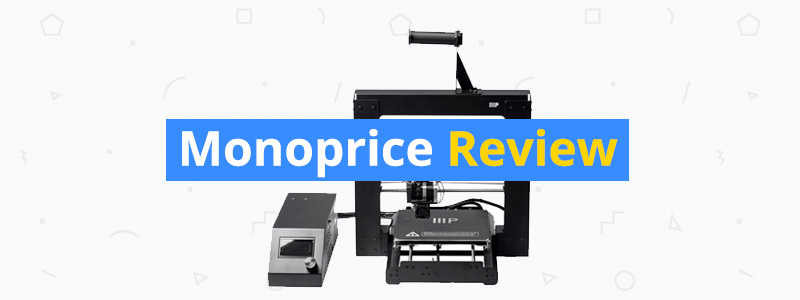
Housed in a sturdy aluminum frame, this 3D printer is accompanied by a separate control box, which translates to a larger footprint, so make sure you have enough space on the table for it. The bulky control box has a knob-operated LCD interface that displays several statistics, such as the print progress and the temperature of the heating components.
The USB and SD card slots are also located on the control box, along with the 110V/220V switch. The cables are well-managed instead of being all over the place as seen on other Prusa-based 3D printers, keeping them from making contact with the moving parts while the machine is printing, which can lead to malfunctions.
In appearance, the Maker Select v2 and the Duplicator i3 are identical. But there’s one difference that’s hard to miss: the location of the spool holder. In the case of the Maker Select v2, the spool holder is mounted at the top of the frame instead of on the control box. This frame-mounted spool holder setup makes the Maker Select v2 more in line with the Original Prusa i3 MK2, which has the same setup.
This 3D printer comes with a heated print bed, meaning you can print with ABS, Nylon, and other high-temperature materials – but not without upgrades in several areas, and that includes the extruder. Monoprice lists a maximum temperature of 260 degrees Celsius for the extruder and 75 degrees Celsius for the print bed.
The overall design of the Maker Select v2 is solid but not exactly unique. Underneath that aluminum frame is another Prusa clone. Still, it’s better than most of the competition on the market, not counting the Duplicator i3 and the other rebrands, and is considered one of the best 3D printers under $400.
The Features
When it comes to features, the Maker Select v2 is bare. If you expect to be treated to a handful of convenient features, you’re going to be disappointed. It doesn’t have a filament sensor, or a Wi-Fi option, or an automatic bed leveling system. Like with the dual extruder setup mentioned above, you will have to add the upgrades on your own.
The Maker Select v2 has a good build volume, which means you’re not confined to small items. Unless you decide to move on to more ambitious projects, its maximum build volume should be good enough for the long haul. It’s possible to expand the build volume, though, but that would require a lot of work. For one, the Z-axis frame needs to be replaced or extended.
Like many other Prusa clones, this 3D printer has an open filament system, accepting third-party filaments as long as the filament diameter is 1.75 millimeters, the most common size. Monoprice also sells filaments, but unlike Dremel, the company doesn’t scare new users by saying its 3D printers are “optimized” for its first-party filaments. And unlike with FlashForge 3D printers, the spool holder that this 3D printer comes with can hold most filaments from other brands.
The Maker Select v2 is compatible with different slicers. Monoprice recommends Cura, one of the most popular slicers. Repetier also works well. But for ease of use and the best results overall, we recommend Simplify3D. It has a user-friendly setup and comes with lots of options for intermediate and advanced users. It costs another $150, of course, but it’s a nice investment that will pay dividends in the long run.
As mentioned above, this 3D printer has no Wi-Fi option. There’s the USB connection for tethered printing and there’s the SD card compatibility for standalone offline printing. Both are reliable, with the latter obviously being the more convenient option. The Maker Select v2 can be outfitted with a Wi-Fi upgrade, which allows you to monitor your prints from afar. But it’s not an essential upgrade right off the bat.
The Setup
The Maker Select v2 is neither a DIY kit nor a fully assembled 3D printer. It comes in a semi-assembled package, with the majority of the parts already secured in place. Even with the lackluster instruction manual, putting it together is a straightforward process.
Before you dive into the assembly process, the first thing you should do is check all the parts. Check every corner for any loose screws or bent areas. Monoprice is notorious for its quality control, or lack of it. Customers have reported units with broken or defective parts out of the box.
Moving on, the initial setup has three easy steps. First, you need to attach the Z-axis frame and the print bed frame together, securing the setup with the screws included in the package. Second, you need to connect the cables to their respective places. Everything is labeled accordingly, so unless you’re not paying attention to the labels, it’s impossible to mess up with the cable connections. And third, you need to install the spool holder at the top of the frame.
That’s it. There’s no need to solder anything. The entire assembly should only take an hour or two. Everything you need to assemble this 3D printer is in the package. Some people might prefer to build a 3D printer from scratch in order to learn about the inner mechanics of the machine. But not everyone has the time or patience to deal with DIY kits, which, as mentioned, can take an entire day just for the assembly, not including the calibration.
But while the assembly process of this 3D printer is relatively simple, the entire initial setup is not all roses. Take the bed leveling process, for example. It can be a frustrating experience for beginners. Even veterans might find it a pain in the butt. The Maker Select v2 has a manual bed leveling process. It doesn’t have a bed leveling assist included in the interface – similar to the one seen on the Sindoh 3DWOX DP200 – to make the process easier. The good news is that there are videos on the internet that show you how to get it done.
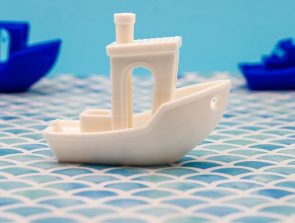
The Maker Select v2 ships with a starter filament and some test models on the included SD card. So once you’re done with the assembly and initial tinkering – both on the hardware side and the software side – you can start printing right away.
The Performance
If assembled and calibrated correctly, the Maker Select v2 can produce decent prints with the default settings. Lots of customers have been able to successfully print the included test models on the SD card without doing any major tweaks.
But make no mistake, this 3D printer needs upgrades out of the box, and none is more important than the MOSFET mod. The MOSFET mod is essential because simply put, it makes your 3D printer safe. Without it, you’re likely going to end up with a fire-related mishap down the road. The Z-brace mod is another upgrade that most users recommend. It makes the frame more stable, leading to better prints.
If you only plan to print with PLA during the first few months, the default extruder and the stock print bed should be enough. Though not exactly remarkable, both are well-constructed and can get the job done. But once you’re ready to step up your game and move on to high-temperature materials, you’re going to need an all-metal hotend and a glass bed, along with an enclosure for better temperature regulation.
The Maker Select v2 can print most of the upgrades it needs. There are lots of mods you can print from Thingiverse, ranging from thumbscrews for the print bed to fan shrouds to cable protectors. It’s best to check out the user groups to see which mods are the most recommended by the community.
Once treated to a proper tune-up and armed with upgrades, the Maker Select v2 can produce 3D models with impressive accuracy and smoothness. It’s not on par with the Ultimaker 3 or the LulzBot TAZ 6, but it’s definitely better than other products in the same price range. It doesn’t need a lot of maintenance when it’s dialed-in, although the print bed does need to be re-leveled after four or five prints.
The Maker Select v2 is a tinkerer’s machine. If you want a plug-and-play 3D printer that can consistently produce quality prints out of the box, this product isn’t for you. There are better options out on the market if you want that kind of setup.
The Verdict
| Tech Specs |
|---|
| Resolution: 100 microns |
| Volume: 7.9 x 7.9 x 7.1 in |
| Filament: 1.75 mm |
| Types: ABS, PLA, PETG, TPU, Nylon, and others |
| Weight: 20 lb |
| Connect: USB, SD card |
| The Pros |
|---|
| Large community |
| Semi-assembled |
| Good build size |
| Sturdy construction |
| Lots of available parts and upgrades |
| Good print quality |
| Compatible with different slicers |
| Open filament system |
| 1-year warranty |
| The Cons |
|---|
| No enclosure |
| Poor quality control and customer service |
| Needs mods out of the box |
| Tricky manual bed leveling process |
Not counting the Duplicator i3 and other clones, there aren’t many products under $400 that can offer the same long-term value as the Maker Select v2. It’s a recommended 3D printer for those who are prepared to invest in upgrades and spend a lot of time on tinkering. It can produce a few successfully prints in its default setup, but in order for it to shine and be a reliable workhorse, lots of adjustments and tweaks need to be made. If that sounds like your cup of tea, then this 3D printer is for you.
Rating: 4.4/5