
Best RepRap 3D Printer Kits of 2019

In layman’s terms, a RepRap 3D printer is a 3D printer that can print the necessary parts to build another 3D printer – “RepRap” is short for replicating rapid prototyper.
The market is littered with dozens of RepRap 3D printers, so shopping for one isn’t the most exciting task for everyone. Honestly, if you want the best of them all, just buy the Original Prusa i3 MK3, the latest in Josef Prusa’s roster of open source 3D printers. But not everyone is willing to cough up $700 for a DIY kit.
Here, we introduce you to the more affordable alternatives to the MK3, with the cheapest one going for less than $300. But since we already have a separate guide for DIY 3D printer kits, we followed a different format to come up with the products listed here.
For this guide, we set the budget ceiling to $500, which immediately erases the Creality CR-10S and other popular DIY 3D printers. In addition, we tried our best to focus on products sold by US-based companies. In the end, only three such products ended up in our final list because we felt they’re the only ones worth including.
| Budget |
|---|
 |
| Folger Tech 2020 Prusa i3 |
| 4.4/5.0 |
| 15.4 lb |
| USB, SD card |
| Rigid aluminum frame, highly upgradeable, and good prints. |
| Check Ebay |
| Best Value |
|---|
 |
| Flsun Prusa i3 Plus |
| 4.4/5.0 |
| 22 lb |
| USB, SD card |
| Sturdy aluminum frame and fairly fast print speed. |
| Check Amazon |
| Top Pick |
|---|
 |
| Maker Farm Pegasus |
| 4.7/5.0 |
| 21 lb |
| USB, SD card |
| Robust construction, quality parts, and fast print speed. |
| Check Amazon |
We have chosen 5 RepRap 3D printers that we think are worthy of consideration. They are listed in the table below:
Best RepRap 3D Printer Kits Comparison Table
| Make and Model | Weight | Connectivity | Price |
|---|---|---|---|
| Maker Farm Pegasus | 21 lb | USB, SD card | Check Price |
| Folger Tech 2020 Prusa i3 | 15.4 lb | USB, SD card | Check Price |
| Flsun Prusa i3 Plus | 22 lb | USB, SD card | Check Price |
| Jgaurora A-3 | 22 lb | USB, SD card | Check Price |
| RepRap Guru DIY Prusa i3 V2 | 12 lb | USB, SD card | Check Price |
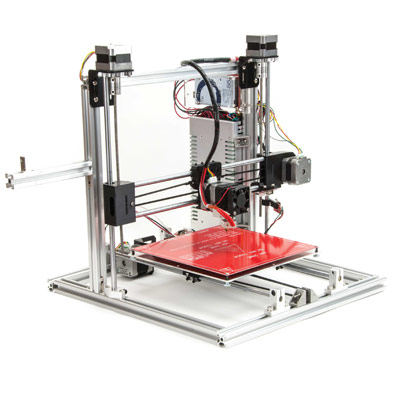
1. Maker Farm Pegasus
Editor’s Rating: 4.7/5
The Maker Farm Pegasus is one of those low-key 3D printers that rarely pops up in top 10 lists of the best DIY 3D printers. It’s a shame, really, considering it’s one of the best 3D printers you can get for less than $500.
The Pegasus is available in three sizes: 8-inch, 10-inch, and 12-inch. The former two are the versions available under $500. If you can afford the 10-inch version, we highly recommend that you go for it because you definitely will want a larger volume once you get a taste of what the Pegasus can do. Get the optional LCD interface, too, which gives you more control over the Pegasus and the ability to print from an SD card.
Before we go down to the Pegasus’s technical details, let’s talk about Maker Farm’s customer service. Colin Farrer, the man behind the US-based manufacturer, is delightfully hands-on with the customer service. He stands by his products and is always willing to help out any customer in need of technical help. If you need technical help, just e-mail him directly.
Unlike other cheap DIY kits, the Pegasus is easy to put together. The instruction manual could use a bit more polishing, but overall it’s easy to follow and doesn’t require a hefty amount of guesswork on your part. The assembly should take you about 6 hours, maybe less if you have lots of experience with 3D printers. In fact, Maker Farm advertises that you can build the Pegasus in just 3 hours at minimum, which is pretty darn fast for a DIY 3D printer.
The Pegasus is made of quality parts and is held together by a sturdy frame that is more than capable of handling the demands of 3D printing. For the best results both in the beginning and in the long run, we recommend that you go for the Titan extruder. If you’re adamant about sticking to a $500 budget, you can go for the 8-inch Pegasus with the Titan extruder and the graphical LCD.
The Pegasus is a reliable workhorse that can produce some of the finest prints you will ever see from a DIY 3D printer. It’s incredibly accurate and has excellent print speed even at higher resolutions. The well-built print bed heats up really fast and the printer is on the quiet side while printing – both big pluses, especially for an open-framed 3D printer.
Similar to other DIY 3D printers, the Pegasus is a tinkerer’s machine. It needs a bit of modification before it can truly shine – but nothing too drastic like replacing more than half of the parts, which is the case for other low-cost 3D printers. It’s easy to modify the Pegasus, so feel free to upgrade it according to your printing needs – you may want to build an enclosure before anything else, especially if you plan to print with ABS.
Since Maker Farm isn’t all that popular compared to Monoprice, FlashForge, and Creality, finding mod support for the Pegasus online can be difficult. So you may need to dig deep in forums to find recommendations and tips on how to optimize it.
The Pegasus is a prime example that there are indeed hidden gems out there that deserve more attention than all those cheaply built Chinese knockoffs. It’s a rock-solid 3D printer that can produce amazing results with the right print settings and upgrades, has a generous build volume (even the 8-inch version), and is backed by a top-class customer support.

| Tech Specs |
|---|
| Resolution: 50 microns |
| Volume: 8 x 8 x 7 in |
| Filament: 1.75 mm |
| Type: ABS, PLA, Nylon, and others |
| Weight: 21 lb |
| Connect: USB, SD card |
| The Pros |
|---|
| Exceptional one-on-one technical support |
| Easy to assemble |
| Robust construction and quality parts |
| Large build volume |
| Fantastic print quality |
| Fast print speed |
| Relatively quiet |
| Print bed heats up quickly |
| Easy to upgrade |
| The Cons |
|---|
| Build manual needs polishing |
| No enclosure |
| Relatively small community |
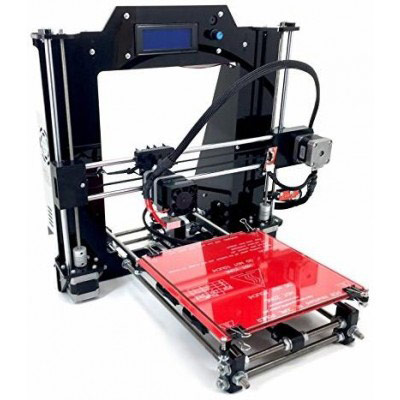
2. Folger Tech 2020 Prusa i3
Editor’s Rating: 4.4/5
Basically, the Folger Tech 2020 Prusa i3 is the cheaper version of the Maker Farm Pegasus. It’s a DIY 3D printer made by a US-based company committed to creating affordable 3D printers for everyone. If you want to keep your costs as low as possible, the Folger Tech 2020 Prusa i3 is one of the best budget options you can get right now.
In 3D printing, the more you go down the price range, the more issues you will encounter during the assembly and initial setup. But the Folger Tech 2020 Prusa i3 sort of sidesteps that trend, though not completely. Like the Pegasus, Folger Tech’s Prusa i3 clone is relatively easy to put together, requiring only around 4-6 hours to build, which places it nearly on par with the real Prusa i3 in that regard.
However, you need to rely on online resources almost exclusively during the assembly. The instruction manual is poorly constructed and needs a lot of improvement. Folger Tech’s customer support seems unreliable as well, so you’re pretty much on your own. It’s not really all that bad considering you can easily find documentation and assembly tips on the internet.
The Folger Tech 2020 Prusa i3 is held together by aluminum frames. It’s impeccably rigid and can handle vibrations like a boss. If you’re upgrading from a cheap acrylic-framed 3D printer, you’ll be blown away by this printer’s robust construction. The cables are all over the place, though, so make it a point to remedy that as soon as possible.
Concerning performance, the Folger Tech 2020 Prusa i3 is definitely heads and shoulders above other cheap 3D printers under $300. It has good print quality and decent print speed. But to get the best results, you need to invest in making modifications to your machine. Start by upgrading the extruder because the machine’s default extruder isn’t really built for heavy work. Similar to the Pegasus, the Folger Tech 2020 Prusa i3 is very easy to upgrade.
Connectivity is limited to USB right out of the box, so we suggest that you pick up the optional LCD interface, which allows for standalone printing via SD card, the more convenient way of data transfer. If you don’t mind having your computer open all the time, then stick to the USB connection. But keep in mind that you will eventually need the onboard interface down the line for direct control, so it’s a sound investment.
Several users have pointed out that Folger Tech has bad quality control, so don’t be surprised if the package you receive has missing or defective parts. It can be a deal-breaker for lots of folks. In fairness, most DIY kits at the same price point have the same issue as well, so it’s not really a problem unique to Folger Tech.
Considering the print quality, relatively easy assembly, build size, and sturdy frame, the Folger Tech 2020 Prusa i3 is hard to beat in the under-$300 price range. It’s an ideal 3D printer for tinkerers and those who want to learn the ins and outs of 3D printers in a more intimate way.
| Tech Specs |
|---|
| Resolution: 50 microns |
| Volume: 8 x 8 x 6 in |
| Filament: 1.75 mm |
| Type: ABS, PLA, PVA, and others |
| Weight: 15.4 lb |
| Connect: USB, SD card |
| The Pros |
|---|
| Low price |
| Easy to put together |
| Rigid aluminum frame |
| Decent build volume |
| Good print quality |
| Highly upgradeable |
| Good quality parts |
| Lots of information from other users available online |
| The Cons |
|---|
| Instruction manual desperately needs improvement |
| No enclosure |
| Messy wirings |
| Poor quality control |
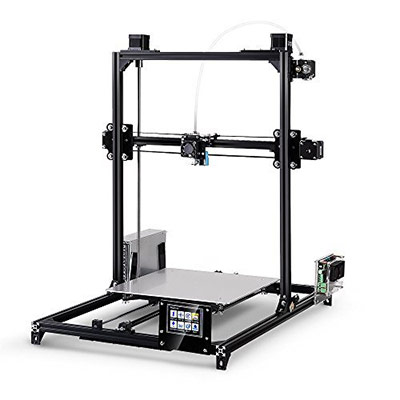
3. Flsun Prusa i3 Plus
Editor’s Rating: 4.4/5
With DIY 3D printers made in China, it’s kind of a hit-and-miss affair. There are products that are easy to figure out from start to finish and there are products that demand a lot of patience and effort. The Flsun Prusa i3 Plus, unfortunately, belongs to the latter group. But that doesn’t mean it’s a complete garbage of a 3D printer. If it was, it wouldn’t be here, let alone in our top three picks.
The Flsun Prusa i3 Plus is the larger version of Flsun’s regular Prusa i3 clone. It’s available in different configurations; the product listed here features a touchscreen interface, an auto-leveling system, and a dual nozzle setup. But it appears Flsun somehow forgot it’s offering the product in different setups because the included instruction manual in this package is for the regular-sized, single-extruder version.
Since the instruction manual is a mismatch, putting together this DIY 3D printer can be a real pain and can take over 10 hours. Depending on your daily schedule and available spare time, that can mean anywhere from a couple of days to an entire week. In order to minimize hiccups during the assembly, it’s essential that you watch videos and read guides on the internet.
Once fully assembled, the Flsun Prusa i3 Plus is easy to like, at least compared to other China-made 3D printers in the same price range. It’s an open-framed 3D printer with a massive build volume, a heated build platform, and a user-friendly touchscreen interface at the base. The latter is particularly noteworthy considering most DIY 3D printers come with a knob-operated LCD interface.
The auto-leveling system is a mixed bag. It works when the printer is in a single extruder setup, but not so much when it’s in a dual extruder setup. The printer can be paused at any time with a simple press on the touchscreen interface. It doesn’t have a filament run-out sensor, though, so make sure the loaded filament is always sufficient enough before every print.
For a $300 DIY 3D printer, the Flsun Prusa i3 Plus produces surprisingly detailed and smooth prints, one of the two main reasons why we tapped it for our best value pick. It’s impressive what it can do when running with the right print settings and a few modifications. The other main reason would be, as you might have guessed already, is the massive build volume. It’s not often you run into a large 3D printer available for $300, so the Flsun Prusa i3 Plus literally stands out.
The dual extruder setup means you can print with two colors. In fact, Flsun wants you to try it out as soon as possible, shipping two rolls of filaments (random colors) with the printer. However, since the instruction manual isn’t really meant for configuring the dual extruder setup, you need to dig around for information first and tinker with both the hardware and software before you can double your fun.
The Flsun Prusa i3 Plus sure sounds like a 3D printer that needs a lot of work before it can produce consistent and quality results. But in case you haven’t heard, almost all DIY 3D printers are like that. If you’re willing to put in the work, you can get a lot of mileage out of the Flsun Prusa i3 Plus.
| Tech Specs |
|---|
| Resolution: 50 microns |
| Volume: 11.8 x 11.8 x 16.5 in |
| Filament: 1.75 mm |
| Type: ABS, PLA, HIPS, and others |
| Weight: 22 lb |
| Connect: USB, SD card |
| The Pros |
|---|
| Massive build volume |
| Dual extruder |
| Responsive touchscreen interface |
| Automatic bed leveling feature |
| Sturdy aluminum frame |
| Good print quality |
| Fairly fast print speed |
| Helpful customer support |
| The Cons |
|---|
| Confusing instruction manual |
| No enclosure |
| Lacking instructions for the dual extruder setup |
4. Jgaurora A-3
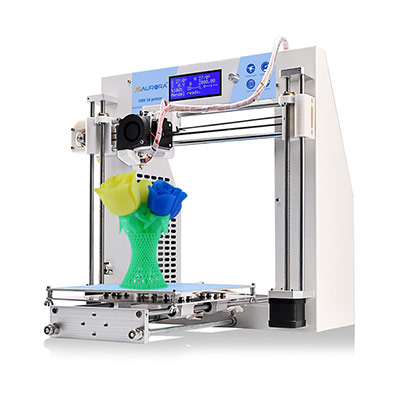
Editor’s Rating: 4.5/5
If the Folger Tech 2020 Prusa i3 is not your cup of tea, the Jgaurora A-3 is a great second option. It’s a Prusa i3 clone parked in the same price range (under $300) – but manufactured by a Chinese company.
It takes 8-12 hours to assemble the A-3, though tinkerers and those with extensive experience with electronics and machinery can probably do it in 5-8 hours. Unlike with the Flsun Prusa i3 Plus, the assembly is pretty straightforward and won’t cause a lot of headaches. Even though the instructions are in video format with only subtitles to guide you, the entire initial setup is manageable even for rookies.
The A-3 is the kind of desktop 3D printer that would look good on any work desk. It’s supported by a sturdy metal frame and has a clean, professional look, which immediately makes it more easily distinguishable than other Prusa i3 clones out on the market. The wirings are not all over the place and the LCD interface is located at the top so you can quickly check the numbers on the display.
But the A-3 is not just about looking good. It’s also the kind of desktop 3D printer that could easily impress anyone who cares about performance and quality results. When rolling with the proper print settings, the A-3 can produce detailed prints comparable to those produced by more expensive 3D printers. It’s not on the same level as the real Prusa i3, though, so don’t get your hopes up too high.
Featuring a heated build plate, the A-3 can print with various types of filaments. However, some materials require you to make a fair amount of modification to get the best results. For example, if you want to print with ABS, you definitely need to build your own enclosure for better temperature consistency. Since the A-3 was based on a popular open source 3D printer, all the information you need to build additional parts is available on the internet.
The A-3’s low noise level is certainly a big plus. It’s quieter than other open-framed 3D printers in the same price range, but not exactly in the same league as the Original Prusa i3 MK3, which is one of the quietest open-framed 3D printers available today. In addition to the low noise level, the A-3’s large volume is another reason why you should consider it.
Uncommon for a 3D printer made in China, the A-3 is backed by a helpful and knowledgeable customer support staff. Lots of satisfied customers have pointed that out, with some saying Jgaurora is one of the best at providing customer support in a timely and professional manner. So if you ever get stuck while assembling your machine, you know who to call (no, not the Ghostbusters).
Though limited in eye-catching features, the A-3 stands out by simply being a quality 3D printer that produces good results. It’s a reliable workhorse that would fit well in a classroom, and the economical price certainly makes buying multiples of it easy on the wallet.
| Tech Specs |
|---|
| Resolution: 100 microns |
| Volume: 7.9 x 7.9 x 7.1 in |
| Filament: 1.75 mm |
| Type: ABS, PLA, TPU, and others |
| Weight: 22 lb |
| Connect: USB, SD card |
| The Pros |
|---|
| Sturdy aluminum frame |
| Large build volume |
| Excellent customer support |
| Straightforward assembly process |
| Relatively quiet |
| Consistent and accurate print quality |
| Heated print bed |
| The Cons |
|---|
| Bed leveling can be a hassle |
| Build instructions could be improved |
| Limited in features |
| Print bed heats up slowly |
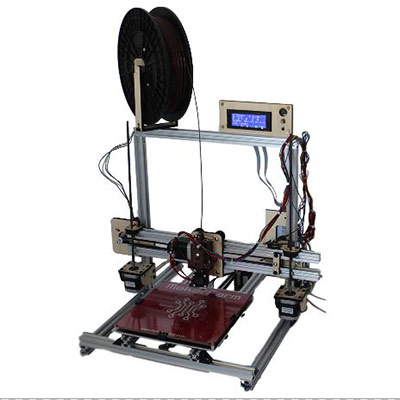
5. RepRap Guru DIY Prusa i3 V2
Editor’s Rating: 4.3/5
The RepRap Guru DIY Prusa i3 V2 is another product that you can buy for less than $300. It’s a tinkerer’s machine, requiring a fair amount of modifications before it can produce consistently good results. The manufacturer is based in the US (South Carolina) so you help a local business by buying it.
The V2 is not a recommended starter 3D printer for beginners, most especially those not too familiar with electronics. It takes a while to put it together, mainly because the included instruction manual is for the product’s older version, the V1. Some steps appear confusing while others simply don’t make sense. For a higher success rate, we suggest that you skip the instruction manual and just watch videos or read guides on the internet.
Expect to spend anywhere between 6-10 hours for the entire assembly and initial setup, which includes the software installation and bed leveling. Beginners may take more than that, though, especially the meticulous ones. On the bright side, you get to learn about what makes 3D printers tick while assembling the V2.
Just like all the other products listed here, the V2 is open-framed, so you have to deal with the usual issues associated with open-framed 3D printers – like constant exposure to dust, subpar temperature regulation, and high noise level. The frame is acrylic, making it less stable than 3D printers housed in aluminum frames. It can still hold down the fort, so to speak, in a reliable manner. But to make it futureproof, you need to make some upgrades.
The V2’s print quality is good for a 3D printer that costs less than $300. With the right print settings and modifications, the V2 can produce excellent results. In fact, you really need to make some changes to the V2’s software and hardware to get the most out of it. As mentioned, it’s a tinkerer’s machine, so you need to be ready to get your hands dirty and spend a few more bucks on necessary upgrades.
The heated build plate means you can print with different materials. But you need to be really careful when printing at high temperatures because the V2’s acrylic frame is not exactly built for that kind of task. The generous build volume allows you to experiment with larger, more complex models.
If you want to print with ABS, you need to build your own enclosure because the V2 doesn’t have one, as depicted in promotional materials. For PLA, simply leave the printer as it is. If you want to play around with exotic or special filaments, make sure you’re fully aware of the required print settings for whatever material you plan to use.
Though not on the same level as Maker Farm’s, RepRap Guru’s customer support is on point. The manufacturer provides great technical support and is quick to attend to users who have received defective parts in the package. Since the V2’s instruction manual isn’t the most helpful, it’s a relief that RepRap Guru has a reliable technical support.
As noted by several users, RepRap Guru has a questionable way of getting reviews for the V2. The company sends out a free filament in exchange for reviews. But it’s worth pointing out that the actual review and rating still depends on the customer – RepRap Guru is not specifically asking for a 5-star review. Still, the practice is unethical and can make some of the reviews unreliable.
In all, the V2 is a good 3D printer that you can get for less than $300. But to turn it into a great 3D printer, you need to invest time and money in upgrades. It’s not really any different from other Prusa i3 clones. It’s just that the V2 requires more work than usual. If you love tinkering with 3D printers, the V2 is for you.
| Tech Specs |
|---|
| Resolution: 100 microns |
| Volume: 8 x 8 x 7 in |
| Filament: 1.75 mm |
| Type: ABS, PLA, PVA, and others |
| Weight: 12 lb |
| Connect: USB, SD card |
| The Pros |
|---|
| Low price |
| Tightly secured and neat packaging |
| Easy to use |
| Large build volume |
| Heated build plate |
| Good print quality |
| Excellent customer support |
| The Cons |
|---|
| Instruction manual is for the older model |
| Acrylic frame |
| No power switch |
| No enclosure |
Contents


STAY AWAY! An ex-employee of theirs will scam you, and there’s non-existent customer support!
I purchased this kit and assembled it, only to find it had a dead 5v regulator on the Arduino board(fairly common).
When contacting their customer support (it took MANY emails and phone calls before I even got one response), I was called back by what I now know is an ex-employee of theirs who is scamming people by “selling” bogus non-existent “upgrade” parts. I’ve now lost $148 due to this scam. After many unanswered emails, Reprapguru finally got back to me and admitted that this employee was fired in March of 2019 for doing his own customer support after hours. Apparently Reprapguru didn’t even change their voicemail password because this employee “Dax” is STILL using their customer support voicemail to scam people into paying him via a PayPal. He’s literally hijacking Reprapguru’s customer support line to harvest suckers for his scam, all in Reprapguru’s name. After payment, you find that his PayPal account leads to somewhere in the Philippines. When contacting Reprapguru again to sort this out, they have apparently ghosted me. 4 emails over 3 days now and I have yet to hear from them. So I’m beginning to think it’s not an “ex-employee” at all, and that the whole company is scamming people.
I’m NOT the first person this has happened to! See for yourself. Go to reprap dot org forums > Prusa i3 and variants > RepRap Guru i3 Printer Kit (Official Thread) and look at page 6 at the very end a post by “boberts314”. This scammer calls himself “Trey McCormick”. Reprapguru refuses to do anything about it. No wonder they’re bribing people with filament for 5 star reviews – they’re putting a tourniquet to try to prop-up their otherwise lousy ratings!
So, to sum up, I’m out $148, with a $280 printer that’s defective, and a company that refuses to do anything about my situation, and the ex-employee who’s scamming people in Reprapguru’s name. A very painful $428 lesson.
STAY AWAY! There are too many other reputable vendors to choose from.
I’ve returned this printer, and am posting this message on every community forum and online vendor I can find, in the hope of helping some other poor tinkerer from the same fate. Good luck makers!