Filament Not Sticking to Bed? Best Solutions for 3D Print Bed Adhesion

Lots of things can go wrong with your 3D print. The plastic could warp as it cools, your nozzle could get clogged in the middle of printing, or your print can collapse spectacularly under its own weight. Experienced 3D printing professionals know that these problems are incredibly common – merely a part of the learning process. However, this does not mean that running into problems in the middle of 3D printing isn’t frustrating.
A successful 3D print starts at the bottom. Specifically, you’ll need to make sure that your base layer sticks to the build platform. What are the best ways to solve bed adhesion problems? What could be causing your filament to not stick to the bed?
Why is bed adhesion important?

A base layer that does not stick completely to the bed or comes off easily will almost inevitably result in a failed print. On the flip side, you don’t want your print to stick too well to the print bed that you can’t remove it without damaging the print in some way. Thus, the best bed adhesion solutions need to hit that sweet spot of providing stability to the print while still not being too permanent.
We’ve heard all sorts of stories about prints coming off of beds in the middle of printing. Since most people don’t exactly pay attention to their prints the whole time, these incidents typically result in “spaghetti monsters” – ruined prints that waste a lot of filament and have to be started over.
Even if a print does not fail to the degree of creating a spaghetti monster, poor bed adhesion is one of the biggest causes of warping. This is an especially big problem when you’re working with filaments that print at a high temperature, such as ABS or Nylon. Warping happens when the stress buildup caused by the cooling of the filament becomes too much for the physical structure of the print, mostly manifesting in the corner bases of the print folding upwards and away from the print bed. A warped print, although still usable, looks terrible and will need to be re-done if you’re looking for professional-grade quality.
What causes poor bed adhesion?
When it comes to bed adhesion, both quality and quantity matter. You can try and increase the surface area of the print that is in direct contact with the bed, keeping in mind that this will also make it harder to remove the print once you’re finished. You can also deliberately make your print bed stickier by the application of adhesion enhancers, which is a time-honored practice in the field of 3D printing.
1. Too little contact with the bed
The easiest solution to bed adhesion problems is to orient your design such that it has the most contact with the bed upon printing. Not only does this help in improving bed adhesion, but it also reduces the number of support structures you will need to prevent your print from collapsing. This lessens the work you’ll be needing to remove the supports (something we hate doing) but also uses up less filament.
2. Uncalibrated nozzle distance
The gap between the nozzle and the bed plays a big role in bed adhesion. Setting them too far apart can result in the filament cooling down too much before it hits the bed, which will result in a loose base layer. However, setting them too close to each other can also result in the nozzle “dragging” the print instead of having the filament flow smoothly out of the extruder.
If you’re experiencing bed adhesion issues, it is often worth the time to re-level your build plate or calibrate your nozzle height. Most slicer software have built-in bed leveling functions that will guide you through the procedure.
3. Poor bed surface
Sometimes, the problem is with the bed itself. The difficulty of getting your filament to stick to the bed can vary from filament to filament, so there may be times when your raw printing bed isn’t enough. There are several ways to remedy this such as applying some form of adhesive to the bed or placing a textures surface which your print can better stick to.s
4. Print bed needs to be cleaned
3D printing can be really finicky. If your print bed even has any traces of fingerprints, the small amount of oil on these fingerprints can be enough to cause bed adhesion problems and ruin the rest of your print.
Top tips to make your filament stick to the print bed
As with any problem encountered in 3D printing, there are several ways to solve bed adhesion issues. Again, we’ll start with the simplest solutions before moving on the more work-intensive or expensive ones.
1. Clean your bed
If you’re going to use your print bed without any adhesives, you need to make sure to remove any traces of oil from your fingertips. This is best done by wiping the bed with an isopropyl alcohol cleaner and allowing the alcohol to completely evaporate.
If you use tape or any type of glue with your print bed, you also need to make sure to remove any residual adhesive every time you use your bed. Not doing so can result in adhesive buildup over time. Eventually, the buildup can get so bad that you could end up having problems with an uneven bed. Any excess adhesive can be easily cleaned with some soap and warm water.
2. Reorient your design
As we’ve mentioned, it is often recommended to orient your design to maximize its contact with your print bed. You can even split up your design into several components so that you don’t run into any bed adhesion problems.
It’s also important to not shy away from using support structures. They may use up more filament, but they make sure that overhang features in your design don’t collapse under their own weight. They also effectively increase the contact surface between your design and the bed, which should marginally help in bed adhesion. Even if quite a bit of filament going into printing supports, a failed print will always end up wasting more filament.
3. Calibrate the bed level
If you’re still running into bed adhesion problems, it’s usually worth taking the time to run a calibration of the print bed and the nozzle distance. Each 3D printer model has its own procedure for bed and nozzle calibration. Most budget models have you do it manually, with the software providing step-by-step instructions. More sophisticated models can come with sophisticated auto-leveling systems. If you are unsure how this is done, it is best to consult your printer’s manual.
4. Adjust nozzle height
Once you’re sure that you have a perfectly leveled bed, you can make adjustments to your nozzle Z-axis offset to set it at just the perfect height. If you have poor bed adhesion, setting your nozzle closer to the bed should help. Just make sure that you don’t set it too close that the nozzle ends up dragging the previous layer of your print as it moves.
5. Apply an adhesive
Sometimes, printing directly on your bed just can’t do the job. Applying adhesive agents is a very common practice in 3D printing. It’s usually cheap, easy to do, and incredibly reliable.
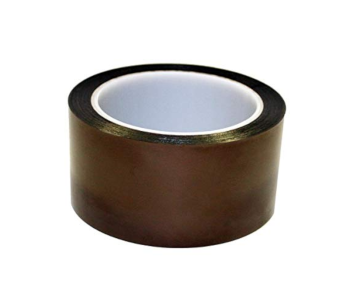
Blue painters’ tape is the most commonly used adhesive in 3D printing – it’s now practically identified with the industry. Compared to regular tape, blue painters’ tape has the advantage of being easy to apply on print beds but also easy to remove from the finished prints. If you need to set very high temperatures for a heated bed, Kapton tape may be a more suitable option because of its heat resistance.
Glue stick is also a fairly popular and versatile adhesive, mostly because of how cheap and accessible it is. The downside of glue stick is that it leaves a lot of residue that is quite hard to clean off.
6. Use a special print bed accessory
If you’re willing to spend a lot more for a specialty product that was specifically designed to help with bed adhesion, then a BuildTak surface might be exactly what you’re looking for. BuildTak is a thin and durable plastic sheet that adheres to the print bed and provides a textured face for the base layer of the print to stick to. It can work with a variety of filaments and can be used with a heated bed.
BuildTak is much easier to apply and is more reliable than any kind of tape or glue. A single BuildTak surface can be used for up to 100 hours on a heated bed and up to 250 hours on a non-heated bed. It’s a bit pricey, but the time that you save and the number of failed prints that you could avoid should certainly BuildTak at least worth your consideration.
7. Add a brim or raft
Another bed adhesion that is easy to implement is the addition or a raft to your existing design. This feature is integrated into most slicer software. By adding a brim or a raft, you can extend the surface area of the base layer, which should enhance bed adhesion.
The difference between a brim and a raft is subtle but significant. A brim is merely an extension of the base layer and is meant to be used for designs that have a low risk of warping. A raft, on the other hand, creates a whole “sacrificial” layer right underneath he base layer of the initial design.
A brim is typically more preferred since it uses up less filament, but it can make removing the finished print from the bed quite challenging. In contrast, a raft provides more protection against warping but tends to result in a print with a rough base layer. Choosing one over the other is a matter of setting your priorities.
8. Use an enclosure
When printing at very high temperatures, the filament tends to cool very rapidly as soon as it exits the nozzle. This is bad news for bed adhesion, as a hot filament tends to stick better. Although there is no way that you can keep the filament from cooling, you can slow it down to improve bed adhesion.
The first step is to ensure that your cooling fan is off, especially while printing the first few layers. If this doesn’t solve your problem, then you might consider using a print bed enclosure. If your 3D printer does not come with its own enclosure, you can just buy one or simply make your own.
A 3D printer enclosure doesn’t have to be anything fancy. You can even build one using a few PVC pipes and plastic sheets. There are several instructions online that you can use if you’re planning to DIY a 3D print enclosure.
Final thoughts
Getting your base layer to stick to your print bed is the first fundamental step in creating a successful 3D print. It’s also one of the first few skills you need to learn in the field of 3D printing. It may seem daunting at first, but it’s not that hard once you get the hang of it.
It’s worth keeping in mind the difference in the behavior of filaments that print at low temperature (such as PLA) and those that print at high temperature (such as ABS). High temperature filaments are definitely more challenging. If you’re printing with ABS or Nylon, then it may be time to bring out the big guns. A heated bed, adhesives, brims or rafts, and support structures should be part of your regular arsenal.