Top 6 Tricks for Easy 3D Print Removal

At the very end of a 3D printing project is the culmination of the whole process – removing the finished print from the build platform. This is often a monumental and satisfying moment, except when it’s not. It is far too often that finished prints get stuck on the print bed.
A stuck print is always unfortunate, as forcing them off often damages either the print or the build platform. The good news is that this is a pretty simple problem to address with some experience and a bit of planning.
1. “Love tap” with a spatula
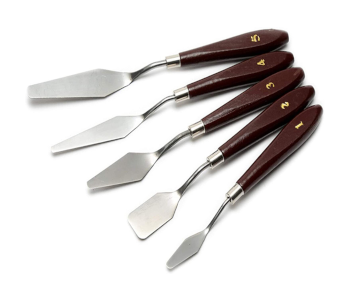
This is pretty much the classic way of removing a stuck print. Lodge a spatula or palette knife under one corner of the print and give it a gentle but firm tap forward. You can do this with your hand but a small hammer gives you makes the “love tap” just a little stronger.
In most cases, this method works well enough to remove stuck prints. Even if you have not run into this issue yet, the spatula and hammer combo is something that you would want to have in your 3D printing toolbox.
2. Heat the print bed
Tapping with a spatula did not work? You can try heating up the print bed just below the glass transition temperature of the material you are printing with. This should help the material soften just enough so that it does not stick too well to the print bed.
With the print bed hot enough, you can try to pry off the print by hand or use a spatula.
3. Cool it down
This seems counter-intuitive given the previous tip, but cooling down the interface between the print bed and the build surface is one of the most reliable methods for print removal. The two materials will contract at different rates, hopefully causing enough stress for separation.
There are several different ways for this cooling-down effect to be achieved. You can spray the bottom of the print with canned air, press a cold pack against the bottom of the build surface, or remove the entire print bed and put it in the freezer.
When doing this, make sure to let the print bed cool down to room temperature first. Thermal stress can cause the print bed to crack if the change in temperature is rapid. Less than 5 minutes in the freezer should do the trick – otherwise, you will need to resort to other methods.
4. Spray with alcohol
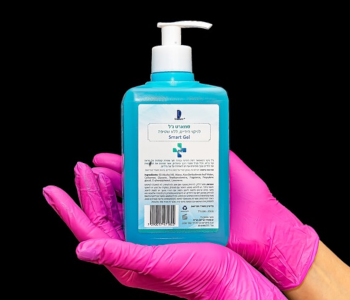
Many 3D printing users have gotten good results by spraying a 50:50 mixture of isopropyl alcohol and water on the base of their prints. The action here is two-fold. Alcohol is a solvent that can help dissolve any adhesives on the print bed. At the same time, the evaporative action of alcohol cools down the section between the bottom of the print and the build plate.
For this technique, simply spray the mixture on the interface between the print and the build plate. You can also try lifting off the corner of the print with a spatula so you really get the alcohol mixture in there. Leave it for 5 to 10 seconds, and then try to remove the print by hand. The prints should move with minimal effort.
5. Print with a raft
If you still often find yourself with stuck prints but do not want to alter your 3D printer setup, then you can consider printing with a raft. This is a setting that should be available in practically every slicer.
A raft is basically a horizontal layer of filament that is printed right underneath the first layer of your print. It is a sacrificial layer in that it helps protect the print’s base layer, even if the raft itself gets damaged during print removal. 3D printing rafts are also used to address issues with warping and poor bed adhesion.
Remember – a raft is not a foolproof solution. If you don’t do this right, you might find that the raft itself gets stuck on your finished print. Make sure to leave a good separation distance between the raft and the base layer. A gap of at least 0.3 mm. works well in most cases.
The biggest drawback of this method is that you end up using significantly more filament for any given project. This adds up quickly if you produce a lot of prints. The base layer also tends to become less smooth when printed with a raft, so you may need to spend more time in post-processing.
6. Use a flexible build surface
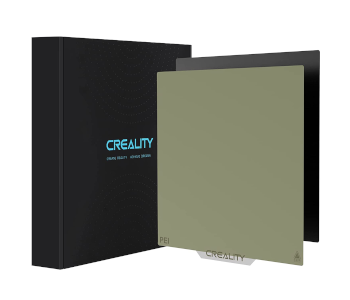
This is probably the most foolproof tip for easy 3D print removal. Instead of printing directly on a metal or glass bed, get a flexible PEI sheet that goes on top of your build plate. These attach magnetically and can be removed right after a printing project. Just bend the sheet and the finished print should pop right off.
PEI sheets are a huge upgrade for any 3D printer. With a PEI sheet, you will no longer need to apply any adhesive to improve bed adhesion. They are also very easy to use, albeit still prone to getting scratched by tools or even by the nozzle.
PEI sheets do not last forever. As a consumable, using PEI sheets will certainly add to your operating expenses. This is something to consider if you’re printing in huge volumes. However, the time you save in not having to struggle with print removal, and the stress-free process are well worth the extra cost.
Final thoughts
Getting a finished print stuck on a print bed is disheartening. Forcing it off risks damaging the print, wasting all the hours spent on the project and the filament that was used. If a little brute force does not work, then it really is better to do it in smarter ways.
If you would rather not worry about stuck 3D prints ever again, then you might want to consider printing on a flexible PEI sheet. They are quite fragile and can cost a bit, but lots of people would testify that there is no going back when you start 3D printing on PEI.