What to do When your 3D Printer Nozzle Keeps Clogging

We’ve said it many times: 3D printing is basically a never-ending process of troubleshooting. So many things can go wrong, especially if you’re trying out a new filament or when some of the parts of your 3D printer need some maintenance.
The nozzle is easily one of the most important parts of your printer. After all, it acts as the transition between the hot end and the print bed – the very thing that turns the filament into an object in 3D space. As such, having your nozzle clog in the middle of printing can be very frustrating. If this keeps on happening to you, then this guide will help you get to the bottom of the case and look for ways to solve it.
What goes on in the extruder?

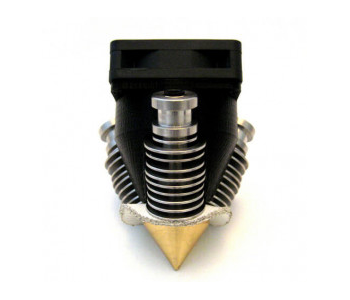
The nozzle is merely the last component of a 3D printer’s extruder assembly. To understand why clogging of the nozzle happens, it is better for us to understand exactly what happens inside the extruder.
The extruder assembly has three major components: the extruder, the hot end, and the nozzle. A successful print relies on these three components working together in a perfectly synchronized manner. Any miscalculation or settings that don’t match up can result in several problems, such as a clogged nozzle.
The extruder is a series of gears that “grab” onto the filament and push them forward in a controlled and consistent manner. Increasing the printing speed settings compels the stepper motor of the extruder to rotate faster. This increases the rate of delivery of the filament to the next step, which is the hot end.
The hot end is basically a heating element integrated with a heat sink, a heat break, and a thermistor. This component of the extruder is responsible for melting the filament so it can be forced through the narrow opening of the nozzle. The printing temperature is one of the most important settings in 3D printing, especially when changing from one filament type to another.
With the pressure created by the continuous rotation of the extruder gears, the molten filament is forced through the nozzle. The opening of the nozzle is much smaller than the diameter of the filament. This helps maintain a steady pressure in the extruder assembly so that the molten filament oozes out of the nozzle at a consistent rate.
What causes nozzle clogging?
1. Hot end temperature is too low
If your printing temperature settings are too low for the filament you are using, the filament may not get completely melted in the hot end. This leads to pressure buildup in the extruder assembly as the filament cannot easily flow out of the nozzle opening. Aside from your print probably suffering due to under-extrusion, the pressure buildup can get so bad that the extruder gears end up stripping the filament. When this happens, you almost certainly need to take apart the extruder assembly and clean out the stripped plastic from the gears of the extruder.
2. Hot end temperature is too high
Strangely enough, setting your printing temperature too high can also lead to clogging problems. Although you shouldn’t have a problem with the melting of the filament, the excess heat can actually start creeping up backward and softening up the filament before it enters the hot end. This phenomenon is called “heat creep” and can make it really hard for the extruder gears to grab onto the filament.
You can typically hear when this starts to happen as the stepper motor starts to make a clicking sound. Eventually, the extruder can no longer keep up and completely fails, resulting in a clogged nozzle. When a jam of this nature happens, you typically have to push the clogged filament through manually.
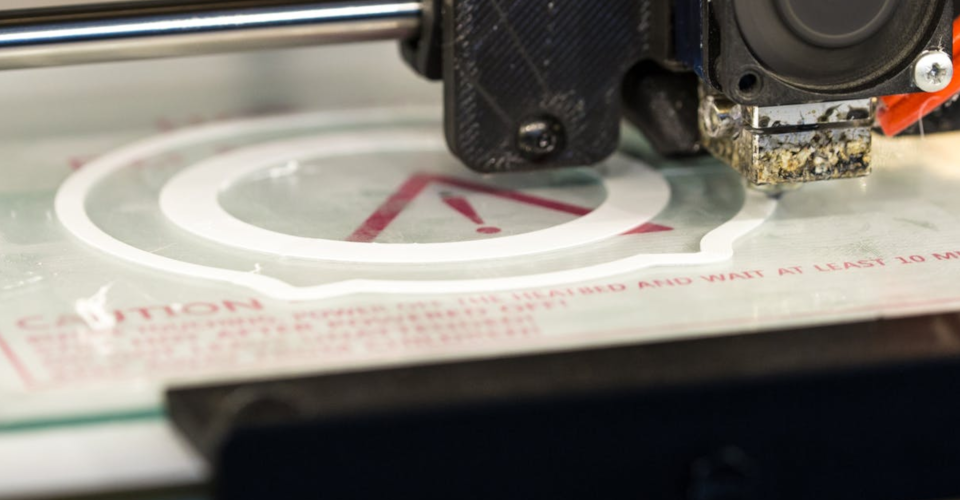
3. Nozzle is too close to the bed
The most common cause of nozzle jams, having the nozzle set too close to the bed can prevent the filament from flowing out freely. Aside from the fact that your print quality will almost certainly suffer as the molten filament gets smeared and dragged by the print head, but this can also result in “retrograde extrusion.” When this happens, filament starts to go back up the nozzle. The pressure buildup because of retrograde extrusion can very easily result in a clogged nozzle.
4. Dust or dirt in the filament
Any material on the filament that does not melt, such as loose dust or particles, will almost certainly burn as it passes through the hot end. As these small particles, the charred remains can stick to all manners of surfaces inside the extruder assembly. Eventually, the buildup of burnt particles can increase pressure and cause a jam at some point in the extruder assembly. When a jam of this nature happens, you definitely need to take the assembly apart and manually clean off the burnt particles.
5. Filament diameter is inconsistent
Even if the diameter of your filament looks the same all throughout the length of the filament, minor variations in the filament diameter can really mess up the steady-state flow that you want to achieve in your extruder. Sections of the filament that are too thin can be hard for the extruder to grab onto, while thicker sections can lead to filament buildup in the nozzle. Either way, you’re going to have a clogged nozzle.
Steps to prevent nozzle clogging
1. Clean the nozzle when switching between filaments
When it comes to jammed nozzles, any sort of residue is your enemy. In most cases, there is always a small amount of filament left over on the nozzle that you cannot pull out after your print has finished. Fortunately, the leftover filament can easily be removed by brushing the nozzle from the outside using a wire brush. You can also use a brush with brass bristles if you want to make sure that your nozzle does not get damaged.
2. Use clean and high-quality filament
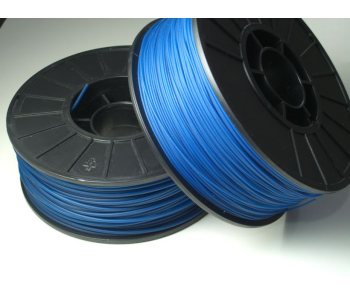
Always store your filament spools in airtight bags. Not only does this prevent any dust buildup, but it also prevents moisture absorption. The effects of moisture in the filament on the 3D printing process deserve a whole article of its own. For now, just take our word for it – moisture is bad news.
More importantly, only buy your filament from trusted sellers. Problems with diameter consistency are typically only encountered when you buy those really cheap filaments from unknown retailers.
You can easily check for diameter consistency by using a caliper to take measurements at multiple points of the filament. Thicker filaments – those with 3-millimeter diameters – are less prone to variations in diameter. For instance, a margin of error of 0.0 millimeters is okay for a 3-millimeter filament but should be enough to reject a 1.75-millimeter filament.
3. Print at the right temperature
Getting the sweet spot of printing temperature for a filament, especially one you haven’t worked with before, can take a lot of trial and error. Setting the print temperature too high or too low can lead to a host of problems – including a clogged nozzle.
Always take note of the recommended printing temperatures from the manufacturer. We suggest starting at the lowest value and working your way up by 5 °C increments until you are satisfied with the printing performance.
4. Level your print bed
If you are still running into problems with a clogged nozzle despite dialing in all the necessary settings and using the best filament you can find, then it may be time to calibrate your print bed. This is because an unleveled bed will almost certainly result in a sub-optimal nozzle height.
Build height leveling is a built-in feature in most 3D printers. You’ll most likely have to do it manually, with the software helping you out with step-by-step instructions. If you have a really high-end model, it may come with an auto-leveling feature. In any case, bed leveling is something you should be doing on a regular schedule.
5. Set the optimal nozzle height
Once you’ve ensured that your bed is level, you can easily set the initial Z-setting of your nozzle at the optimal height. Setting it too high can cause poor bed adhesion as the filament cools down before it hits the print bed while setting it too low largely increases the chances of your nozzle clogging up.
Determining the optimal height is a function of the diameter of your nozzle. As a rule of thumb, the nozzle must be set at a height that is 50% to 70% of the nozzle diameter. This allows the nozzle to exert just enough pressure on the filament to aid bed adhesion, while also not being too close to result in retrograde extrusion. We recommend setting it at 70% and lowering it gradually should you run into bed adhesion problems.
Final thoughts
Having a clogged nozzle can be one of the most frustrating problems you can encounter in 3D printing. Not only are your forced to stop the current print and start over, but you’ll very likely also need to take apart the extruder assembly to remove the filament or particles that have caused the clog.
The best precautions against clogging are buying a good-quality filament, making sure that your filament and nozzle are clean, and double-checking the optimal printer settings for your filament. You should also include bed leveling as part of your regular pre-printing checklist.
Despite these precautions, clogged nozzles can happen to the best of us. If the problem’s already there, then check out our article on how to clean your clogged nozzle. Have you had problems with clogged nozzles? Tell us all about them in the comments section.
Hi bought my printer at Christmas. Printed small and large things in different colours mainly for my granddaughter. 95% of the time using esun filament at average £35 a roll. Never suffered a blockage then I started printing head shield parts for 3Dcrowd. once my supply of esun ran out I started using all different filament donated to me, mostly the £15 to £20 a roll. then it started. I could have printed for 3 hours then clicking of the extruder, if I was lucky I could manually push the filament through and clear the blockage and go on to print another 5 or 6 before it happened again, but then there were times when I had to strip everything down. This has happened on most of the cheap filament using the same settings as used on the better filament.
Similar to @Trevor, I bought mine at Christmas. For myself 🙂 I went through the throes of too low, too high, bed leveling. Got everything working great on a chess set on Thingiverse. Its when I found out how much time things would take. My problems began on a project to build a larger object printed in sections with tabs. That’s when I was introduced to construction supports (additional pillars to keep objects standing – breakaway). Of a sudden, printer was spewing extra into the area of interface between posts and sharp angles. Led to lifting, garbling and general mayhem. Working on solutions. Always in the same places. Other prints work just fine. Ain’t hobbies supposed to decrease stress? Diatribe over.
I have been 3d printing for 4 years with 5 different printers a prusa clone a Cubex from 2013 I converted to open source, an aluminum extrusion printer made from scratch an a net 8 and an SLA printer. so I have experienced my share of clogs.. But this creality CR-10 V2 has me stumped. I replaced the nozzle and the Bowden tube reaches all the way to the back of the nozzle. I cut about half inch off the bowden tube and slid it right up against the back of the nozzle. The Gcode is fine. I printed two models over and over. same material. tried two different rolls of the material. I clear the clog and still get heat creep up the bowden tube until it clogs about 5 minutes into the build. I tried adding a second fan powered externally and stacked on top of the cooling fan in case there was a speed issue I could not see. The only thing I can think of now is the thermistor is not working correctly . which would make the nozzle keep getting hotter than needed.