10 Neat Raspberry Pi Projects for 3D Printers

Fiddling with technology is one of the best things about living in an era when technology is affordable and DIY guides can be found pretty much anywhere online. This is even more fun if you can combine pieces of technology that you genuinely enjoy – such as a 3D printer and a Raspberry Pi.
There have already been a lot of products made with a combination of a 3D printer and a Raspberry Pi, and here are some of the best we’ve found. If you’re looking for ideas, you can try any of these projects and perhaps, be inspired to come up with your own.
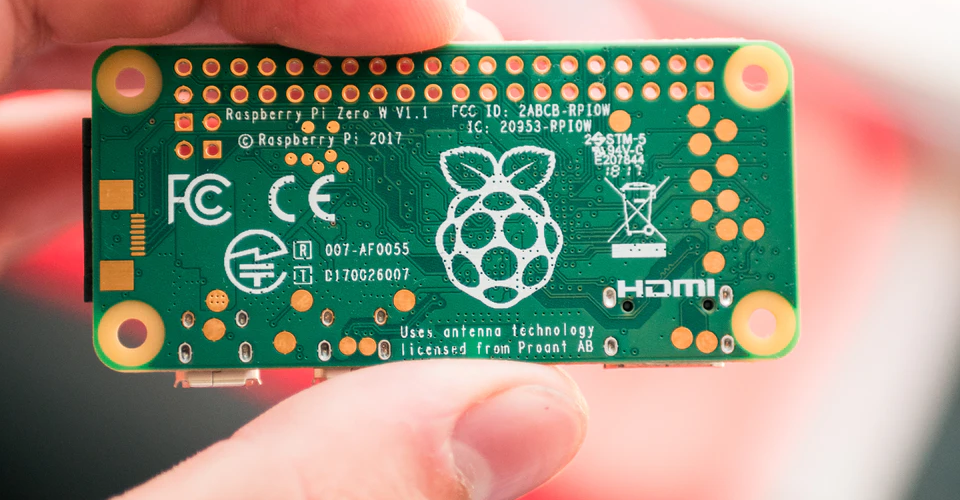
What is Raspberry Pi?
For those who aren’t familiar with Raspberry Pi, it is the most popular brand of single-board computers. This means that a Raspberry Pi is an entire, functioning computer that fits in the palm of your hand. It’s also necessary for a Raspberry Pi to have the essential components of a computer including a CPU, graphics card, RAM, and various input and output ports, although its compatibility to external devices may have from one model to another.
Raspberry Pi single-board computers can do just about any task that you can do with a standard computer, such as word processing and web browsing. With the right equipment, you can even get a Raspberry Pi to run simple video games. Because they are so cheap and versatile, Raspberry Pi computers have been used as platforms for various DIY projects and as an education tool for coders.
Nowadays, Raspberry Pi computers are considered valuable industrial and commercial tools and are commonly found in digital cameras and portable media players.
1. TalkiePi Walkie Talkie
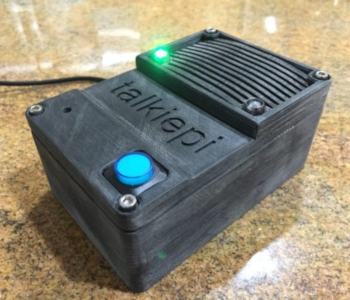
The first on our list is this simplified walkie-talkie developed by Daniel Chote from New Zealand. All the files needed to recreate the project can be found on his GitHub page.
The main function of the TalkiePi is made possible by the Mumble app installed on the Raspberry Pi computer. This means that users can simply create user groups for contact they frequently get in touch with, while people without TalkiePie can get still stay in touch by simply using the app on their smartphones. The use of Mumble is a stroke of genius that makes this project one of the easiest to create.
For the audio components, any USB-powered speakerphone will do. You are also going to need a GPIO header connector, several nuts and bolts, and an LED-lit push button which also doubles as the talk function of the walkie-talkie.
On the 3D printing side, the GitHub files also contain STL models for a walkie-talkie enclosure. While not entirely necessary, this is a great way to hide all those messy wires and boards connected to the Raspberry Pi. Since the walkie-talkie only requires a single “talk” button, the TalkiePi has less moving parts, which means fewer chances of damage and less maintenance.
2. Raspberry Pi Tablet
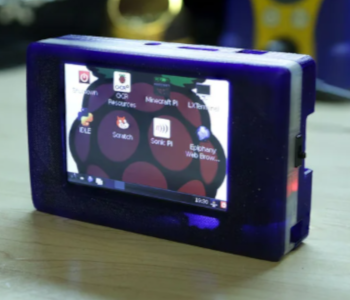
With a capacitive touchscreen, you can use a Raspberry Pi to create your own tablet that comes with your preferred operating system and apps. Of course, a good tablet needs to have an enclosure that hides all its components but still provides access to the various input and output ports. This design was specifically made for the Raspberry Pi, but there is also an alternative that’s meant to be used for the Raspberry Pi 2.
As you would know, a tablet is more than just its enclosure. This Adafruit tutorial will guide you through the devices you need for your own tablet from a Raspberry Pi and the step-by-step process of building it. The components should just about cover everything you’re going to need from a standard tablet – a Wi-Fi module, a 2500mAh LiPo battery, a Powerboost 500C USB charging power booster, a 3.5-inch PiTFT Touchscreen, and a 4GB microSD card to install the operating system and apps.
The nice thing about the 3D printer enclosure is that it provides slots that all the internal components neatly fit into. It’s also an open-source design so anyone can make modifications to its if they want to add more accessories to their Raspberry Pi build. This tablet and enclosure is a fairly simple build that you can use as a template for more complex projects.
3. Classic Famicom Raspberry Pi Enclosure
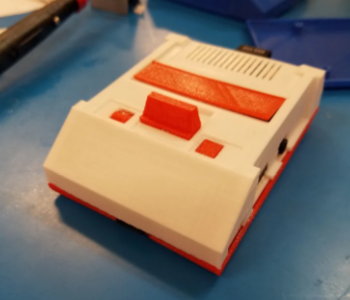
It takes a bit of work, but you can get a basic Raspberry Pi to build classic video games, particularly those from the Nintendo Entertainment System (NES) era. Why not complete the nostalgic experience and build a Famicom case for your Raspberry Pi?
This custom Raspberry Pi case, which looks really great, prints in six separate pieces that can be put together easily. You will need self-tapping M2 or M2.5 screws. The case should fit all Model B Raspberry Pi boards, including the Raspberry Pi B+, 2, and 3 versions.
The enclosure retains access to the various USB ports, LAN port, HDMI port, and other input and output audio ports of the Raspberry Pi board. If you can get USB-compatible game controllers to work with your Raspberry Pi and output the video to a TV or monitor, then you can virtually replicate the gaming experience from more than 20 years ago.
If you’re down for some retro gaming, then this is a relatively easy project that you can work on. As for the games, you can simply install the RetroPie game library on your Raspberry PI, giving you effortless access to a range of classic console, PC, and arcade games.
4. DIY Google Glass
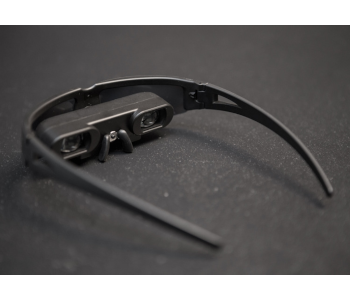
One of the most popular DIY Raspberry Pi projects, this Google Glass alternative allows you to watch 320 x 240 videos close to your eyes using a design that clips onto standard prescription glasses. With a Raspberry Pi, there are virtually no boundaries to what you can display with your DIY Google Glass. Fancy watching a movie while on your morning commute? This is a great way to do it without having to pull out your phone and look appropriately futuristic at the same time.
The project does require you to cannibalize a pair of video glasses to use its specially designed display. There are not many of these nowadays, so just acquiring the video glasses can set you back more than $100. You will also need a battery pack that can be recharged via USB. The design includes an audio part located at the rear of the glasses for you to plug in earphones or headphones
The 3D printed enclosure (downloadable from Thingiverse) has three separate components: one for the video display, another for the Raspberry Pi board, and another for the battery pack. Wires run from compartment to the next but are cleverly hidden by the “frame” of the DIY Google Glass. The form factor meshes well with any prescription glasses, although you’ll have to get used to having one side of your face feel heavier than the other.
5. Pip-Boy Wearable Raspberry Pi Case
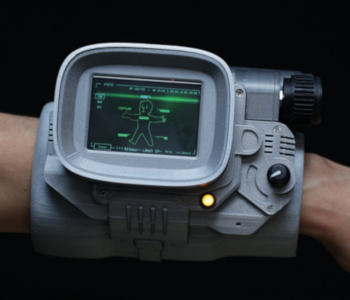
Fans of the Fallout video game series need no introduction to the Pip-Boy. The Personal Information Processor (PIP) is an all-around electronic device issued to Vault residents in the fictional post-apocalyptic world, serving as storage for all personal data, a mapping tool, flashlight, door unlocker, and Geiger counter.
Since we don’t live in a radioactive wasteland, this version of the Pip-Boy is a lot less focused on survival. Instead, it’s a handy way to bring a computer on the go. To complete the Pip-Boy look, just make sure to include a touchscreen display. A few LED lights also take the custom case the extra mile in completing the look.
As with any good Pip-Boy, this Raspberry pi case can be worn around the wrist. It’s huge and certainly no wristwatch, but there’s something novel about the idea of wearing a fully functional computer on your wrist. What you do it is up to you – this is just a case, after all, and you’re still free to customize your Raspberry Pi the way you want to. Just make sure you don’t lose it in the event of a nuclear holocaust.
6. DIY Quadcopter
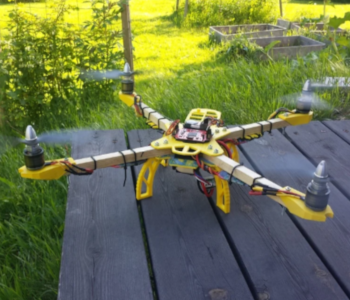
Our entries so far have been fairly beginner-friendly, but here’s something to challenge even the most hardcore DIY enthusiasts – building your own quadcopter using a Raspberry Pi. As you can probably tell, 3D printing the frame of the quadcopter (the STL files of which are available on Thingiverse) is one of the easiest parts of this build. Even with that in mind, the frame will require you to print 16 different pieces.
Just to be clear, the frame of the quadcopter isn’t fully made of 3D printed plastic. The propeller arms are made of wood, giving them a bit more rigidity and toughness. These wooden arms are screwed to the plastic components, so you’re also going to need a handy drill. You will also need to buy powerful brushless motors and propellers in the appropriate size.
The bulk of the project is summarized in this GitHub page by the person who made it, Robin Nilsson. The “Farlig 550 Modular Quadcopter” doesn’t just fly, but it also has an onboard Pi camera that delivers a live video feed and real-time telemetry data. For those functions, you’ll need to install apps like Socket.io that allows for 3G connectivity and Node-copter, which is a web-based interface that will let you control the drone.
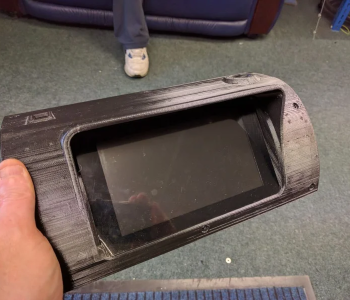
This is one of the more useful projects you can work on in your Raspberry Pi in terms of practical applications. This project will require you to make modifications to your car, as well, so keep that in mind before you decide to work on it.
Basically, the aim of the project is to replace the passenger airbag compartment with a built-in GPS navigation system powered by a Raspberry Pi. The basic components will be the Raspberry Pi 3 board and a Raspberry Pi 7-inch Capacitive LCD screen, but you’re also going to need a power switch and an enclosure.
As usual, 3D printing will come in useful for creating the enclosure. The original design (uploaded in Thingiverse) was created for a Suzuki Jimny. Modifications might be necessary for other car types. In any case, the enclosure was designed to maintain access to the USB ports just in case any modifications had to be done to the Raspberry Pi. The use of a touchscreen reduced the need for any other type of input device.
Any navigation software that runs on the Raspberry Pi will do for this project. The maker’s instruction uses Navit, a free and open-source navigation app that uses OpenStreetMap data. If you can get a Pi that is compatible with an Android OS, then Google Maps would be the default option.
8. Raspberry Pi Smart Clock
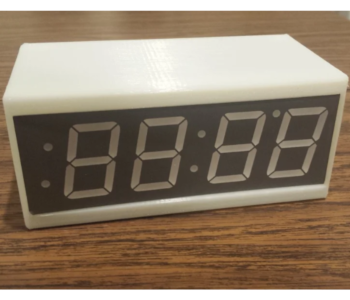
If you think that using a Raspberry Pi to power a clock seems overkill, you probably haven’t seen what this smart clock is capable of. To be fair, this project uses a Raspberry Pi Zero, which is as basic as you can get when it comes to single-board computers. Still, this could be a massively useful tool if you need to keep track of different time zones or a clock to remind you of your appointments.
On the surface, the Pi Zero clock looks just like any digital alarm clock. That’s thanks in no small part to the 3D printed enclosure and the Adafruit 1.2-inch 7-segment clock display. The enclosure is a simple two-piece 3D printing project that you can print on the same build platform. You’re also going to need a Wi-Fi dongle to give this clock its “smart” features.
After assembling the clock, what you do with it is entirely up to you. You can set it to sync with the time zone of the IP address of its network, making it a handy clock if you travel frequently. You can also set it to sync with subway schedules so you will always know when the next train will be coming. As with most Raspberry Pi projects, what you can do with the project mostly depends on the scope of your imagination.
9. Telescope
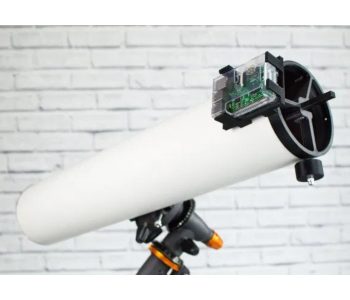
Would you believe that it’s possible to build a fully functional telescope for viewing stars and other heavenly bodies using just a Raspberry Pi, a 3D printer, and a few accessories? This project, developed by students from Sheffield University, was successful enough to warrant national press coverage and led to an Indiegogo campaign.
The so-called PiKon telescope is based on the 350-year old design of the Newtonian telescope but uses a digital camera sensor to receive the light from the telescope’s concave lens. This eliminates the need for a secondary mirror. The setup allows for viewing of the telescope’s images on an external device like a tablet. It’s even possible for the telescope to be controlled via touchscreen.
The PiKon telescope is capable of magnification of about 120x, rivaling standard reflecting telescopes. You may need a fundamental understanding of optics to determine where to optimally place the Pi camera sensor relative to the focal length of the concave lens you will be using.
Again, 3D printing is put to good use in this project to create the enclosure for the telescope. Another purpose of 3D printing is to create the movable mount for the Pi camera sensor. The camera sensor mount doubles as a mount for the Raspberry Pi board which allows the images collected by the telescope to be viewed in a monitor or uploaded directly to the Internet.
10. Server Farm
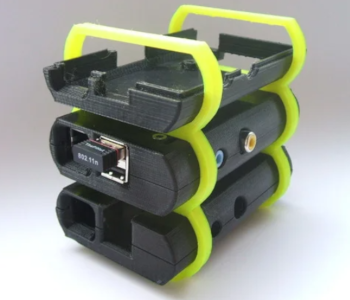
When one Raspberry Pi isn’t enough, maybe three will get the job done. As versatile as the Pi is, it isn’t exactly known for its power. Perhaps this was the motivation for the designers of this stackable server farm for the Raspberry Pi.
The idea for this 3D printed stackable case is to allow several Raspberry Pi’s to be clustered together neatly while still maintain access to all their essential ports. This could be really useful in a home or office setup – basically anywhere that you don’t need the Raspberry Pi to be moving around or permanently installed in a more customized case.
The main issue with this design is that it’s only for the ring-like structure that holds together up to three Raspberry Pi cases. The design for the cases, however, are not free form Thingiverse. Instead, they are hosted in a 3DAgogo link. It’s still a great idea, though, and the author of the design deserves every bit of credit, in cash or otherwise.
Final thoughts
One thing that we can say is common between 3D printing and Raspberry Pi is that they are both disruptive technologies. One has revolutionized the field of rapid prototyping, while the other has made us reevaluate the definition of what a computer is. The combination of the two can only lead to DIY projects that we’ve never seen before, and we’re excited at the prospect of more and more collaborations between the two technologies.
Do you have an idea for a project that uses both Raspberry Pi and 3D printing? Or have you tried building any of the projects on this list? We hope that we’ve at least struck some inspiration in you!
Contents