Best 3D Printing Bed Surfaces and Adhesion Methods

A key component in making a good 3D print is getting the first layer right. It sounds simple but getting a good first layer is a product of several factors coming into play: the printing temperature, printing speed, whether you’re using a cooling fan, or if the filament material adheres well to the bed.
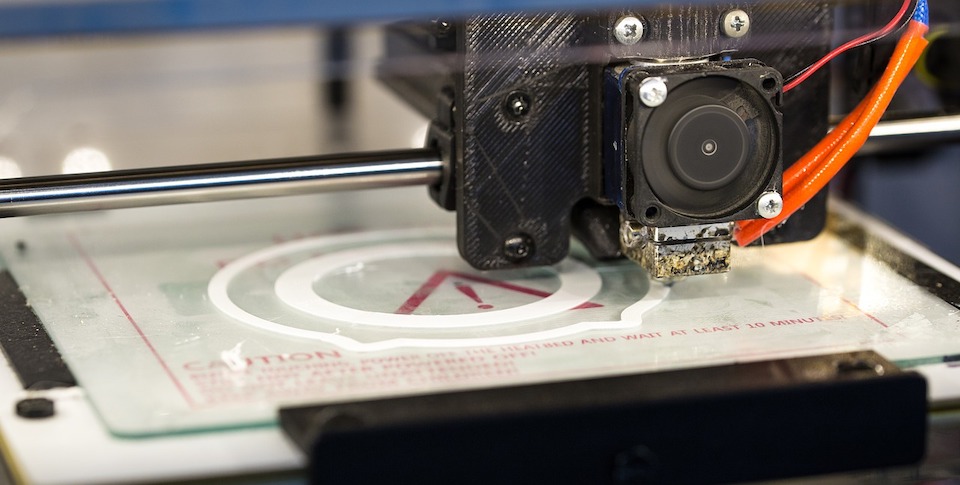
In this article, we would like to focus on one of the most important elements to getting a good first layer: the printing bed. We go over the different types of printing bed surfaces, their pros and cons, and which printing bed surface goes best with which filament material.
Why is the printing bed so important?
In 3D printing, perfecting the first layer is such an important step that long and detailed guides have been written about it. So many things can go wrong that will hinder you from getting the first layer right, which makes it a good indicator for how well the rest of the print will go. The first layer is also a good time to troubleshoot, as you can anticipate problems that might come up during the rest of the print without wasting too much time and filament material.
Of course, several factors come into play when trying to get the perfect first layer. The choice of printing bed is one of these factors. The right printing bed should do two things: provide enough adhesion for the filament material to stick and prevent warping. A print that does not stick to the printing bed will stick instead to the extruder, resulting in an uncharacteristic blob of molten filament. Warping occurs when the material at the outer edges of the first layer cool at a faster rate compared to the material in the inner sections, resulting to a deformed base.
This is not to say that getting the right printing bed is the be-all and end-all solution to your first layer woes. Setting the extruder at the correct height and setting the correct printing temperature and speed values are equally as important. As many experienced 3D printing enthusiasts will tell you, perfecting the 3D printing process involves a complex interplay of tweaking and adjusting of different settings in your 3D printer.
Aluminum or glass?
Most 3D printers come with either an aluminum or glass printing bed surface. Your 3D printer may also come with an option to heat the bed. Any combination of these settings has their own pros and cons, as we shall discuss shortly.
In theory, printing on bare aluminum works well since the high conductivity of aluminum ensures that it is heated uniformly. This means that the first layer of the print also heats up uniformly, reducing the risk of warping. Aluminum is also a relatively sturdy material, which means it can withstand the somewhat rough methods needed to separate the print from the bed.
The major drawback of using a print bed made of aluminum is the fact that aluminum expands a lot under high temperature. Since print beds need to be anchored by screws to the frame of the 3D printer to make a stable surface, the thermal expansion of aluminum usually results in the print bed itself getting warped. In most instances, this warping is most pronounced near the middle of the print bed since it is the most likely point of failure. As many guides on 3D printing tell you, a print bed that is not leveled is bad news. No matter what adhesion method you use, making a filament material stick to an uneven printing bed will be very difficult.
On the other hand, printing on a glass printing bed compensates for the disadvantages of printing on aluminum. Glass is not a material that expands so much when heated, and this lack of thermal expansion means that a glass printing bed will remain leveled even at high temperatures.
However, glass is a fragile material that has a higher chance of breaking when you aggressively try to remove a finished print off of it. Using a glass printing bed pretty much means having to replace it every several months or so.
Another potential problem with glass is the fact that it is not conductive as aluminum, resulting in a heat distribution that is not as uniform. When using a heated glass printing bed, you can probably expect that some areas of it will be hotter than others. When left unchecked, this uneven heating can lead to warping issues.
Should I be using a heated bed?
All this talk of heated beds might have you wondering: what’s the deal with heated beds anyway? Most desktop 3D printers nowadays have provisions for heating the printing bed because it is one of the most effective ways to prevent warping of the first layer. The concept of a heated bed works by keeping the filament material uniformly warm, preventing the uneven cooling down which results to warping.
The optimal setting for the temperature of a printing bed is determined largely by the filament material. Ideally, you want to set the printing bed temperature at or slightly above the temperature at which the material becomes malleable (or what is known as the heat-deflection temperature). This value differs for every filament material. For instance, a temperature of 50 to 60 °C is generally recommended for PLA, while a much higher setting of 100 to 110 °C is recommended for ABS.
There is no ‘one size fits all’ solution when it comes to using a heated printing bed. Some filament materials have very little tendency to warp, such as PLA in the right conditions, and may not need to be printed on a heated bed. However, using a 3D printer without a heated bed seriously limits your options in terms of filament material. If you are on the fence between buying a cheaper printer without a heated bed or buying a slightly more expensive model that has a heated bed, we will strongly recommend getting the slightly more expensive model.
The only major drawback of using a heated printing bed is the additional power that it consumes during printing. 3D printing is already a very power intensive process with just keeping the extruder motor running and maintaining the nozzle temperature for several hours for just a single print. Adding in the requirement of keeping a large surface at high temperature significantly ramps up the power requirement of this whole activity. Installing an enclosure for your 3D printer is an easy way to keep the components hot, which reduces the power consumption for all the heating elements.
Common bed adhesion methods
For most printing applications, printing on the bare printing bed just will not cut it. It is not enough that the printing bed is heated, but you have to provide a surface for the filament to stick to. Fortunately, there are several ways that this can be done.
A quick and easy way to improve bed adhesion is to use materials that can be easily found in your art supplies store. Glue sticks, such as those used in typical arts and crafts projects, can be applied on a glass heated bed and has proven to work well with ABS. For PLA, a commonly used method for bed adhesion is to use hairspray on a glass surface. Due to the application method of hairspray, it only takes seconds to apply a thin and uniform layer which easily strips away after the print has been completed.
If those adhesion methods still don’t work well enough, you can go one level higher and use standard blue painter’s tape. We have found that a layer of painter’s tape works very well with ABS and can even be used in combination with the glue stick for a fail-proof adhesion method.
An adhesion method that works especially well for ABS is ABS slurry or ABS juice. This is basically a glue made by melting little piece of ABS in acetone, resulting in a thick and cloudy material. A thin layer of this ABS slurry on any heated printing bed naturally works very well with ABS as a filament material. The downside of using this is the time and effort needed to prepare the ABS slurry.
For PLA, we find that using Kapton tape works better than blue painter’s tape. Kapton tape is commonly used by applying a single layer on the heated glass bed which covers the entire print area. PLA sticks very well to Kapton tape, but you may have to replace the tape layer for every use. It is quite tedious but delivers great results.
For a somewhat more expensive but foolproof solution, you may use a BuildTak layer over your heated printing bed. BuildTak comes in a variety of shapes and sizes, so you are sure to find one that fits perfectly over your printing bed. These can also be used in combination with glue stick or hairspray to make for an even more reliable adhesive surface. Although BuildTak surfaces can be quite expensive compared to the other alternatives listed above, each BuildTak surface can be used multiple times as long as you take care not to print on the same spot all the time and that you clean it after every use.
Which printing bed should I use?
To recap: Is a heated bed necessary? Absolutely. Should I choose an aluminum or glass printing bed? Each one has its strengths and drawbacks, but the more important point to make is that you should not be printing on the bare printing bed surface if you want your filament material to stick. Considering all the factors, we still recommend using a heated borosilicate glass printing surface to avoid leveling problems, while recognizing that a bed adhesion method will be necessary.
Choosing a bed adhesion method will depend on your budget, the filament you are working with, and the time and effort you are willing to spend. Each adhesion method has its own set of advantages and disadvantages, as we have helpfully summarized below.
| Bed adhesion method | Works best with | Advantages | Disadvantages |
| Glue stick | ABS, Nylon | – Cheap – Easy to apply | – Difficult to clean off the printing bed – Can be quite messy |
| Hair spray | PLA, PETG, ASA | – Cheap – Quick and easy to apply – Produces a thin and even layer | – Other parts of the 3D printer (bearings, screws) can be inadvertently sprayed on |
| ABS Glue | ABS, ASA | – Works exceptionally well with ABS | – Preparing the ABS slurry will take some time and additional effort |
| Blue painter’s tape | ABS, PETG, TPU | – Cheap – Easy to apply and remove | – Not very durable – May have to be reapplied after every use |
| Kapton tape | PLA, TPU, ASA, HIPS | – More durable than blue painter’s tape – Produces an even surface on the first layer | – Difficult application – May have to be reapplied after every use |
| BuildTak | Any | – Provides very reliable adhesion – Can be used multiple times – Easy to wash with soap and water | – Expensive – Can work a little too well; prints may be hard to remove |
Conclusions
Getting the first layer right is just one of the essential skills needed to perfect the 3D printing process and choosing the right printing bed is a vital ingredient to this step. A good printing bed not only ensures that the first layer of your print sticks to the surface, but also reduces warping and deformation.
A heated printing bed has become an absolute necessity, as it opens up the possibility of working with several types of filaments. Most 3D printers come with either aluminum or glass printing beds, either one of which has its own pros and cons. However, the point remains that you will probably have to use an additional adhesion method to ensure that your first layer sticks to the printing bed.
A variety of bed adhesion methods are available. Your mileage may vary depending on the price, the time and effort needed, and the filament you are working with. Keep in mind that each method has applications that it works best with, and you will likely have to change them up every now and then. This really isn’t such a bad thing – it expands your skillset, which means you’ll be ready for more challenging 3D printing projects.
Hey very good article; as someone who has struggled a lot about first layer adhesion (with abs particularly) but also with stabbing myself a few times trying to pry off parts that would stick too well (pla mostly), I would like to share a new bed adhesion solution I found recently that has been working beyond expectations: DustNPrint.
It takes a few applications to get the process perfect, but once you figure it out, it is 100% adhesion, zero force unstick and it truly works with all plastics (that I have tried so far: abs, pla, petg, nylon, pc). And its also all natural which for me is important.
Also, one key component about first layer that has not been talked about a lot in the article is of course the infamous bed leveling.. There are tons of articles out there but really the only thing that has truly worked for me is the following:
A. Having a fixed bed (get rid of those adjustable springs on your bed that only add vibration and de-adjustment)
B. Having a solid frame (look at how flexible those printers are sometimes… if one can deform the frame with simple force, bed calibration will always be an issue)
C. No bed leveling sensor (most of them are less repeatable then what one might think)
D. Using MESH_BED_LEVELING (bed leveling with paper)
I’ve wasted tons of time with cap sensors, bltouch, adjustable springs, 3d lac, buildtak and abs slush; enough that I wanted to share my findings 🙂