How to Fix 3D Printing Layers That Are Not Smooth

Perfection is hard to attain in 3D printing. Most of these flaws can be fixed in post-processing, but errors that propagate through the entire print are much harder to repair. One such example is when the layers of your print are not smooth.
There are lots of possible reasons for why the layers in a 3D print would not be completely smooth. It can be due to extrusion problems, too high printing temperatures, or excessive vibration in the 3D printer. The actual appearance of the layers has to be considered to accurately diagnose the cause.
Zits on the walls
The most common flaws in an imperfect outer surface are zits or blobs on the walls. A small number of zits is not a big issue, as they can be sanded smooth with minimal effort. However, if the cause of the zits is pervasive, then you would likely end up with zits or blobs all over the entire 3D print. This would be very hard to fix in post-processing.
The good news is that zits and blobs can be easily addressed by making a few changes in your slicer settings.
Lower the printing temperature
The easiest solution if there is still room to lower your printing temperature considering the recommended temperature range for the filament you are using. Ideally, the filament cools down rapidly enough upon extrusion to maintain rigidity and not deform. The problem with printing at high temperatures is that the filament tends to “flow” even when it has extruded as a layer in the 3D print.
Another added benefit of printing at lower temperatures is that it tends to create better detail accuracy because of reduced thermal shrinkage. However, printing temperatures that are too low can also negatively affect layer and bed adhesion. Make sure to keep within the recommended range – we would not recommend reducing the temperature to the lowest allowable value.
Enable retraction
In some cases, zits or blobs appear at points when new layers are started. This is easily observable by keeping an eye on your 3D printing while it is running. If this is the case, then the reason for the zits is over-extrusion.
Your 3D printer actually has a built-in mechanism for avoiding surface imperfections due to over-extrusion. This feature, called retraction, pulls back a segment of the filament once a layer is finished to relieve the excess pressure in the hot end nozzle. This ensures that no excess filament is extruded when a new layer is started.
There are two settings you can tweak to address this issue. The first is the retraction distance or the distance through which the filament is pulled back at the end of a layer. The second is the priming distance or the distance through which the filament is pushed forward before extrusion restarts.
If there is excess filament being extruded whenever a new layer starts, then your 3D printer needs to retract more filament than it primes. The difference should not be too drastic. You can start with a retraction distance of 1.00 m and a priming distance of 0.80 mm. The 0.20 mm difference between the two settings should be enough to prevent over-extrusion, but you can increase it if necessary.
Enable coasting
Your case can be the opposite of what is mentioned above – zits or blobs may appear at the point where the layers end. This means that excess filament is being extruded as the nozzle lifts to end a layer, causing blobs to form at these spots.
The feature you need to enable to prevent this is called coasting. It shares the same goal as retraction but takes a different approach to achieve it. When coasting is activated, extrusion is stopped just before a layer is completed. This prevents the buildup of excess pressure in the hot end nozzle that causes over-extrusion at layer terminals.
The usual default coasting distance is 0.5 mm. If you notice gaps or holes forming because of coasting, then you can reduce the setting gradually by 0.1-mm increments. You can set the coasting distance to as low as 0.2 mm and still see significant benefits.
Wavy layers

Another manifestation of layer imperfection are layers that look wavy or have shifted in place. The severity of wavy layers can range from visible ripples on the surface to layers that have shifted so much that the final product is barely recognizable. These can all be traced to excess, unwanted motion in the 3D printer.
Excess vibrations
If the signs of wavy layers still appear subtle, then it might be due to the 3D printer vibrating excessively and unnecessarily during operations. This is almost certainly a hardware problem that can be solved by making a few adjustments to your 3D printer or working area.
Wobbly parts are more common in 3D printers that need to be assembled by the user. If this is the case, keep an eye out for loose brackets or other parts while the 3D printer is running. Just tighten the relevant screws as you go along, and the problem should be fixed eventually.
A solidly assembled 3D printer is still of no use if the surface it rests on is not stable. This stresses the importance of a solid and heavy workbench for your 3D printer. If you’re using a table, then make sure that the legs themselves do not wobble while the 3D printer is in operation. Some people even set their 3D printers on the floor to solve this type of problem.
Travel speed is too high
In some cases, the layers of the 3D print can look like they have been shifted from their target positions. When this happens, it almost certainly is because the print head was moving too fast and missed its target.
When the print head moves from Point A to Point B, how quickly it gets there is determined by the travel speed setting. Increasing this travel speed is a great way to shorten the printing time.
However, setting the speed too high can also cause the print head to overshoot its target. This problem more commonly happens in 3D printers with direct extruders, as the extra weight of the print head increases its momentum. 3D printers with Bowden extruders, as well as Delta 3D printers, are better equipped for very high travel speeds.
A good default travel speed setting is 100 mm/s. You can try to go faster, but only increase the setting in 5 mm/s increments just before layer shifting problems start to become visible.
Gaps or holes in the layers
Zits on the surface of your 3D print can still be sanded smooth, but gaps or holes are much harder to remedy. These are almost certainly caused by under-extrusion. The underlying cause for this under-extrusion, however, can have a range of possibilities.
Moisture on the filament
Having excess moisture on the filament can cause under-extrusion issues. The good thing is that moisture is very easy to diagnose. A tell-tale sign is a popping or hissing sound coming from the hot end. This comes from the expansion and vaporization of the moisture in the filament once it is exposed to elevated temperatures.
Evaporation of moisture in the filament disrupts the smooth extrusion pattern. This inconsistency will likely result in some sections of the layers of your 3D print turning out “missing.”
To address this problem, just swap out your filament with another filament that you know has been stored properly. All of your 3D printing filament should be stored in airtight bags with a healthy amount of desiccant. Constant exposure to a moisture-rich environment can cause a filament to become brittle and snap into several pieces with minimal mechanical stress. When this happens to your filament, it is no longer usable.
Clogged nozzle
If there is material clogging your nozzle, then it will eventually cause massive extrusion problems. You may end up with holes in your layers, layers that are thinner than expected, or even layers that are completely missing.
Figuring out the cause of a clogged nozzle will require an entirely separate article. It can be because of moisture or dust in the filament, filament stripping in the extruder, improper slicer settings, or residual filament getting burnt in the hot end. If you fail to address the root cause, then a clog will recur in the nozzle after some time.
The first order of business would be to clean the nozzle to clear off any clogged material. This can be done either by inserting a pin or needle into the nozzle or by using another filament to do the “cold pull” method. If all else fails, you can always unscrew the nozzle and soak it in acetone or replace it completely.
Layer lines are too visible
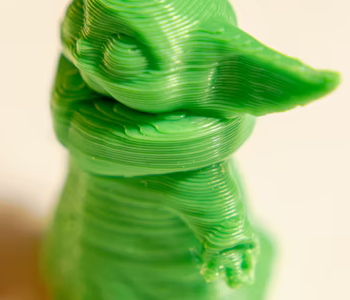
While it’s not possible to completely eliminate layer lines in FDM printing, you should be able to reduce their visibility to make the surface seem smooth when viewed from afar. However, there may be times when layer lines are too visible to be acceptable.
The first thing to consider is the frequency of occurrence of the visible layer lines. Are they appearing randomly or in a cyclical manner? Just this one detail can help you narrow down the root cause for this issue.
Inconsistent filament diameter
A hallmark of a good 3D printing filament is that it has a consistent diameter throughout its length that is within a margin of tolerance. Any large diameter variations can cause inconsistent extrusion. If the visible layer lines in your print appear randomly, then this is a possible cause worth investigating.
If you have a caliper, then it’s easy to check the diameter tolerance of your filament. Just take random measurements at different points of the filament and confirm if they are within the tolerance as declared by the manufacturer. This should not be a problem we expect you to have if you buy your filaments from reputable brands.
Inconsistent filament diameter will result in inconsistent extrusion. Thus, there may be sections of the print where the nozzle is over-extruding, causing irregular layer lines.
Fluctuating printing temperature
Another requirement for consistent extrusion is that your 3D printer can maintain a constant printing temperature. Maintaining this temperature is the result of a complex interplay between different elements of the 3D printer – the heating element, the PID controller, the thermistor, and even the heat break.
Since temperature is controlled by the PID controller, any fluctuations in printing temperature will likely happen in a fixed pattern. If extrusion problems are being caused by fluctuating temperatures, then you will also likely see the problematic layers happening in fixed intervals.
The typical repair for this type of problem is to do a calibration of your 3D printer’s PID controller. You will probably need to get in touch with your 3D printer manufacturer to get this done.
Excess vibrations
Visible layer lines may not be the result of extrusion problems. Perhaps the layer lines have slightly shifted, causing them to be more visible. If your 3D printer is visibly wobbling while it is running, then this could be the culprit for visible layer lines.
Again, the easiest solution is just to try and tighten all the screws and bolts in your 3D printer. While you’re at it, make sure that the 3D printer is placed on a stable surface. There are only benefits to gain when you try to keep your 3D printer as still as possible during its operations.
Final thoughts
Having zits or visible layer lines on the surface of your 3D prints can be frustrating, especially if you’re the type who wants to make them as perfect as possible. If you sell your 3D prints, then these surface imperfections are unacceptable and only mean that you will have to do more work in post-processing.
There are dozens of possible reasons for why the layers of 3D print may not be perfectly smooth. Getting to the root cause of the issue involves observing the signs and relying on your fundamental knowledge to figure out why the errors are happening.