What Is Resolution In 3D Printing?
While many 3D printers today offer the convenience of being able to print a 3D model with pre-set parameters, it is in the fine-tuning and tweaking of these parameters where the skill of a 3D printing professional is truly tested. To come up with truly professional-grade 3D prints, the resolution of a 3D printer is something that needs to be heavily considered.
Resolution in 3D printing is a far cry from our usual understanding of resolution in TV screens or inkjet printers. There are several aspects to 3D printer resolution, each one manifesting in the finished 3D print in different ways. What exactly is 3D printer resolution? What parameters or 3D printer parts do you need to manipulate to adjust this resolution?
The elements of 3D printer resolution

The resolution of an FDM printer is driven mainly by two components – the nozzle and the stepper motors. What this means is that there are certain physical limitations to the resolution that any 3D printer can achieve, especially when using FDM technology. However, other factors also come into play such as how the filament material reacts to thermal contraction. Let’s take a deep dive into each one of these elements.
XY Resolution
Any 3D printing project starts with a 3D printing model that a slicer software converts into a corresponding G-code algorithm. A huge part of the commands included in the algorithm corresponds to the movement of the nozzle along the X-Y plane, thus determining how the molten filament will be deposited onto the build platform.
The thing about the movement of the nozzle is that it is not continuous. Instead, the movement occurs along very fine intervals as defined by the rotation of the print head’s stepper motors. Each “step” of the rotation of the motor corresponds to an incremental movement of the nozzle. Most stepper motors used in 3D printers take 200 to 400 steps to complete a full 360-degree rotation, corresponding to a step angle of 0.9 to 1.8 degrees.
As you can imagine, this means that the nozzle can only move at finite increments as dictated by the stepper motors. This has a direct influence on the level of detail that can be reproduced in the X-Y plane. This forms the foundation for determining the XY resolution that a 3D printer can achieve.
Z Resolution
Z resolution pertains to the level of detail that can be recreated along the vertical plane. There is a single printing parameter that has a direct influence on the Z resolution – the layer height. However, the layer height is also a function of the diameter of the printer nozzle.
The common rule of thumb is for the layer height to be set at 80% of the diameter of the nozzle. This creates just enough compression of the filament material to improve layer-to-layer adhesion without deforming the layer or causing excessive layer ovality.
The dependence on the nozzle diameter means that the Z resolution can be instantly enhanced by using swapping a 3D printer’s nozzle for a smaller version. This allows for finer detail in the vertical plane, although the improvement is most pronounced if the 3D model contains a lot of curved surfaces.
The biggest downside of increasing Z resolution by reducing a layer height is a significant increase in printing time. Depending on the changes made in layer height settings, the total printing time can easily increase by a factor of two to three times. Aside from the slower turnover of 3D printing jobs, this also translates to higher power costs.
Minimum feature size

In most 3D printers, the matter of resolution is simplified by merely providing a “minimum feature size” specification. This corresponds to the smallest “dot” that a 3D printer can make, akin to a single pixel on a TV screen.
The minimum feature size of a 3D printer is simply a composite of both the XY resolution and the Z resolution. It takes into account factors such as the size of the steps in the stepper motor and the diameter of the hot end nozzle. Indicating a minimum feature size is merely the manufacturer’s way of conveying the hardware limitations of a 3D printer. If you need to print at a higher resolution, you will have to look for a 3D printer with a small minimum feature size number.
Material deviation
Even with the finest hardware tweaks, there is one more phenomenon to consider – the effect of contraction as the filament cools down. This is an unavoidable process, but it can be controlled through the selection of filament materials and with the proper cooling settings.
Some filament materials are more prone to thermal contraction than others. Filaments that print at higher temperatures, such as ABS or Nylon, undergo more drastic cooling. Consequently, they can contract to a degree that makes warping a serious issue. Polycarbonate is another filament with notoriously bad thermal contraction issues.
A common way to prevent warping or contraction is to control the rate at which the filament cools down. This can be done through the use of a heated bed or a print chamber enclosure. These are common practices for filaments that print at high temperatures. However, there are also filaments – like PLA – that have no issues with warping and do not require special measures.
FDM vs SLA
While we’ve been discussing 3D printer resolution in the context of FDM printing, let’s segue a bit and look at how these concepts apply to another 3D printing technology – stereolithography (SLA). In contrast to FDM, SLA uses a liquid resin raw material that undergoes photopolymerization through the controlled emission of concentrated UV light beams. Solidification of the liquid resin happens almost instantaneously, although a post-curing step is necessary for the finished print to develop strength.
While FDM printing relies on the nozzle and stepper motor to determine the resolution, SLA printing relies only on the size of the concentrated beam of UV light. It’s easy to see how the optical element of such a beam can be so much smaller than the diameter of a nozzle. This translates to excellent resolution for SLA print, often magnitudes better than any print made in an FDM printer.
The superior resolution of SLA printers has made them the technology of choice for 3D printing highly detailed designs or tiny parts. The biggest downside of the SAL printers is that they are not quite as accessible or affordable as FDM printers, although some recent models may put that argument into contention.
How to enhance 3D printer resolution

Settling for low resolution is always an option if you’re working on simple 3D prints where mechanical strength is more important than aesthetics. However, high-resolution 3D printing may come in handy for detailed models such as action figures, busts, and prototypes. If you’re not satisfied with the output resolution of your 3D printer, here are a few changes you can make.
Use a filament that is not prone to warping
As we’ve mentioned, some filaments are simply more prone to warping than others. PLA and ABS, the two most common 3D printing filaments, provide the perfect contrast to demonstrate this point. If you’re having trouble with a detailed print, then switching to a filament that doesn’t warp may be the simplest and easiest solution for you.
Make sure that you are using the proper printing temperature
The temperature at which a filament melts controls how well it flows out of the nozzle, how the layers stick to each other, and how quickly the filament cools down. All these processes are essential in ensuring a good level of detail in the finished print. Setting the temperature at the upper range of recommended values for a filament often yields better results, although you’ll have to watch out for stringing problems.
Use a smaller nozzle
As we have already pointed out, swapping your nozzle for one with a smaller diameter is the single most significant change you can make to your 3D printer to enhance its resolution. Just don’t forget to change your layer height settings accordingly. Switching to a smaller nozzle also means that you’ll have to live with the fact that your 3D printing projects will take so much longer to finish.
Print slow
Slow and steady wins the race when it comes to printing at high resolution. Printing slow gives the filament more time to cool, thus allowing for better retention of fine details.
Add supports
Features getting deformed because of gravity is the last thing you need when printing 3D models at high resolution. This becomes even more pronounced when there are fine details in overhang features which makes them even more prone to failure. A quick remedy is to simply add support structures to the project using the slicer software. Just be careful about adding too many or too dense supports – they can also be very hard to remove.
Use a different slicer software
There’s no guarantee that this will work for your setup but using different slicer software may yield different levels of quality and resolution. Keep in mind that the basic purpose of this software is to divide a 3D model into slices. How well the software executes this step may have a bearing on how the final 3D print looks.
How to test your 3D printer resolution

After making tweaks to your 3D printer settings and changing some of its parts, you may want to do test prints to check there are any palpable improvements to your 3D printer’s resolution. The easiest way to do this is to 3D print a Benchy, the default torture test for any 3D printer. This is a small and easily recognizable model that works great as a benchmark when adjusting your 3D printer settings. It’s not very detailed, though, so subtle improvements in resolution may not be very visible.
If you’re testing specifically for resolution, then this Printer Resolution Test Plate should do wonderfully. The test plate contains a series of bars, pegs, pins, and voids at different sizes. This is the best way of determining the actual minimum feature size of your 3D printer, although all elements only go as small as 0.1 millimeters.
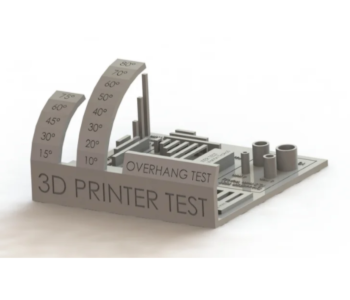
For more thorough testing, then we recommend this All-in-one 3D Printer Test. As its name implies, this test plate can be used to assess just about every single quality-related parameter in 3D printing. Aside from resolution, this plate also tests for overhang performance, bridging capacity, voids, and stringing. If you continue to have problems with your 3D printer, this all-in-one testing plate just might be the tool you need to start troubleshooting.
Final thoughts
Resolution may seem like a familiar buzzword to just about everyone, but it takes on a different meaning when used in the context of 3D printers. It’s not something that you can just increase or decrease as you please – it relies on several different 3D printer parts and (to a lesser degree) on the software. If you want your 3D printer to have a resolution upgrade, then you’ll have to look forward to a few hours of tinkering and testing.


