Best Tips for 3D Printing Spheres
A sphere is one of the most basic 3D shapes, but it can be a pain in the neck to 3D print. Spheres are unique in that they are challenging to 3D print, the same as with any curved surface. However, you also want them to look as close to perfect as possible. Achieving this is easier said than done.
Printing perfect and flawless spheres is almost impossible without having to do some creative edits to your 3D model. It’s possible, but the solutions are not exactly straightforward. Check out our guide to 3D printing the perfect sphere.
Why are spheres so problematic?

It’s a shame that spheres are so difficult to 3D print, considering how common they are. It would be a great idea to 3D print some balls for backyard games or a stylish spherical lampshade. What is it about spheres that make them problematic for 3D printing?
Spheres are uniquely challenging because they can only intersect with a flat surface on exactly a single point. In the case of a 3D printer, this flat surface will correspond to the print bed.
If we stick to the 45-degree rule, then there should be no need to add any support structures to a sphere. This does not work in practice. Once the sphere is sufficiently built up, gravity starts to take over and causes some of the layers of the sphere to sag and deform. Without supports, it is virtually impossible to print a sphere that can perfectly maintain its spherical shape.
Why not just print with supports then? Well, supports tend to leave blemishes when they are removed. In a perfectly curved surface like that of a sphere, these blemishes become highly visible. Sanding them smooth is a possibility, but you also risk altering the shape of the sphere.
Minimizing the stair-stepping effect
The surface of a sphere is just like any curved surface when 3D printed – they are formed by flat layers on top of each other that simulate the look of a curved surface. To make spheres look nice, the conventional wisdom is to reduce the layer height, thus increasing the Z-axis resolution.
Just this single step should already help massively in the quality of your 3D printed sphere. You will want to set the layer height at about 25% of the nozzle diameter while also making sure that the value is a multiple of the step size of the printer’s Z-axis stepper motor. In most cases where 0.4-mm. diameters are used, a layer height of either 0.08 or 0.12 mm is ideal.
Take note that this will significantly increase the printing time for any model. A well-done sphere takes time – there is no way around that fact.
Method 1: Print with supports
We have already said that printing with supports is still problematic, but you can still do this method and get a flawless product if your printer has dual extruders. More specifically, you will want to print the support structures with dissolvable filament like PVA or HIPS. This eliminates the issue of supports leaving blemishes upon removal.
Even with supports, your model may still suffer from poor bed adhesion because of the low area of contact with the print bed. An easy to remedy this is to print with a raft or brim. This will increase the bed adhesion of support structures to keep them more stable. This will increase filament consumption for the print, but this is a small sacrifice.
Method 2: Split the sphere in half

The more common recommendation is to simply split the sphere in half and to print the spheres separately with the flat side facing down. This avoids the issue of having the layers fall apart or the surface of the sphere getting ruined by supports. The hemispheres can then be glued together during post-processing.
There are a couple of cardinal rules to be followed when doing this method. Since you will be putting the hemispheres back together, they must be almost exactly similar. This means printing with the same number of shells, infill pattern, and infill density. A sphere with different hemispheres may be put together, but it will have a weight imbalance.
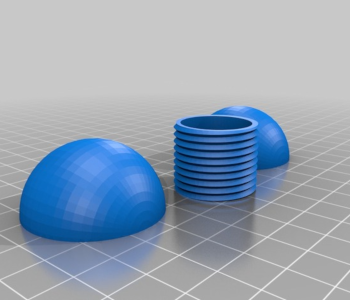
Conversely, a model available in Thingiverse proposes a method to assemble two hemispheres together without glue. Instead, there is a cylindrical threaded column that is hidden inside the sphere. This is a very smart design that creates a very tidy and impermanent sphere.
A potential problem with this technique is that the flat side of the hemisphere can get distorted or have an “elephant’s foot” when it is printed as the first layer. Any minor distortion of this surface can create a very obvious flaw when the sphere is put together.
To avoid an elephant’s foot problem, you may need to increase the Z-height of your nozzle. The goal is to avoid over-extruding the first layer, which causes some distortion. Bed adhesion may suffer because of this solution, but this can be remedied by adding some glue or tape on top of the print bed.
Post-processing
Whether you printed the sphere as a whole or split it in half, you will have to do some post-processing to make it look great.
For spheres printed whole, the first order of business is to remove the supports. Hopefully, you were able to use dissolvable material. If not, a sharp utility knife or X-Acto knife should help you remove as much of the support structures as possible.
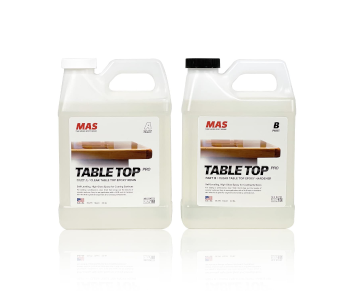
If you printed the sphere in two halves, then they will have to be put together first. Hopefully, there have been no distortions of 3D printing artifacts that will prevent the two halves from coming together perfectly. We recommend using an epoxy resin to glue the two halves together, as its thick application can also be used to hide minor imperfections.

The surface of the sphere will then have to be sanded smooth to hide any visible layer lines. You will need a complete sandpaper set for this. Start sanding at the low grit numbers until you are satisfied with the appearance, then move on to the next grit number in the set. Do not sand too fast – heat from the friction can cause the material to warp, ruining the perfect spherical shape.
Once you get to the 1000-grit sandpaper, it will be best to do the wet sanding method. Using sandpaper with water will help mobilize any dust and keep the surface of the plastic cool. This should help speed up the sanding process and produce a more consistent finish. Sanding with 2500-grit sandpaper should produce a very smooth and almost reflective surface.
Finally, apply some polishing compound on the surface of the sphere and buff it with a soft and clean cloth. The Turtle Wax polishing compound is as good an option as any. The compound will help fill in any imperfections that remain from the sanding process. The application of the polishing compound and subsequent buffing can be repeated until you’re satisfied with the results.
Take note that no level of post-processing can make up for a bad print. If there are sagging layers and major 3D printing artifacts, it is often better to go back to the drawing board and address them, rather than waste time sanding and polishing them until they are no longer visible.
Final thoughts
Spheres are some of the most common 3D shapes in the real world, making them prime options for designing 3D models. Unfortunately, 3D printing a sphere can be a surprisingly daunting task.
While it’s possible to 3D print an entire sphere with lots of supports, it is far more common to split a sphere into two hemispheres. This is easier in terms of the 3D printing process, although it makes the post-processing step a bit more involved.

