Anet A8 Review

The Anet A8 is a popular cheap 3D printer based on the Prusa i3 design. In most places, the A8 retails for around $150-200, with the price going as low as $130 during a big sale. Nope, that discounted figure is not a typo.
It’s important to judge the A8 based on what it can do for the cost and refrain from comparing it to other products that go for more than double the price. Because compared to, let’s say, the Original Prusa i3 MK3 and the Creality CR-10S, the A8 comes off as an underpowered machine with glaring limitations. But compared to other products in the same price range, it easily comes off as one of the top 10.
First of all, this Chinese 3D printer is a full DIY kit. This means it needs to be assembled completely from scratch. It doesn’t come in a semi-assembled package like the Monoprice Maker Select or the aforementioned CR-10S. Because of this, the A8 is not the most ideal starter 3D printer for a beginner – unless that person wants to learn about what makes 3D printers tick and is willing to do a lot of tinkering at the onset.
There’s a support group on Facebook dedicated to the A8 and other Anet 3D printers. It’s recommended that you check out some of the tips and advice posted there in order keep your mistakes to a minimum, especially during the initial setup. There are reports of this printer causing fires.
The Design
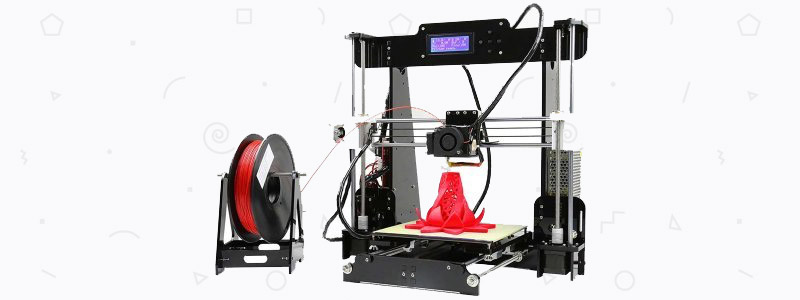
On the surface level, the A8 is not that different from other Prusa i3 clones. It has that familiar open-framed design that most people will instantly recognize. The most noticeable difference lies in the material used for the frame. Instead of aluminum, this 3D printer is housed in an acrylic frame – a red flag to most people since plastic frames are known for being less stable and a lot more fragile than all-metal frames.
The A8 has a single extruder setup and a heated print bed with an aluminum base. There’s an onboard LCD interface at the top of the frame. But instead of the usual knob input, the LCD interface is controlled using a set of small buttons right beside the screen. The buttons are a bit flimsy, though, and can be unresponsive at times.
Instead of being mounted at the top of the frame, the spool holder is separate from the main unit. This design choice is essential to keep the plastic frame from carrying too much weight – an excessive load on a not-so-stable frame can have a negative effect on the prints.
The A8 has terrible cable management – the cables are all over the place. Not to mention, the electronics are exposed. These issues need to be attended to as soon as possible. The messy cables, in particular, can get in the way of the moving parts or come into contact with the heating components, and that can lead to dangerous results.
The overall design of the A8 is … not pretty. Everything is bare. The silver lining here is that the exposed nature of the machine makes it easy and convenient to adjust the moving parts in case there’s something out of place. But most importantly, the open frame design makes the A8 easy to upgrade.
The Features
Similar to other cheap 3D printers, the A8 is not loaded with a lot of features – the thing doesn’t even have an actual power switch, which means the only way to power it down is to unplug it.
The biggest highlight here is the large build volume. This Chinese 3D printer is slightly more generous than most other Prusa i3 clones in the same price range. Having a large build space means you can print more complex 3D models. The A8’s large build volume becomes even more notable once you consider that most products that go for $200 or less are of the “mini” variety, such as the Monoprice Select Mini and the XYZprinting da Vinci Mini.
The A8 has an open filament system, accepting filaments from third-party sellers as long as the filament diameter is 1.75 millimeters. There’s none of that “Our product is optimized for our own filaments” thing from Anet. The Chinese manufacturer lets you use any filament on the market without any conditions or trade-offs that might cause you to look the other way. On a related note, the A8 is also open to different slicers and is compatible with some of the most popular slicers on the market.
For connectivity, the A8 offers the usual one-two combo of a USB connection and the ability to print without a computer through an SD card. This is a standard for Prusa-based 3D printers, although there are a few that offer the SD card option as an add-on instead of an out-of-the-box feature. It’s also possible to add a Wi-Fi option to the A8, but that will require a considerable amount of tweaking.
Lastly, the A8 doesn’t have automatic bed leveling technology, or even an assisted bed leveling system. The entire bed calibration process is done manually. But there are some resellers that offer units already equipped with automatic bed leveling technology, so there’s an option for those not willing to deal with the often daunting task of leveling the print bed.
The Setup
This is where things get really complicated. Setting up the A8 is no easy task. The entire assembly and initial setup can stretch out to several days, even an entire week. It requires a lot of patience, maximum effort, and the ability to not throw something at the wall at the first sign of trouble.
The A8 arrives in a well-secured package, with all the parts separated into three sections inside the box and labeled accordingly. There are a lot of parts in play here, ranging from the big frame pieces down to the nuts and bolts. Everything you need to assemble the A8 is included in the box, including some tools and extra parts. There’s no need to solder anything or bring out a heavy-duty equipment for the job.
The first thing you’ll notice is that there’s no printed instruction manual anywhere in the package. Customers have been caught off-guard by this, with some even going into full-on panic mode the moment they realized there’s no physical instruction manual. But don’t worry, there’s an instruction manual included on the SD card, along with links to videos.
For the most part, the assembly instructions are relatively easy to follow, but there are areas that definitely need to be more detailed, especially the ones related to the print bed and the positioning of the rods. There’s a small margin for error during the assembly process, so it’s best to always double-check everything before you move on to the next step.
Perhaps the most annoying part of the initial setup is not related to the actual assembly itself. The plastic parts of the 3D printer are covered with protective tapes, which need to be removed before you start putting things together. There’s a lot of protective covers all around, so removing them can be really time-consuming. But while some people have expressed frustration at the task, others felt grateful that Anet made the effort to make sure the plastic parts don’t get scratched during shipping.
Once the protective covers are off, the assembly begins. As mentioned above, there are a lot of parts involved here. Take the assembly one step at a time and pay close attention to the instructions. If a specific instruction doesn’t make sense, don’t force the issue. Instead, check out tutorial videos on the internet or ask around on the Facebook user group about what needs to be done. It pays to be extremely meticulous during the assembly because even a single error can lead to a completely non-working 3D printer in the end.
In all, the entire assembly process can take anywhere between six hours to 12 hours, depending on your aptitude with electronics and whether or not you already have experience with 3D printers. After the assembly, there are a couple more things to attend to, both of which can be a pain the butt.
First, there’s the manual bed calibration. As noted in the features section, the A8 has no automatic bed leveling technology. Leveling the bed is really tricky, so don’t expect to get it right the first time, even if you have extensive experience with 3D printers and manual bed leveling. And second, there’s the filament loading, which is also a tricky affair. It’s difficult to insert the filament into the feeder. In the worst case scenario, you will have to remove some parts to get it right.
The A8 comes with a few test models on the SD card, as well as a sample filament. Once you’re done with the lengthy assembly process and the initial calibration, you can start printing right away. Some customers have reported not getting any sample filament in the package, though. Regardless, it’d be great if you already have a fresh roll of filament standing by because the sample filament isn’t really on the generous side.
If you think the entire initial setup sounds complicated and time-consuming, that’s because it is. If you’re expecting to have a smooth time throughout the entire process, then you’re in for a rude awakening. On the bright side, assembling the A8 will teach you a lot about how 3D printing works and the roles of each part of a 3D printer. The lessons you learn will prove valuable down the line when problems start popping up.
The Performance
Out of the box, the A8 is very limited. It’s practically limited to PLA, for one. Using the default print settings, the A8 can successfully print one of the small test models on the SD card, but the print quality is not good. It’s what happens after just a small amount of tinkering that will surprise you.
If you tinker with the print settings and make sure all the parts are configured correctly, especially the print bed, the A8 can produce results with a considerable jump in print quality. The edges become noticeably smoother and the details become more pronounced.
But for the best results, the A8 needs a significant amount of upgrades in almost every area. The A8 has a reputation online for burning down half a house. Like, seriously. It appears that, out of the box, the A8 has overheating issues and lacks the right amount of cooling, especially for long prints. Some of the immediate upgrades needed for the A8 include: getting a MOSFET mod and another power supply unit, replacing the extruder with something more capable, and going for a glass print bed.
Seriously, there’s a lot of work that needs to be done before the A8 can become a safe machine to use and produce the kind of results that you can proudly show off at online 3D printing forums. The good news is there are lots of guides online about how to take the A8 to top form.
The Verdict
| Tech Specs |
|---|
| Resolution: 100 microns |
| Volume: 8.7 x 8.7 x 9.4 in |
| Filament: 1.75 mm |
| Types: ABS, PLA, PETG, and others |
| Weight: 18.7 lb |
| Connect: USB, SD card |
| The Pros |
|---|
| Ridiculously low price |
| Great community |
| Heated print bed |
| Onboard LCD interface/td> |
| Easy to upgrade |
| Open filament system |
| Compatible with different slicers |
| Large build size |
| Includes tools, spare parts, sample filament, and test models |
| The Cons |
|---|
| Needs a lot of mods |
| Acrylic frame |
| Poor cable management and exposed electronics |
| No printed instruction manual |
| Bed leveling and filament loading can be frustrating |
The Anet A8 is not for everyone. It’s a budget 3D printer that requires a significant amount of mods out of the box, not only for performance improvement but also for safety purposes. But once fully optimized, it brings excellent long-term value and turns into a total workhorse capable of producing 3D models with impressive print quality. But make sure you are perfectly willing to do a lot of tinkering and are prepared to run into dozens of failures before you commit to this cheap DIY kit.
Rating: 3.9/5
This is the most DANGEROUS and convoluted printer ever made, STAY AWAY FROM IT. The firmware that is shipped with it has issues with creating fires and all sorts of things, it will not run out of the box! This requires extensive modifications and firmware updates just to get a print, complete waste of money.
The design is sketchy at best, the tolerances are no where near what they claim.
could you elaborate just a bit, i have recently made the purchase and have spent the last 2.5 days putting it together and i still have not been successful in a actual print.
thank you in advance.
Bought this Last week, it came yesterday, took me aproximately 3-3.5 hours to assemble it, and after i changed some of the print settings i had succesfully made it print one of the test models that was in the included sd-card.
Having limited 3D print skills ,and an old xineo printer I purchased an Anet a8 plus….biggest mistake ever, It will not print anything no slicer or computer interface will make it work ,Marlin fails even a motherboard change did nothing ,random off bed extruding and unrecognizable prints are all it can do .