How to Build a Drone from Scratch (with a Parts List)

Why build a drone from the ground up when you can buy one off the shelf that’s ready to fly (RTF)? Heck, it seems like a lot of unnecessary hassle for most people. Then there’s the time involved and potential frustrations, especially at the beginner level. Well, there are many reasons, and this section highlights the most significant ones. It also looks at the pros and cons of building a quadcopter.
The points below underline some of the reasons drone enthusiasts take the DIY route:
- Immense pride and satisfaction from creating your own quadcopter
- Own a flying robot that’s 100% unique to you
- Get to select high-quality parts and materials
- Choose the camera and gimbal and how they function
- Control the payload (amount the drone can lift and still fly well)
- 100% upgradable; easy to source and replace parts
- Save money on costly flight batteries
- Fun and rewarding experience
- In-depth knowledge makes you a better pilot
Drones come in three flavors, consumer, commercial, and military. This guide focuses on consumer quadcopters for recreational and light commercial use.
When Not to Build a Quadcopter
OK, anyone can have a go at building a drone, but it’s not such a good idea for the raw novice. That doesn’t mean the total beginner can’t—it just suggests the process is difficult. Folks with an understanding of how quadcopters fly are off to a much better start. Flying experience is also useful as those maiden flights can be quite nerve-racking.
Don’t build a flying robot if all you want to do is get out there and have fun. Seriously, public drones these days are both affordable and feature-packed. It makes no sense to build a drone unless you want to. The opening paragraphs outline the reasons why so many choose to do just that.
Kit Vs. Building from Scratch
Consider a kit if time is short or you want a more straightforward introduction to building a drone. The Do It Yourself (DIY) projects are like drone jigsaws. By that, I mean all the parts you need are in the box ready for assembly. They can be great fun—especially for newbies—but the drones are not 100% unique. Many kits allow for customization, but they’re still pre-modeled quads.
The most ambitious drones are the ones you envisage and then make a reality. There isn’t a boxed kit to assemble. You must source all the parts individually when you construct a drone from scratch.
Don’t Struggle Alone
Reading an online guide is a great start, but there’s no feedback if you get into difficulties. Some of you will sail through building a drone while others are sure to face problems. The key here is not to struggle alone. There are many helpful online communities for amateur drone enthusiasts. Just find one you like, sign up, make new friends, and become an active member in this exciting hobby.
1. Drone Terminology Defined
There are a lot of abbreviations and acronyms in the world of drones. This segment highlights the most common. You may want to print this list out if you’re unfamiliar with the terminology. My guide focuses on quadcopters, but I’ll run over all types here for reference.
DRONE BASICS
Drone at the consumer level, is the term used to refer to multirotor aircraft.
UAV is an acronym and general term that stands for Unmanned Aerial Vehicle.
DIY is an acronym for Do It Yourself. In this case, that’s building a drone from a kit or a custom craft from scratch.
DRONE PROPULSION
ESC is an acronym for Electronic Speed Controller. An ESC helps manage speed. It works in conjunction with the quad’s flight controller, motors, and flight battery.
Motors: Drone motors rotate the propellers.
Prop Adaptors, also called prop drivers or shaft adaptors. These secure a quadcopter’s motor to its propellers.
PCB is an acronym for Printed Circuit Board and is made from thin fiberglass. The PCB accommodates essential components held in place by regular solder.
PDB is an acronym for Power Distribution Board. The PDB supplies (splits) an electrical feed from the battery to individual devices. It also works as a protective circuit breaker or fuse for circuits within an enclosure.
LiPo is an abbreviation for Lithium Polymer. It has become the universal battery of choice to power quadcopter drones. LiPos are popular because they’re ultra-lightweight and release plenty of electric current.
SENSORS
Sensors are subsystems or modules typically found in the nose of a drone. They detect and read environmental changes and pass that data on to other electronics.
Gyroscopes exist to help the quad fly in a stable manner. They measure the rate of change in angular velocity on the XYZ axis.
GPS is an acronym for Global Positioning System. A drone’s GPS sensor communicates with satellites and relays information to the pilot. There are several benefits to GPS. Some examples are setting coordinates, added flight stability, and Return to Home (RTH). GPS can also notify users of any no-fly zones.
Accelerometer is a sensor used to measure the quad’s vibration and liner acceleration, or its rate of change of velocity.
Barometer sensors gauge the drone’s height above the ground. It works by measuring the air pressure which changes with the craft’s altitude.
VIDEO AND CAMERAS
FPV is an acronym for First Person View. FPV lets pilot see what the drone’s camera sees in real-time via a live video feed. You can experience FPV on a smartphone, tablet, or an external monitor. Some remote controls (RC) have integrated screens. The most immersive FPV experience is with FPV goggles.
LCD is an acronym for Liquid Crystal Display. LCDs can display images from a receiver along with essential flight data. And LCDs on smart devices work with flight apps to control drones.
Gimbals hold and stabilize the drone’s camera during flight to ensure smooth, steady footage.
PREASSEMBLED CONSUMER DRONES
RTF means Ready-to-Fly. RTF RC quadcopters arrive fully-assembled and ready to use straight out of the box. A box typically includes the drone, battery, transmitter, and instructions.
BNF means Bind-N-Fly. BNF quadcopters arrive with everything in the box aside from a transmitter. You must source the transmitter separately and bind it to the aircraft.
ARF means Almost-Ready-to-Fly. ARF drones usually need a few extra parts and a little basic assembly before they can fly.
TYPES OF DRONES
Multirotor is a general term used to describe any multiple-rotor aircraft (more than two).
Tricopter drones have 3 motors/propellers.
Quadcopter drones have 4 motors/propellers and are the focus of this guide.
Hexacopter drones have 6 motors/propellers.
Octocopter drones have 8 motors/propellers.
DRONE PARTS/MECHANICS
COG is an abbreviation for Center of Gravity. It’s the balance point of a quad and where there’s an equal distribution of weight on every side. The COG has a significant impact on the craft’s flight performance and must be spot-on.
Size has two meanings. One is the precise distance between two drone motors. The typical unit used to measure this is millimeter (mm). The other size identifies smaller drone types. The typical ones include Mini, Micro, Nano, and Whoop quadcopters.
Frame is the drone’s skeleton and the structure that accommodates all the essential parts. It also provides protection.
Landing Gear safeguards the fragile hardware by cushioning the landing. A quadcopter’s undercarriage typically uses legs as takeoff and landing are vertical. This gear can be metal, plastic, rubber, or a combination. Some camera drones use retractable landing gear to keep the legs out of view when filming.
Prop Guards serve two purposes. One, they help to protect the propellers in the event of a collision. Two, they protect the operator’s fingers from fast-spinning blades.
Shell refers to the drone’s outer cover and may include one or a few materials. The better the shell, the more protection it provides. A shell’s aerodynamics, weight, and aesthetic design are other considerations.
Dampeners are specially molded rubber components used to dampen vibrations.
LED is an acronym for light-emitting diode. Colored LED lights look cool. The brighter ones can enable night flying. One practical use for ultra-bright lights is search and rescue.
Transmitter (TX) is a handheld box used to control the drone via sticks, dials, and switches.
Receiver (RX) is a hardware device or module that receives signals from the transmitter. It passes the information to the quad’s flight controller which then moves the drone.
USB is an acronym for Universal Serial Bus. A USB key lets pilots save aerial photos and video.
2. Preparing to Build Your Drone | Essential Parts
You need to decide what kind of quadcopter you want to build. That includes things like size, power, aerial filming capability, speed, and so on. For example, racing quads have a completely different setup to slower aerial filming drones. Do you want a big stable bird or something more portable? Read this guide if you’re unsure as it will help you to make a more informed decision.
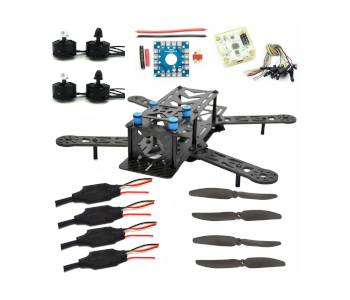
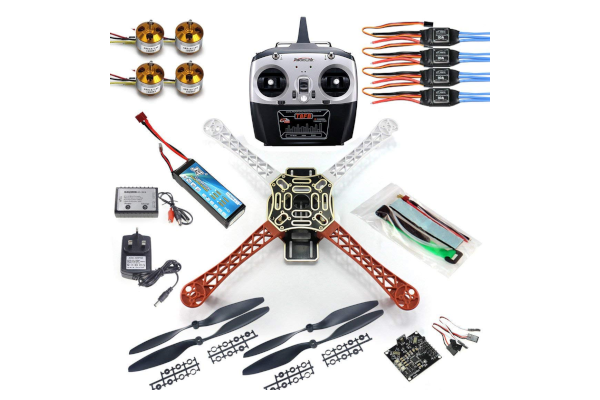
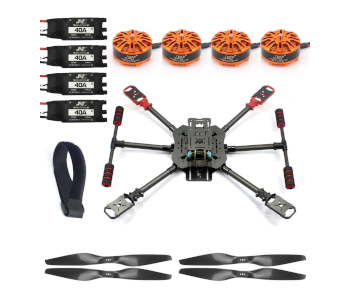
The 10 Point Shopping List
The essential parts list becomes a simple box-checking exercise once you know of what you need. The list of drone parts below break down the names of each piece needed to build a drone. Refer to the previous section if you need a recap on any of these items.
- Quadcopter frame; consider size, type of quad, and materials, etc.
- Four motors, brushless or brushed? See the next section
- ESCs (Electronic Speed Controllers)
- Propellers: must be an exact match for the frame; think about materials
- Connectors. See below for sizes
- Flight battery / battery monitor (optional)
- Mounting pad
- Radio controller (RC) and receiver
- Aerial camera if applicable
- USB key for saving video and stills if applicable
OK, let’s run through why we need each of the above parts.
Frames and Motors
You can buy a frame or make one yourself. Either way, think carefully about the materials and don’t rush into buying the frame. It’s a whole new topic, and you need to research what size and material best suits your needs and why. You also need four motors for a quadcopter. Consider brushless options over brushed as they’re quieter, last longer, and require no maintenance.
ESCs and Propellers
You want four Electronic Speed Controllers (ESCs). Make sure the ESCs provide the correct voltage. They must also handle the highest current consumed by the quad’s motors. Ask your drone community if in doubt. Next up are the propellers, but they’re not all equal. The crucial thing here is that the props you choose are a perfect match for the drone’s frame. Think about the prop materials as well.
Connectors, Batteries, and Mounting Pads
Use 3.5mm connectors to solder to the motors and ESCs. Choose 4.5mm connectors for your PDB or power distribution board. The PDB is what connects the ESCs to the drone’s battery. Batteries can vary greatly. You’ll most likely opt for LiPo but consider its capacity. You may also want to invest in a battery monitor so that you can keep an eye on its power level.
A decent mounting pad vastly reduces vibrations and thus makes flights smoother. It’s an essential part if you plan to take quality aerial photos and video.
RC Controllers and Receivers
A handheld radio controller (RC) commands the quadcopter motors based on user input. There are plenty of capable options to choose from that we’ll look at later.
Sensitive receivers hear better which means signals can travel further. It’s not that cut and dry, though, as overly sensitive receivers are prone to pick up more noise. The ideal radio setup depends on your drone and expectations.
Cameras and Storage
There are many aerial cameras available to drone builders. The price, quality, and capability can vary enormously. Some people already have GoPro and other action cameras they can use. Cameras are personal decisions and serious considerations at the design stage. Think also about First Person View (FPV) capability if that’s important to you. Don’t forget the USB key to store your video and photos.
I list a few possible options for consideration later in the guide.
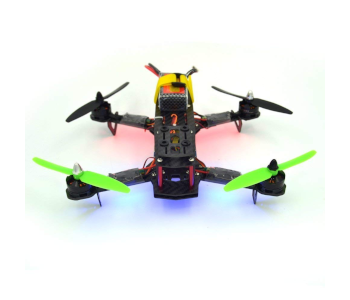
3. Your Logical Guide to Building a Drone
You can build any drone with a little knowledge. For this guide, though, the focus is on the popular quadcopter. Most enthusiasts find quads more convenient. They have plenty of online support, and they’re easy to pilot. I recommend quadcopters if it’s your first DIY drone project. This section gives a rundown on how to build one of these flying robots.
Step 1. The frame
Quadcopter frames are the shape of an X, and each propeller sits on an X point. The two primary considerations for these structures are size and materials. The size can range from nano/micro models to ones the size of an armchair and everything between. Once you know the size, it’s time to consider the materials. Opt for the trusted favorites like plastic, aluminum, wood, or carbon fiber.
The table below is a general guide to frame sizes:
| FRAME SIZE (WHEELBASE) | PROP SIZE | MOTOR | kilovolt (kV) |
|---|---|---|---|
| 100mm | 2 inches | 1102 – 1104 | 6000+ |
| 120mm | 3 inches | 1104 – 1106 | 4000+ |
| 150mm – 180mm | 4 inches | 1306 – 1408 | 3000+ |
| 200mm – 220mm | 5 inches | 2204 – 2306 | 2100 – 2800 |
| 235mm – 280mm | 6 inches | 2205 – 2308 | 1600 – 2500 |
| 330mm – 350mm | 7–8 inches | 2208 – 2212 | 1500 – 1600 |
| 450mm – 500mm | 9-10 inches | 2212 – 2216 | 800 – 1000 |
Below are some quality premade frames to consider if you don’t want to build one from scratch.
- iFlight XL5 Lowrider V3 5.5” Carbon Fiber FPV Frame
- Readytosky 220mm Carbon Fiber FPV Drone Frame
- Readytosky S500 FPV Quadcopter Carbon Fiber Frame Kit w/ Landing Gear
- RipaFire® Multi-rotor F450 4-Axis Airframe
- Usmile 210mm Mini Quadcopter X Style Carbon Fiber Frame
Point to note: The size of your frame influences the size of the motors and propellers.
Step 2. The motors
Quadcopter motors are the power that lifts the frame laden with its essential components. Their job is to spin the propellers. Motors with higher kilovolt (kV) ratings spin the fastest. Those with the most power can support larger props—it’s as simple as that.
Make precise holes in the frame to accommodate each motor if they’re not pre-drilled. The four motors should secure easily using the proper screws and a regular screwdriver.
You can choose between brushed DC (older technology) and brushless motors for your quad. Brushless motors are the better options, but they do cost more. Brushless technology is more efficient, more powerful, quieter, and longer lasting. Below are a few examples:
- Emax 4pc RS2205 2600KV (Brushless)
- Crazepony 4pcs EMAX RS2205 2300KV (Brushless)
- iFlight 4pcs XING T2306 2450KV (Brushless)
- Crazepony 4pcs 1104 8700KV 2S (Brushless)
- BETAFPV 4pcs 0703 Motor 19000KV, Tiny Whoop (Brushless)
Point to note: Make sure the motor’s wires face inward before you secure them to the frame.
Step 3. The ESCs
Next are the Electronic Speed Controllers or ESCs for short. Attach the ESCs underneath the frame as this allows more room at the top for other components. The usual way to secure the ESCs to the frame is by using zip ties.
Below are a couple of examples though the choices are vast so take your time:
- Nidici BLHeli_32 Bit 35A ESC 2-5S Brushless ESC
- 35A Brushless ESC, Rcharlance BLHeli_S 32 Bit 35A 2-5S ESC
Point to note: You have two options for ESCs in that you can use four or a 4-in-1 controller.
Step 4. The propellers
The propellers you use depends on the size of your quadcopter. The quality is not equal with some being flimsy and brittle and others super durable. Either way, props are not expensive so try not to skimp in this area. The best performing blades are carbon fiber. Many propeller brands state their compatibility with specific drones, but they may fit your motors. Refer to the table above for guidance.
Here are a few examples of quadcopter propeller types and costs:
- Amyove 10″ Carbon Fiber Propeller Blade for Multicopter
- AxPower 2 Pairs Quick Release Low Noise Drone Propellers
- Master Airscrew Performance 1245 Black Propellers for VTOL drones
- Myshine 9450 (2 pairs) Self-tightening Propellers
- RCGEEK Low Noise Night Cruise Flashlight Props
Point to note: Drone propellers spin clockwise (CW) and counterclockwise (CCW). Most parts have markings to state the direction. Be sure to do a visual check if they don’t.
Step 5. The landing gear
Now it’s time to add the landing gear. Landing apparatus protects your quadcopter by reducing the shock as it touches down. It’s especially vital when landing on harder surfaces. You can be creative and build landing gear with PVC pipe, carbon, metal, and rubber. Reach out to the online community for ideas and guidance if you need it.
Point to note: Choose a premade frame that includes landing gear if you don’t want to build one.
Step 6. The flight controller
By now your construction should start to look like a proper quadcopter, but there’s still work to do. All drones need a flight control system with sensors to help stabilize flights. The controller reads signals from the receiver and determines the craft’s movements. You can attach the receiver to the flight controller. Check and double check that the connections are secure and tight-fitting.
It is possible to build a flight controller though it’s not a job for the faint-hearted. Note that elaborate flight controllers have more features but are harder to install. If it’s your first ever project you may want to buy one that’s ready to use. Below are a few examples:
- DJI Naza-M Lite Multi-Rotor Flight Controller System
- APM2.8 ArduPilot Flight Controller
- Swiftflying KK 2.1.5 LCD Multirotor Flight Control Board
- Radiolink Pixhawk PX4 32 Bit ARM Flight Controller
Point to note: Make sure your flight controller has plugs to accommodate the quad’s ESCs.
Step 7. The radio control (RC) system
The radio controller is essential for flying and controlling your new drone. How much functionality you need depends on your quadcopter setup and expectations. You want at least four channels (CH) to control yaw, pitch, roll, and throttle. You need more channels if your drone carries a camera.
Range considerations
The range is the distance the quad can fly from its controller (transmitter). The radio control system also determines the range. There are legal limitations, but no one wants to fall short on how far their drone can fly. The control distance depends on three factors:
- The output power of the transmitter
- The sensitivity of your chosen receiver
- The antenna quality at both ends (drone and controller)
Some reputable transmitter/receiver brands are FlySky, Radiolink, CoolRC, Spektrum, and Turnigy. There are others too, so shop around and read the reviews. Below are a few worthy models:
- FrSky 2.4G ACCST Taranis Q X7 16CH Transmitter
- FrSky Taranis X9D Plus 16CH 2.4ghz Transmitter
- GoolRC RC Receiver and Transmitter MC8B
- Radiolink AT9S 10CH RC Transmitter and Receiver
- Spektrum DX6E 6Ch Transmitter
Point to note: Check the available receivers for your transmitter. They mustn’t be too big if you have a mini-quad. Likewise, you don’t want a tiny receiver that lacks range for a bigger drone.
Protecting your quad’s antennas
I want to mention something about protecting a drone’s antennas before we go to step 8. Antennas tend to jut out and are prone to catching branches and other nearby obstacles. They’re the second most commonly replaced part after propellers. The damage typically occurs at the connector end.
One way to protect the antenna is to secure it to the frame using a zip tie just beyond its connector. You can also use a flexible antenna mount for a cleaner, less botched look. Either way works.
Types of antenna
Not all antennas are the same, not in price, quality, or functionality. There’s isn’t a perfect antenna to suggest as they all serve different purposes. Just stay away from ultra-cheap ones whichever type you choose. I’ve listed the 7 types of antenna for you to research for your custom quadcopter.
- Skew Planar / Cloverleaf
- Monopole
- Dipole
- Pagoda
- Helical
- Patch
- Antenna Diversity (uses two antennas for improved performance)
Point to note: Match the radio system with your quad and personal expectations before you buy anything. Consider frequency, power, channels, camera demands, and FPV if applicable.
Step 8. The flight battery
You can attach the flight battery to the receiver and hook it up to the flight controller. Some quads have fixed (built-in) batteries. It’s one way to keep them secure, but it’s hardly practical. Drones are notorious for short flight times, so swappable batteries are the preferred option. The favorite ways to secure a battery—top or bottom—is to use Velcro or foam. You’ll need a battery strap for the latter.
Remember to consider the battery type and its size. The size relates to its physical dimensions and its capacity. It’s best to go with a reputable brand when choosing a battery for your quad. Make sure it has reliable connectors too. There’s much to know about the inner workings of batteries, including charging and storage. Read our guide on battery types if you need to make better sense of it all.
Point to note: Some quad designs have the battery on the top. In this case, the locking mechanism needs to be below the plate. This method prevents the zip tie from digging into the battery.
Step 9. Pre-flight checks and flight Test
Building your drone should not be too difficult if you prepared well. Benjamin Franklin once said: “By failing to prepare, you are preparing to fail.” That applies to building a drone as with anything else.
Here are a few essential pre-flight checks that apply to all drones:
- CHECK: Weather is suitable for maiden flight
- CHECK: All parts are secure, including props
- CHECK: Controller is properly organized (matches receiver)
- CHECK: Motors and props respond and function well to commands
- CHECK: Signal and satellite strength is okay
There may be other checks depending on your custom drone. The point is to know how pre-flight checks apply to you and your flying quadcopter. Some checks are logical and others less so. Ask someone to help if you’re not confident to perform those first flight checks and the maiden flight.
That’s it. You should now be the proud owner of a custom-made quadcopter. It’s an incredible feeling, and you’re sure to experience some pre-flight jitters. It’s all part of the fun. It won’t be the last model you build—not if you get the bug. It’s the start of an exciting journey guaranteed to open new horizons. You’ll be part of a growing community where likeminded others meet from around the globe.
Good luck, and welcome to the world of custom drone building.