
5 Best Accurate Display Colorimeters

If you want to properly calibrate your monitor or laptop and make it as color-accurate as possible, you’ll need a colorimeter. Using a colorimeter to calibrate a display is faster and more accurate than using a software-only calibration tool or manually adjusting the color settings based on your own perception.
But shopping for the best display colorimeters can be confusing (although not as much as when shopping for the best monitors for photo editing). There are only a few products that are worth the money. If you are in the market for a colorimeter that offers good value, this guide is for you.
| Budget |
|---|
 |
| X-Rite ColorMunki Smile |
| 3.7/5.0 |
| Features: Basic |
| Calibration Speed: 5-10 min |
| It’s easy to set up out of the box. |
| Check Amazon |
| Best Value |
|---|
 |
| Datacolor SpyderX Pro |
| 4.1/5.0 |
| Features: Advanced |
| Calibration Speed: 1-2 min |
| It supports latest display technologies. |
| Check Amazon |
| Top Pick |
|---|
 |
| Datacolor SpyderX Elite |
| 4.3/5.0 |
| Features: Expert |
| Calibration Speed: 1-2 min |
| Has lots of calibration setting options. |
| Check Amazon |
What is a Colorimeter and Why You Should Use It
A colorimeter is a piece of hardware used to properly calibrate a monitor or a laptop screen. Using a specialized sensor, it reads a specific set of colors displayed on the screen by its accompanying software. The software then changes the color values from what the sensor picked up into what they should be based on an established standard, creating a color profile that can be applied to the display.
Since many monitors are not factory calibrated, a colorimeter is essential for professional photo editing, graphic design, and other color-critical work. Even if a monitor has excellent color accuracy out of the box, it’s still recommended to use a colorimeter just to be sure.
With a colorimeter, you can rest assured that your images will be seen in other color-managed outputs just the way you see them on your monitor. If you process an image on a non-calibrated display and send it to a client who uses a color-calibrated display, the colors on your image will look off, and that’s something you don’t want to happen.
For printed media, using a colorimeter to calibrate your monitor is essential if you want your printed image to match the image on your monitor. If your images will be mostly posted on the internet, calibrating your monitor is still important, even though many people won’t be able to see your images the way you want them to be seen because they are using a non-color-calibrated display. If your monitor is properly calibrated, you’ll be able to establish a more consistent working environment.
Keep in mind that screens don’t retain their colors forever. After some time, the colors will start to shift, so you’ll need to re-calibrate your screen on a regular basis. For professionals, re-calibrating your screen at least once a month is recommended.
There are different display colorimeters on the market. Some products are designed specifically for professional use while others are built for hobbyists. The biggest difference between budget and high-end models are the available features on the software side – the more expensive the product, the more features or calibration options included.
How to Use a Colorimeter
While they seem complicated on paper, colorimeters are actually straightforward to use, with the entire calibration process usually only taking around 10 minutes or less, not including the software installation. It’s recommended to go through the calibration process in a room with controlled lighting, with screen glare reduced as much as possible. You also need to let your monitor warm up for at least 30 minutes and reset the monitor settings to default before calibrating it.
The first step is to plug the colorimeter into a compatible USB port. Once you have installed the software and initiated the calibration process, you will be asked to change some of the monitor settings – such as the brightness – and specify your preferred calibration settings.
After going through the calibration settings, you need to place the colorimeter on the screen by hanging it over the display. The colorimeter usually has some form of counterbalance in the cord to prevent it from sliding or falling from its position. Once it’s secured, all you need to do is initiate the actual calibration process, during which your monitor screen will display a set of colors, with a progress bar to keep you updated.
When the calibration is finished, the software will ask you to save the newly created color profile, which can be activated or deactivated anytime. You can also view sample images to see the differences between pre-calibrated and post-calibrated colors and set future calibration reminders – although the actual options depend on the product. And that’s it. Sounds easy enough, right?
Display Colorimeters Comparison Table
| Make and Model | Rating | Features | Calibration Speed | Ambient Light Sensor | Connector | Price |
|---|---|---|---|---|---|---|
| Datacolor SpyderX Elite | 4.3 | Expert | 1-2 min | Yes | USB-A | Check Price |
| X-Rite ColorMunki Smile | 3.7 | Basic | 5-10 min | No | USB-A | Check Price |
| Datacolor SpyderX Pro | 4.1 | Advanced | 1-2 min | Yes | USB-A | Check Price |
| X-Rite ColorMunki Display | 3.9 | Advanced | 5-8 min | Yes | USB-A | Check Price |
| X-Rite i1Display Pro | 4.0 | Expert | 5-8 min | Yes | USB-A | Check Price |
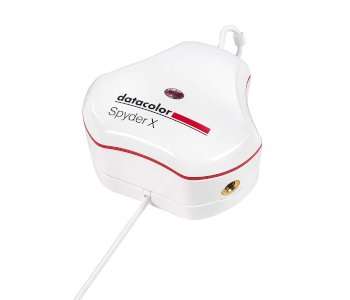
1. Best Pick: Datacolor SpyderX Elite
Editor’s Rating: 4.3/5
The Datacolor Spyder series colorimeters are the most popular on the market. Considering their accuracy and speed, it’s not that hard to see why they have a big reputation. And with the recently released Datacolor SpyderX Elite, that reputation won’t be going away anytime soon.
Selling for just under $300, the SpyderX Elite is a well-designed unit, featuring a clean white casing with red and black trims, which easily set it apart from the all-black Spyder5 series. As usual, it connects using a USB cable and comes with a cover that doubles as a counterbalance when the colorimeter is hanging on a display. It has a built-in ambient light sensor out front.
Featuring an easy-to-use software, this newest iteration of Datacolor’s popular monitor calibration tool allows for faster calibration. The entire calibration process (not including the initial software setup) only takes less than two minutes, which is incredible. You can check the pre-calibration and post-calibration colors of your display using your own uploaded images. You can also check how your images will look like when printed on a specific printer.
Overall, the SpyderX Elite is the best display colorimeter on the market. It has more calibration setting options than the cheaper SpyderX Pro and can also be used to calibrate digital projectors. If you can spend around $300 on a colorimeter, go for the SpyderX Elite.
| Tech Specs |
|---|
| Features: Expert |
| Speed: 1-2 min |
| Ambient Light Sensor: Yes |
| Connector: USB-A |
| The Pros |
|---|
| Incredibly fast calibration speed |
| Lots of calibration setting options |
| Supports latest display technologies |
| Soft proofing feature |
| User-friendly software |
| The Cons |
|---|
| Expensive |
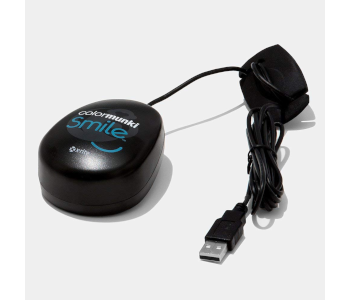
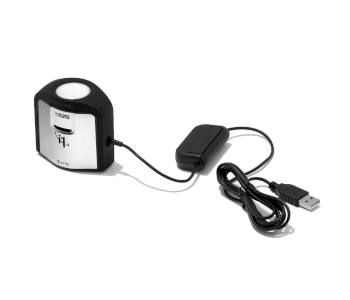
2. Best Budget: X-Rite ColorMunki Smile
Editor’s Rating: 3.7/5
Selling for less than $100, the X-Rite ColorMunki Smile is a recommended product if you want a basic colorimeter for your monitor or laptop. Unlike our top pick, it’s not designed with professional use in mind and is more suitable for those who edit photos as a hobby.
The ColorMunki Smile has a plain design. It comes with an overly simple software with limited options to choose from, especially compared to the other products on this list. While unimpressive in terms of features, this colorimeter is easy to set up and will only require a few minutes for the initial setup. The calibration speed is around five to 10 minutes, which is good but not as fast as more recently released colorimeters.
If you don’t want to spend over $100 on a display colorimeter, check out the ColorMunki Smile, which is almost $200 cheaper than our top pick. It’s not loaded with features, which isn’t surprising for a basic product, but it’s good enough for non-professional use.
| Tech Specs |
|---|
| Features: Basic |
| Speed: 5-10 min |
| Ambient Light Sensor: No |
| Connector: USB-A |
| The Pros |
|---|
| Budget-friendly price |
| Good calibration speed |
| Easy to set up out of the box |
| The Cons |
|---|
| Limited features |
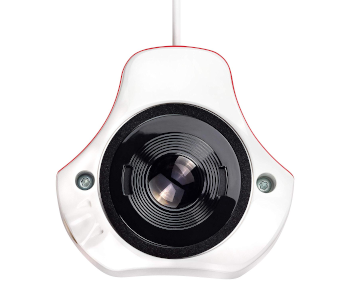
3. Best Value: Datacolor SpyderX Pro
Editor’s Rating: 4.1/5
The Datacolor SpyderX Pro is basically the Datacolor SpyderX Elite with fewer features on the software side. It’s around $100 cheaper, which puts it in the same price range as budget IPS monitors for photo editing like the Dell P2417H.
Regarding the hardware calibration tool, the SpyderX Pro uses the same colorimeter as its more expensive version, so don’t worry about getting a stripped-down colorimeter if you go for the cheaper product. This latest colorimeter from Datacolor is faster and more accurate than all previous versions in the popular Spyder series, with the calibration process taking less than two minutes.
Compared to the SpyderX Elite, the SpyderX Pro has fewer features on the software side, with only 12 calibration setting options to choose from (instead of unlimited) and no soft proofing feature, which might disappoint those who mainly work in printed media. The display performance analysis tools are also more limited, but the good news is that the interface is still user-friendly.
A suitable colorimeter for serious photographers and graphic designers, the SpyderX Pro is a great product overall, offering good value for the money. If you want a reasonably priced and reliable colorimeter with nice features, this product is for you.
| Tech Specs |
|---|
| Features: Advanced |
| Speed: 1-2 min |
| Ambient Light Sensor: Yes |
| Connector: USB-A |
| The Pros |
|---|
| Very fast calibration speed |
| Supports latest display technologies |
| Easy initial setup |
| User-friendly software |
| The Cons |
|---|
| Fewer features compared to SpyderX Elite |
4. X-Rite ColorMunki Display
 View on Amazon
Editor’s Rating: 3.9/5
The X-Rite ColorMunki Display is a good alternative to the Datacolor SpyderX Pro. It sells for about the same price, so the price difference won’t be a factor when deciding between them (well, unless one of them is heavily discounted). It’s a recommended calibration tool for serious photographers and graphic designers, offering a decent selection of options.
Featuring a minimalist casing, this colorimeter has a good build quality and will not look out of place with all your other photography equipment. It has an ambient light sensor and features a built-in cover/stand that allows for easy positioning when calibrating a projector. It connects using a USB cable and includes a counterbalance in the cabling for when calibrating a monitor or laptop.
While not as extremely fast as the Datacolor SpyderX series, this X-Rite display calibration tool offers a great calibration speed, with the process taking just around five to eight minutes. It compensates for screen glare, which can be an issue when calibrating a display. The software has a decent amount of options to choose from – which can’t be said for the stripped-down software of the cheaper X-Rite ColorMunki Smile – but the user interface could be improved.
All in all, the ColorMunki Display is a good product. It’s an accurate and reliable colorimeter that will work well for serious photographers. If you don’t like the Datacolor SpyderX Pro, check out this similarly priced product instead.
| Tech Specs |
|---|
| Features: Advanced |
| Speed: 5-8 min |
| Ambient Light Sensor: Yes |
| Connector: USB-A |
| The Pros |
|---|
| Great calibration speed |
| Screen glare compensation |
| Decent selection of calibration options |
| Easy to set up |
| The Cons |
|---|
| User interface could be improved |
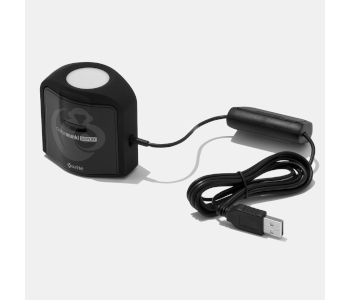
5. X-Rite i1Display Pro
 View on Amazon
Editor’s Rating: 4/5
If you can spend more than $200 on the best display colorimeters, the X-Rite i1Display Pro – which is a bit cheaper than our top pick – is another good option. Similar to the more recently released Datacolor SpyderX Elite, this product is intended for professional use.
The colorimeter design is the same as with the cheaper X-Rite ColorMunki Display, featuring a cover that doubles as a mini-stand when calibrating a projector. Like with the other products on this list, the connector is a USB Type A or USB-A.
Featuring a fast calibration speed, the i1Display Pro is an accurate display calibration tool that offers a good selection of features – including screen glare compensation and ambient light monitoring. But as with the ColorMunki Display, the user interface could be improved.
Overall, the i1Display Pro is one of the best display colorimeters on the market. While it has its fair share of flaws in the software department, it can get the job done. It’s reliable and offers a good selection of calibration settings. If you are in the market for a colorimeter for professional use and can afford to spend around $250 on one, consider this product.
| Tech Specs |
|---|
| Features: Expert |
| Speed: 5-8 min |
| Ambient Light Sensor: Yes |
| Connector: USB-A |
| The Pros |
|---|
| Great calibration speed |
| Screen glare compensation feature |
| Very easy initial setup |
| Good calibration options |
| The Cons |
|---|
| Expensive |
Contents