DJI TapFly Mode – What is it and How Does it Work?

Without a doubt, drone photography is the most popular application of drone technology. For most people, the novelty of being able to capture aerial photos and videos is enough of a reason to buy their very first drone. For those with more enterprising minds, this hobby can even evolve into a legitimate well-earning career.
DJI drones have recognized how big of an opportunity drone photography is and has loaded their drones with a veritable toolkit for budding drone photographers. Aside from equipping their drones with high-quality cameras, DJI has also pre-programmed their most popular drones with autonomous and extremely useful Intelligent Flight Modes that can help drone photographers get creative with their shots. In this article, we will discuss the TapFly Mode. How does it work and how can you make the most out of this flight mode?
What is TapFly Mode?
With TapFly Mode, you simply have to press a spot on the real-time video feed of your drone to command the drone to automatically move towards the destination. While the camera is moving, you have full control of the gimbal, allowing you to compose shots or focus on any subject. You can even yaw as the drone is moving.
The effect is similar to having a drone moving along a dolly. Using TapFly, you can focus on composing shots while not having to worry about flying your drone. This Intelligent Flight Mode is not as widely used as some of the more popular alternatives, such as ActiveTrack and Cinematic Mode. We think TapFly is criminally underrated and underused, as it can be a very versatile and useful drone photography tool.
Which DJI drones support TapFly Mode?
TapFly Mode is available in all of the modern DJI drones, including the Spark, the Mavic series, and the Phantom 4 series. There are minor differences in how TapFly is implemented for each model, though. For instance, the Free mode of TapFly is not available in the Mavic Pro while the Coordinates mode is missing from the Mavic 2 drones.
These small differences are likely due to the unique features found in different DJI drones that make some of the TapFly modules redundant. Later on, we shall discuss in detail how each specific sub-mode under TapFly works.
How do you activate TapFly Mode?
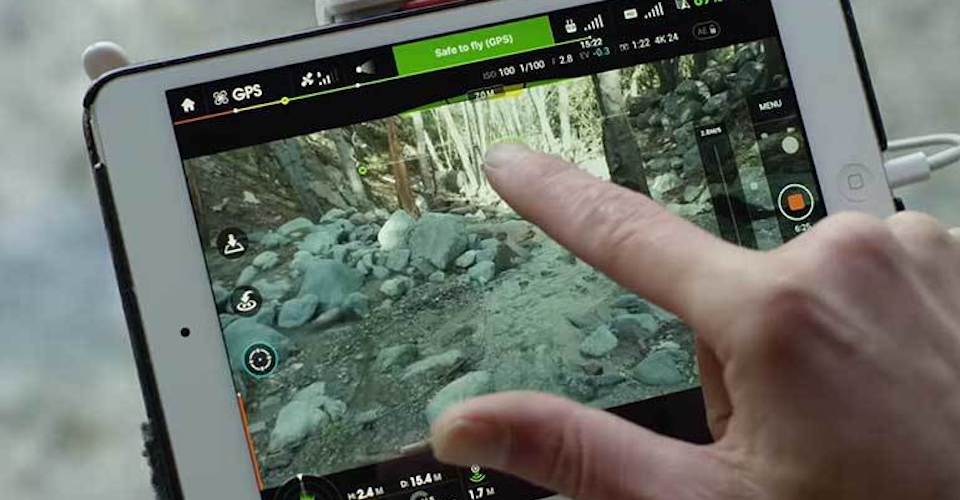
TapFly can only be activated once the drone has been launched and is operating in standard Positioning Mode (P-Mode). To activate TapFly, you need to enter the Intelligent Flight Modes menu by clicking the remote control-shaped button on the left-hand of the DJI GO app screen. Once you have entered the menu, simply click on the TapFly option.
The TapFly screen should open at this point. A slider bar on the left side can be used to set your drone’s movement speed and can even be adjusted while the drone is moving. The screen will also show a horizon line, allowing you to approximate if the spot you are targeting will cause the drone to ascend or descend.
True to its name, setting a destination for your drone is as simple as tapping on a spot on the screen. This should bring a large green “GO” button, which you simply need to press to instruct the drone to start flying towards your chosen destination. While the drone is flying, you can fully control the gimbal, yaw the drone, adjust the speed, choose a different destination with another tap, or pause the drone’s movement at any time.
The complete implementation of TapFly comes with four different sub-modes:
- Forward – The drone moves forward automatically, even without choosing a destination.
- Backward – The drone moves backward automatically. This is a great mode for gradually revealing vast and beautiful landscapes.
- Free – The most commonly used mode, Free mode allows you to pick any destination on the screen for the drone to approach.
- Coordinate – In Coordinate mode, the drone hovers in place as soon as it reaches the destination you have set.
How does TapFly Mode work?
TapFly makes full use of the drone’s GPS capabilities to allow the drone to fly autonomously in a very controlled manner. When using TapFly, the drone pilot does not need to worry about the drone veering off-course and can focus on composing shots. The following are the features that work together to make TapFly one of the most useful flight modes:
1. GPS-guided movement
At the very core of TapFly is its smart use of the drone’s onboard GPS module. Aside from allowing the drone to travel to its pre-set destination, GPS stabilization also helps the drone maintain a steady course. This degree of stability is simply not possible if you fly a drone manually.
2. Anti-collision sensors are activated
A great feature of TapFly is the fact that you won’t need to worry about running into obstacles even while the drone is flying automatically. With its obstacle avoidance systems activated, the drone can simply fly over obstacles in its path and resume flying towards its destination. If the drone runs into an obstacle too large to be bypassed, the drone will simply stop moving and hover in place.
When starting up TapFly mode, the DJI GO app will helpfully let you know if it anticipates running into an obstacle so you can make adjustments. If it does run into an obstacle, the app will also notify you if it made evasive actions.
3. Full gimbal and camera control
The best feature of TapFly mode is the full control you have over the gimbal and camera while the drone is automatically moving along its course. This means you can tit the camera for slow reveal shots or even zoom in on a specific object. You can even do a yaw movement, allowing you to pan the camera (and the whole drone) to focus on the view perpendicular to the path that the drone is moving. Take note that doing a yaw slightly adjusts the motion path of the drone, but the app will notify you of these adjustments.
In summary, TapFly leaves you free to do other things by automatically moving the drones while avoiding obstacles. This is a great tool for professional drone photographers, especially those who work along and don’t have the luxury of having a second pilot for individual drone and camera controls.
Tips on using TapFly Mode
1. Double-check before hitting GO
The downside of the worry-free nature of TapFly is that people tend to get complacent and careless when using it. Before you hit the green GO button on the TapFly screen, make sure that you are choosing a destination which is free of major obstacles. For safety’s sake, do not use TapFly to have your drone approach a person or animal.
2. Keep your eye on the altitude readout
The horizon line is also a great indicator of whether the drone will ascend or descend once TapFly takes control of the drone. Ascending is typically not a problem, but pilots usually have their drones crash when the drone unwittingly descends too low as it approaches the target. If you really must pick a target close to the ground, then you need to keep your eye on the drone’s altitude readout and be ready to stop the drone’s movement when it gets too low.
3. Avoid transparent or thin obstacles
Although the drone keeps its obstacle avoidance activated while in TapFly, its visual sensors are still limited. This means that it cannot detect transparent obstacles (such as glass or clear plastic) and very thin or small obstacles (such as the branches of a tree). In these cases, only pilot intervention can save your drone from getting into a crash.
4. Keep your thumbs trained on the PAUSE button
Anytime you let your drone fly autonomously, whether it’s in TapFly, ActiveTrack, or Follow Me mode, you need to be ready to bail out anytime. Many things can go wrong when you are not actively flying your drone, such as birds swooping in or your drone flying too low or too near potential obstacles. Make it a practice to keep your thumb close to the PAUSE button on the DJI GO app.
5. Use TapFly to make time-lapse videos
At the slowest speed setting, flight in TapFly is so smooth and steady that you can even shoot time-lapse videos. Even though the length of video you can capture is still limited by how long your drone can fly in a single battery charge, even a 20-minute time-lapse video shot from your drone can be a very interesting and unique piece of footage. We have seen time-lapse videos shot from drones showing clouds drifting across the sky or even cars moving through a busy highway. By playing around the settings of TapFly and being creative with how you move your drone and gimbal, you can certainly come up with unique shots that maximize the capabilities of TapFly.
Final thoughts
With the wealth of Intelligent Flight Modes pre-programmed into DJI drones, drone photographers nowadays are only limited by their levels of innovation and creativity. These flight modes combine the technological capabilities of DJI drones in various wonderful ways, giving drone photographers the ability to capture exceptionally smooth and stable shots.
TapFly isn’t exactly one of the most popular flight modes. It’s frequently overshadowed by more action-oriented alternatives, such as ActiveTrack and Cinematic Mode. However, it is an excellent flight mode for slow and dramatic reveals of landscapes. It is also great for slow-panning shots or time-lapse videos. In the right hands, TapFly could be one of the most versatile and useful flight modes available for DJI drones.