How to Estimate the Printing Time of a 3D Printing Project

The best way to estimate the 3D printing time for any project is to slice the model to generate the G-code. This takes into consideration parameters such as layer thickness, nozzle diameter, and retraction settings among a handful of others. There may still be some inaccuracy in this estimate, but they should be minor.
If you’re planning to get a 3D printing project started, one of the most important things you will need is a lot of time. Exactly how much? That’s where a good 3D print time estimator comes in handy.
Best option – use a slicer
The best option available to you would be to use the slicer for the 3D printer that you will be using. You will need both the STL file that you will be printing as well as the slicer profile. This should give you the most accurate estimate of the total 3D printing time.
To come up with a printing time estimate, the slicer slices the model and generates the G-Code. This is basically a set of instructions for the 3D printer. The G-Code takes into account not just the geometry of the 3D model, but also the other parameters that a user can set such as the thickness of each layer and whether retraction will be used throughout the process.
Take note that the estimated 3D printing time can vary across different slicers and different 3D printers, even if you are using the same 3D model and profile. This emphasizes the importance of using the actual slicer and 3D printer you will be using when estimating the printing time.
Even with this option, there may still be some inaccuracies in the estimated printing time. The estimate does not include the pre-heating time for the hot end and print bed. However, this is typically a very short period compared to the entire printing time.
Alternative – use an online time estimator
Although far from ideal, you can still estimate the total printing time for a 3D model if you have no access to a slicer. There are many websites out there that allow you to upload an STL file and input basic printing parameters such as layer height and infill percentage. These websites will then yield an estimated printing time.
A lot of these websites actually have the ultimate purpose of estimating the total costs of a 3D printing project. Since time factors into these costs, these online tools can also be used to get reasonable estimates of printing time. If you’re trying to look for an online tool, you will get more results by searching for 3D printing cost estimators.
The major disclaimer here is that these online estimators likely have a huge margin of error. Each online tool is designed based on a specific slicer. If this is not the slicer you will be using to process your 3D model, then there could be a significant deviation of the actual printing time from the estimate. To play it safe, it would be best to assume that actual printing times compared to the estimates will be about 20% longer.
What factors affect the 3D printing time?
If you’re estimating the printing time ahead of actually 3D printing your project, then you’re probably interested in how you can possibly make this printing time shorter. There are lots of ways that this can be done.
The important thing to keep in mind is that cutting down on the printing time always involves a compromise. The resulting print may not turn out as strong as you intended, or you may lose out on some of the finer details of the digital model. It is up to you to decide if the potential savings in time and cost are worth these sacrifices.
Print with thicker layers
Printing with thicker layers speeds up the 3D printing process simply because you will need fewer layers to print any given model. The tradeoff here is that you will likely lose out on detail accuracy. If you’re printing a model with a simple geometry, then this is probably one of the best options.
The general rule of thumb is that the layer height or thickness must not exceed 80% of the nozzle diameter. For the standard 0.4-mm nozzles, this means that a layer height of 0.3 millimeters is close to the maximum. If you want to print with even thicker layers, you can swap to a nozzle with a wider opening.
Use lower infill density
The infill is the part of the print that is inside the shell. This is not visible in the finished print but plays a huge role in determining the weight, density, and overall strength of the part. A huge portion of the total printing time also goes toward printing the infill.
While it’s possible to set the infill density to zero, creating a hollow 3D print may not always be a practical option. A setting of 10% should provide just enough mechanical reinforcement without increasing your printing time by much. In terms of the infill pattern, the linear or zigzag options are generally accepted as the fastest.
Reduce support structures
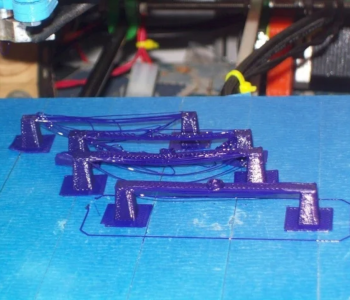
If your model has a lot of overhangs, then you will have to print it with support structures. One problem with support structures is that they also have to be printed, thereby increasing the total printing time. If you can reduce the number of these support structures, then you should also benefit from a shorter printing time.
The simplest method to reduce the number of support structures is to reorient the model in your slicer such that there are as few overhangs as possible. This will likely increase the footprint of your model, but the reduction in the number of support structures should still yield a net decrease in printing time.
The benefit of reducing the number of support structures is two-fold. Not only does it reduce the printing time, but it also reduces the length of time that you will spend in post-processing to remove the supports.
Do regular general calibration and maintenance
The best time investment that you can spend to boost the productivity of your 3D printer is to do calibration and maintenance regularly. Failing to do so may result in multiple failed prints. Having to start over on a project after printing for several hours will invalidate most of your efforts to reduce the printing time.
This can involve leveling the print bed, calibrating the extruder, checking that the nozzles are not clogged and that the belts have proper tension. Doing these things helps ensure that you do not encounter problems during 3D printing.
Final thoughts
There is no substitute for your slicer if you want to get a good estimate of the 3D printing time for your project. The slicer takes into consideration not just the geometry of the model, but also your preferred printing parameters and the appropriate profile for The only other alternative would be to use an online estimator tool, but these are likely to have larger errors.
Printing time is one of the major considerations when optimizing the productivity of a 3D printer. However, reducing printing time may mean cutting a few corners in the quality or mechanical strength of a finished part.