The Best Techniques to Finish Your PLA 3D Prints

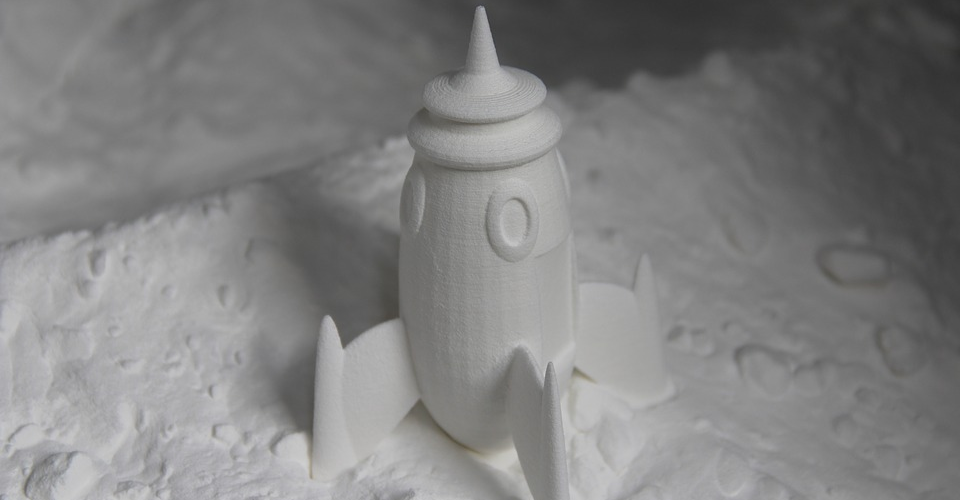
As versatile as 3D printers are when they turn digital 3D models into real-world objects, rarely do 3D printed projects come out with professional-grade quality without some degree of post-processing. With the proper finishing technique, you can give your plain plastic 3D prints a more polished, mirror-like appearance.
The appropriate finishing technique will depend on the results you’re looking for and the type of plastic material you’re working with. In this article, we’re focusing on one of the most common in the 3D printing world – PLA.
Why bother finishing your PLA prints anyway?
The approach of FDM printers towards additive manufacturing involves laying down thin layers of molten filament on top of one another, gradually building an object based on a reference 3D model. While this technique gives the technology an incredible amount of design flexibility, it also has its inherent flaws.
One glaringly obvious characteristic of a raw FDM print is the visible layer lines. These are the lines separating the individual layers of the filament and will show up regardless of how thin you set your layers to be.
If you want to offer 3D printing services professionally or to sell your finished 3D prints, then retaining these layers lines is simply unacceptable. Even if you’re just doing 3D printing for fun, learning how to post-process your prints is still a great way of upgrading your skills. This can be particularly important if you’re printing with PLA, which is known as one of the most forgiving and easiest 3D printing filaments to work with.
Things to remember about PLA
In selecting the best finishing technique for your PLA print, there are certain characteristics that you may consider in making your decision.
1. Incompatible with most solvents
PLA is unusual as far as plastics go because it is derived from organic, rather than petroleum-based, sources. This means that its molecular structure does not have many polar groups that make it susceptible to attack by typical solvents like acetone.
Thus, there really aren’t many finishing methods for PLA that involve the use of solvents. Smoothing using tetrahydrofuran (THF) used to be quite common, but THF has since been declared as a potential carcinogen. Whatever other chemical alternatives are almost impossible to purchase without supporting documentation. We suggest that you stick to old-fashioned methods that won’t expose you to unnecessary hazards.
2. Low glass transition temperature
One of the factors that make PLA an easy filament to work with is the fact that it melts at relatively low temperatures. While you shouldn’t be using enough heat to melt your PLA print during post-processing, it’s still possible to introduce enough heat to go above the glass transition temperature, which can result in significant deformation. You’ll have to be extra careful employing any method that introduces heat or friction to your PLA print.
3. Low strength and rigidity
PLA is cheap and easy to work with, but it’s not exactly known for its strength. For this reason, PLA use is often reserved for items meant just to be displayed or proof of concept prototypes. This lack of overall strength and durability means it can be easy to damage your PLA print during post-processing if you don’t handle it with care.
What to do before finishing
Before you do any post-processing, the first thing you’ll need to do is to remove support structures if you used any. You’ll also have to glue together any parts you printed separately and to fill in any untoward gaps or holes. Filling in the gaps with an autobody filler (like this Body Repair Kit from 3M) before sanding will save you some time since you can smoothen out any uneven applications of the filler.
Use a sharp X-acto knife or a pair of pliers to remove tough supports. If there are very small nubs that are hard to remove without causing any damage to the finished print, you might want to consider removing them via sanding.
Method 1: Sanding
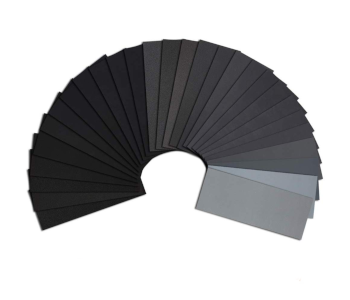
The first option to remove the layer lines of your raw PLA print is to sand them off using regular sandpaper. This is the oldest technique in the book and should be accessible to just about everybody. For the best results, however, you’ll have to do a multi-step sanding process.
The technique involves the use of several pieces of sandpaper with different grit size numbers. You can start with 200-grit sandpaper and move progressively to finer counterparts. The following grit numbers are recommended: 400, 600, 800, 1000, 1500, 2500, and 3000. You can buy a complete set of sandpaper to save you the hassle of having to buy them one by one. This 45-piece set should have more than enough grit variants and costs less than $10.
The way this process works is that you start with the coarsest sandpaper you have and smooth your print until you’re satisfied with the results. You then move on the next grit size in sequence until you reach the finest sandpaper you have. At each step, the effort and time spent to smooth out the features of your print should become reduced.
When sanding PLA, care must be observed to ensure that you don’t generate too much heat via friction when you sand too fast. As we’ve mentioned, it’s easy to deform PLA when it is exposed to too much heat. It’s also best to sand using a rotational motion so you don’t end up with obvious bias lines.
For better results in less time, we suggest using a ‘wet sanding’ technique. This is done by slightly wetting the sandpaper as you rub it on the PLA print. This serves to mobilize the plastic particles that get removed from the surface of the print, thereby accelerating the sanding process. By keeping the surface of the print and the sandpaper wet, you also avoid generating enough heat to deform the plastic material. You can do this technique no matter what grit size of sandpaper you have, but you’ll need to get sandpaper that has been specifically labeled as ‘waterproof.’
Method 2: Polishing

While the results of sanding with fine-grit sandpaper are somewhat satisfactory, they will not be enough if you want your PLA prints to have a “mirror-like finish.” To achieve this level of finish, you’ll have to apply a polishing compound to your print. Any liquid metal polish should be able to do the job. We suggest using the ever-reliable Brasso Multi-Purpose Metal Polish for simplicity’s sake.
To apply a liquid metal polish, simply place a small dab of the polishing compound on a soft cotton cloth. Apply the polish to the surface of the print using circular motions. You should see a marked improvement in the smoothness of the print’s surface and the development of a shiny, mirror-like finish. You can enhance this further by buffing the surface of the print with another piece of soft cloth. You can repeat the cycle polishing and buffing until you are satisfied with the results.
If you can’t get ahold of liquid metal polish, then a solid wax-based metal polish should also do the trick. These often come in bars that are very inexpensive, such as this set of six from Enkay. To use a solid polisher, rub a piece of cloth on the surface of the bar and apply it to the surface of the PLA print. A small amount of the metal polish will be deposited on the surface and fill in any small gaps which you may have missed during sanding. Wax-Based metal polish can also be buffed via repeated cycles, much like liquid metal polish.
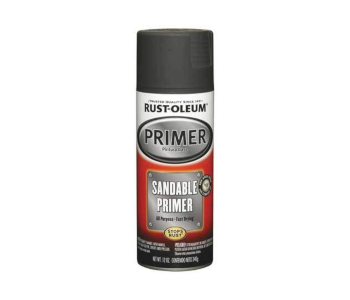
Method 3: Priming
The sanding and polishing method involves smoothing down the irregular features and filling in the small irregularities with polishing compound. You can do it the other way around with the priming method. By applying a primer compound, you can fill in all the gaps and then sand the layer of primer down to achieve a more consistent and smoother finish.
This method also doesn’t require the use of an expensive compound. A can of Rust-oleum, which costs less than $10 each, should work beautifully. Just make sure that you get the sandable primer version.
Before you apply the primer, you can do the sanding method first to get rid of the rough irregularities. Once you’re satisfied with the results of sanding, spray a thin and even coat of the primer on your print. The primer will fill in the small spaces on the surface of the print which were not sanded out. It will take a few minutes for the coating to dry out.
The benefit of using a sandable primer like Rust-oleum is that you just need to sand it to get a smooth finish. If you still find that there are certain parts of your print that are not as smooth as you’d want them to be, you can just spray an additional layer of Rust-oleum on those parts and repeat the sanding process.
Method 5: Epoxy
Sanding, polishing, and priming are finishing techniques that require a lot of time and effort. Between going through a whole array of sandpaper, buffing the metal polish, or waiting for the primer to dry, having to do all these methods for a large number of PLA prints can be tedious and very tiring. However, there’s a much quicker, albeit more expensive, way to finish your prints – with a brush-on epoxy coating.
The XTC-3D epoxy has been a very popular product among 3D printing hobbyists because of how quick and easy it is to use. Just combine the two components of the epoxy and brush it onto the surface of the raw print. The epoxy will fill in any irregularities and even has a self-leveling characteristic to ensure a smooth and consistent finish.
One caveat is that the XTC-3D is pretty expensive, especially compared to the cost of metal polish, spray-on primer, or sandpaper. Think of it as paying a little bit extra so you won’t need to spend as much time and labor.
Method 5: Heat treatment
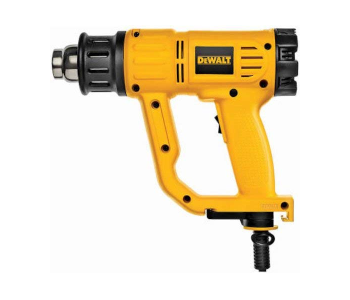
Knowing that PLA is very vulnerable when exposed to moderately high temperatures, heat treatment as a finishing method for PLA prints is rarely heard of. If you don’t know what you’re doing, you can easily end up ruining the PLA print you’ve already spent several hours on.
If you’re familiar with using a heat gun, such as this 1550-watt variable heat gun from DeWalt. We still recommend doing a good amount of sanding before heat treatment so that the plastic surface is a bit more exposed, which will make heat treatment more consistent.
To finish your PLA print by heat, simply point the heat gun set at about 80 °C to the surface of the print and move the gun around with slow and sustained strokes. Don’t let the heat gun linger at one spot for too long, so you don’t end up with deformed features. This will melt a very thin layer of plastic at the surface of the print and allow the plastic to auto-level.
When heat treating a PLA print, take note of the fact that the plastic will likely emit fumes even if there aren’t any detectable odors. Make sure to do heat treatment in a room with good ventilation.
Final thoughts
PLA has the reputation of being one of the best filaments for those who are just starting out with 3D printing. If you’re a beginner who is learning about 3D printing by working with PLA, we suggest extending that learning process to finishing. After all, the methods for post-processing of PLA are pretty simple, although a little tedious and labor-intensive.
Post-processing is considered one of the skills that a 3D printing professional must learn to advance to the next tier of expertise. It is the only way for you to give your finished prints a professional look worthy of being sold at a premium. The added dimension of post-processing is well worth the efforts of learning how it’s done.