Getting Started with the DJI Spark Drone

DJI’s Spark series of drones are a popular consumer drone series of the company. It is dubbed as a mini-drone which has all of the core DJI technologies in a small and easy-to-use drone. The DJI Spark is meant for entry-level users or someone who wants to get the first taste of drone technology.
The DJI Spark is one of the most affordable DJI drones as you can find one for less than $400. People of all ages can fly the DJI Spark because the DJI Spark does not overwhelm users in a way that the variety of features in advanced models would.
The DJI Spark has a decent camera for photography and videography, infrared sensors for obstacle avoidance, and hand gesture controls. If you are used to flying drones, then the DJI Spark is pretty easy to master. However, if you have never flown a drone, then the DJI Spark is the correct drone to get your feet wet. Simply follow the steps mentioned below and you will be ready in no time to fly your DJI Spark for the very first time.
Step 1 – Unbox the DJI Spark drone
When you unbox your DJI Spark drone, you should first have a good look at all the components that are in the box. There are two options for purchasing the DJI Spark. You can either get just the drone without the remote or you can get the Fly More combo which has the remote controller, extra batteries, and a bunch of other stuff.
Step 2 – Charge the batteries and the controller
When you receive your DJI Spark drone, it would most probably have 50% charge on it. This seems to be the standard practice for DJI. However, whenever you fly your drone, you would want to first charge the batteries to 100%. The drone flight time is not very long and you wouldn’t want to stop a flying session because you ran out of battery within a few minutes of flying. Besides, it is a best practice to always fully charge the batteries before every new flying session.
There are two ways to charge the drone battery. If you buy the Fly More Combo pack, then you can charge using a charging hub. If you don’t buy the Combo pack, then you will have to simply connect the charging module to the drone battery using a USB cable.
If you did not opt for the combo, then there is no need to remove the battery from the aircraft body. The larger port of the USB cable goes into the charger module and the smaller port will go into a charging point located on the drone’s battery pack itself. You have to lift a boot which covers the charging point and the SD card slot. Plug everything in and wait for a second or two till you see green pulsing lights on the battery pack of the drone.
Now if you did opt for the combo pack, then you can charge multiple battery packs using the charging hub. First, you need to remove the battery from the drone body. The battery is located at the bottom end of the main body. You will see a latch each on both the side faces of the body. You have to push both latches simultaneously to detach the battery pack from the drone body.
Then, make sure that your charging cable is plugged into the wall power port on one end and the charging hub on the other. The charging cable on the hub side will connect to the port which has pins on it. When everything is plugged correctly, you will see a green light on the charging hub.
You can charge 3 batteries at any time on the charging hub. The battery simply slides into the charging hub. You will see a pulsing green light on the battery pack which means that the battery is charging. The battery with the most charge will charge first as you can get that pack into the drone the fastest.
The remote controller also needs to be charged. A regular USB cable can be used to charge the controller. One end goes into the charger module and the other (smaller port) goes into the controller. You can charge both the controller and the battery simultaneously. However, the charger may get quite hot if you do so. If the charger does get too hot, then try charging the battery pack first.
Step 3 – Download the app and register
While DJI will supply you with most of the things that you need to fly the drone, there is one thing that you need to arrange for yourself. That component is your mobile phone or tablet. If you have not ordered a remote controller, then your phone will also serve as the controller.
Depending on whether your phone/tablet runs iOS or Android, you will have to visit the App Store or Play Store and download the DJI GO 4 app. After you have installed the app on your device, launch it and log in to your DJI account. You can create a DJI account on the app itself or on the website. If you want to save time, then create the DJI app while the drone and controller batteries (if you ordered a controller) are charging.
If you want to take the time-saving aspect a step further, then create your DJI account as soon as you order the drone. Visit the DJI website and follow the instructions to create your account far in advance and save time during the setup phase.
Step 4 – Mount the mobile device on the controller
Once your mobile device has the DJI Go 4 app running, it is time to mount the mobile device onto the remote controller. Below the buttons on the remote controller, you will see a couple of brackets meant for your mobile device. Adjust these mounting brackets as per the size of your mobile device and securely mount your mobile device between the two brackets.
Lastly, you need to electronically connect your mobile device to the remote controller with a USB data cable (OTG cable) or an Apple lightening cable depending on the mobile device that you are using. You can use Wi-Fi to connect the controller and your mobile device, but that connection will not be as secure as a wired connection.
Step 5 – Set up the drone body
The drone body has the motors, the camera, and the gimbal on it. Depending on whether you purchase the combo version or the regular drone-only version of DJI Spark, the propeller may already be mounted on the drone or they may be separated.
If the propellers aren’t mounted, then do not mount them just yet. First, complete the entire setup process and then go outdoors before mounting the propellers. Fast spinning propellers may cause unnecessary damage if they come in contact with something or even with your hand. The best practice is to mount the propellers when you are ready to fly.
Make sure you insert your SD or micro SD memory card in the slot above the battery pack. You will have to lift a boot which covers the SD card slot.
Step 6 – Power up the drone
After the drone battery is charged, remove it from the charging hub and slide it back into the body of the drone. If you are charging the battery directly without the charging hub, then simply unplug the USB cable.
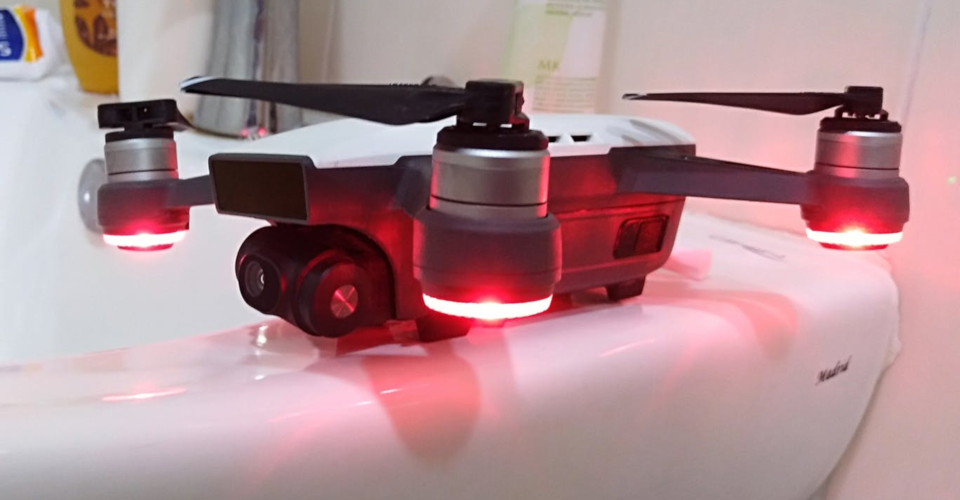
Then, power up the drone by pushing on the power button. To power up, you need to tap the power button once and then push again and hold. The green light indicator near the power button should light up. You will hear a beeping sound as the drone boots up.
Step 7 – Connect the drone to the mobile device via Wi-Fi
The DJI Spark drone body needs to be connected to your mobile device via Wi-Fi. To do this, you will go to the Wi-Fi settings menu in your mobile device and look for a Wi-Fi signal from your Spark drone. If you do not see anything on the menu, then you will have to reset the drone Wi-Fi settings to make it visible to your mobile device.
To reset, press the power button on the drone body and keep it pressed for 9 seconds. Every 3 seconds, you will hear beeping sounds. After the first 3 seconds, you will hear 1 beep, then at 6 seconds you will hear 2 beeps, and at 9 seconds you will hear 3 beeps. Let go of the power button after you hear 3 beeps. You will now go back to the Wi-Fi settings menu in your mobile device and see a signal from your Spark drone.
Go ahead and connect to the Spark’s Wi-Fi signal. You will be asked for a password. Normally, the default password is “12341234”. You can find this password on the base of the drone body where the battery pack slides out. So, before you charge your drone battery pack, simply slide it out and note down the password for the Wi-Fi.
Step 8 – Update Firmware
After you have connected the drone to the mobile device, you may see a prompt in the app asking you to update the firmware. You can download the firmware update file on your mobile device and then transfer the update to the drone from your phone using a USB cable.
Step 9 – Power up the controller and link it to the drone
After powering up the drone, the next step is to power up the controller by tapping the power button once. Then, tap once more and hold the button down. You will hear a beep sound after a couple of seconds. This procedure will turn on the remote controller.
If you buy the Fly More combo package, then the remote controller is most probably linked to your drone body. If it isn’t for some reason, or if you buy the controller separately at a later date, then you can link it to the drone via Wi-Fi.
After you turn on the controller, go to your mobile device’s Wi-Fi settings page. You will see a Spark signal from the remote controller. The name of this signal will begin with the word Spark but then have numbers which are different from the ones of your drone’s Wi-Fi signal. The signal name and password for the controller Wi-Fi are located at the back of the controller.
Select the controller’s Wi-Fi signal and then enter the password. Now go to the DJI Go 4 app, select Spark, and tap on the “RC connection” button which you will see on the bottom left. It will ask you if you want to link the controller. Click on the blue button at the bottom and then you will be prompted to press the power button on your drone body for 3 seconds. After you do so, you will hear a beep and then your controller will be linked to your drone.
Step 10 – Check the sensors and calibrate IMU
Check your gyroscope and accelerometer by clicking the menu button at the top right of the camera view page in the DJI app. Then tap the drone icon which is for the general settings of the drone. Then scroll down and you will see a button labeled “sensors”. Tap on sensors and you will see green dots below accelerometer and gyroscope.
If you do not see green dots, then you probably need to do an IMU calibration. You should do an IMU calibration the first time you receive your drone regardless of whether it is already calibrated or not.
Below the sensor dots, you will see an option labeled “Calibrate IMU”. Simply tap on it and follow the instructions. You will basically have to place the drone in different orientations as per the directions and the whole procedure will barely take a few minutes.
Step 11 – Calibrate the Compass
DJI Spark drone (and even other DJI drones) uses a digital compass. The compass basically feeds the directional information to the drone and tells it which way it is heading. The compass works in conjunction with the GPS and the two of them together form the backbone of the drone’s navigation. So, calibrating the compass is perhaps one of the most important steps in this entire guide.
It is recommended that you calibrate the compass before every new flying session. Digital compasses get easily affected by magnetic interference and metal objects. Even electrical cables and power cables can affect the compass. These interferences tend to throw off the compass’s calibration. Interestingly, even the remote controller of the DJI Spark can cause interference. Hence, always keep the drone and the controller about 2 feet apart when calibrating the compass and try not to bring them too close thereafter.
The compass should always be calibrated outdoors in an open area. There may be metal objects indoors and metal bars (re-bars) in the concrete walls of a building, both of which can throw off the calibration. To calibrate the compass, go to the sensors option under general settings as you did for the IMU calibration. On top, you can toggle between Compass and IMU. Select Compass. Then, tap the “Calibrate Compass” option in the middle of the page and simply follow the instructions.
Two lights on the drone’s arms will turn yellow. After they do, rotate the drone horizontally for about 360 degrees till the two yellow lights turn green. The app will then prompt you to orient the drone in a vertical position and then turn 360 degrees vertically. The app will tell you when the calibration is successfully done.
Step 12 – Mount the propellers on the drone
You have done most of the setup and are almost ready to fly your drone. This is the right time to mount your propellers. If they are already mounted, then you can skip this step. If they are not, then locate the propellers in your DJI Spark box. They will either be in a compartment or in a pouch.
The propellers are to be mounted on each of the four motors of the DJI Spark. Two of the four motors rotate in the clockwise direction while the other two rotate in the anticlockwise direction. Hence, it is important to mount the right propellers on the right motors.
The motors on the DJI Spark either have a white mark on them or no mark at all. The propellers with a white mark (a white ring) will be mounted on the motors with the white mark. They will also have two arrows denoting a clockwise direction. After mounting the propellers, press them down while turning them clockwise till they are locked in.
Next, mount the propellers without any markings on motors which have no white marks. The unmarked propellers will have two arrows denoting a counterclockwise direction. These set of propellers should be pressed down and turned counter-clockwise in order to lock and secure them. Lastly, try to rotate all the propellers slightly to check if they are indeed securely locked into place.
After you mount your propellers, you should mount the guards to protect the propellers from hitting something. You have to mount the guards from the bottom and then fasten them using a buckle on the guard. The guards are also of two kinds, white marked and unmarked. White marked guards go on the white marked motors and the unmarked guards go on the unmarked motors.
Step 13 – Fly away
If your DJI app’s camera view says “Safe To Fly” in a green colored bar on the top, then it means you are ready to fly. If the bar at the top is yellow or red, then it means you do not have a GPS signal or you need to calibrate your IMU/Compass. As a beginner, it is always recommended to fly with GPS. If you fly without GPS, you might have difficulty controlling the drone once it is far away from you.
To arm the motors of the DJI Spark, pull down the two stick buttons such that they come close to each other. So, the left stick is to be pushed south-east and the right stick is to be pushed south-west. In the armed state, the motors will begin to rotate at a low speed.
Now, to make the drone move up, you use the left stick on the controller. Push the left stick up to make the drone take-off and go higher. If you push the left stick down, the drone will descend down. You can also use the automatic take-off option in the DJI app. You simply have to tap on the take-off button located on the left side in the camera view page of the app. The automatic take-off will make the drone go up 1.2 meters from the ground and then stay there till you start controlling it.
We personally believe that it is better to use manual controls when taking off for the first time. That way you know if everything is working properly and that the controller is responding to your commands. Another thing to note is that if you leave the drone in the armed state and not perform any commands, then the motors will automatically turn off after a few seconds.
Step 14 – Explore air controls
The drone is controlled in the air using the left and right stick-buttons. Each of the two stick-buttons moves up, down, left, and right. So, there are a total of 4 functions on each stick and a total of 8 functions for both the sticks combined.
If you push the left stick-button up, the drone will move higher up. If you push it down, the drone will descend down. If you push the left stick-button right, the drone will rotate to the right. If you push it to the left, the drone will rotate left.
Then, explore the right stick-button. Pushing the right stick-button up will make the drone move forward. Pushing it down will make the drone move backward. Pushing the right stick-button left will make the drone move laterally to the left. Pushing it to the right will make the drone move laterally to the right.
The idea initially is to perform every one of these 8 functions and get a feel of the drone moving. Once you develop a good sense of the movement, you can start filming and making hand gestures.
Step 15 – Landing the drone
To land your DJI Spark drone, you can either use the stick-buttons on the controller or the landing button on the app. Use the left stick-button to move the drone down. Push the stick-button downward slowly to lower the drone. Once the drone makes contact with the ground, push the left stick-button down and hold it till the motors turn off.
You can also land automatically by using the “Return to Home” button on the app. Tapping this button will open a pop-up window with a button which you have to swipe. Once you swipe, the drone will return back to where it first took off and land at that spot safely.
We hope that the information above made the onboarding process easy for you. Within a few minutes, you will be good to go and enjoy flying your new DJI Spark drone. Remember to follow all the safety standards that go with flying drones.