Beginner’s Guide to GoPro Time-Lapse Settings

Open up any travel vlog, and chances are you’ll see a beautiful time-lapse when the author wants to set the scene or advance time in a tasteful way. You too can easily create jaw-dropping time-lapses with your GoPro, especially if you have the latest flagship model – the HERO7 Black.
This guide covers all the time-lapse modes at your disposal. It goes over which settings are available, when you should use which, and what else to keep in mind when filming a time-lapse. Take a look and use what you’ve learned to make stunning time-lapses of your own!
What is a time-lapse?
A time-lapse is a video that’s either sped up or stitched together from photos taken at set time intervals. Since these speeds and intervals can be changed, a time-lapse video shot with a GoPro that lasts 30 seconds can cover as little as 1 minute or as much as 15 hours. Time-lapse videos are an effective means of portraying both scenes that change quickly like a crosswalk during rush hour and ones where you want to capture the passage of time like the ebb and flow of the tide.
What time-lapse modes does a GoPro have?
The newest GoPro HERO Black has four time-lapse modes – TimeWarp, Time Lapse Video, Time Lapse Photo, and Night Lapse Photo. Each mode is unique and suitable for different situations.
Time Lapse Video is the most straightforward mode. It works by taking pictures, processing them, and putting out a video file. The process is streamlined, so you can set up a shot and leave the GoPro to do the rest. The downside is that you don’t have any more creative say once you set up initial video parameters.
TimeWarp is the newest addition to GoPro’s time-lapse modes. It works the same as Time Lapse Video but takes advantage of the HERO7’s HyperSmooth technology. TimeWarp lets you make stabilized time-lapse videos without the need for tripods or gimbals. It’s ideal for documenting trips and other situations where using ordinary time-lapse would result in unstable footage.
Time Lapse Photo is the most involved mode. You can choose whether to shoot in JPEG or RAW. Instead of a completed video, the result is a series of pictures that form a coherent sequence but which you can edit in post-processing. That involves changing ISO settings and color balance to create more vivid and detailed videos.
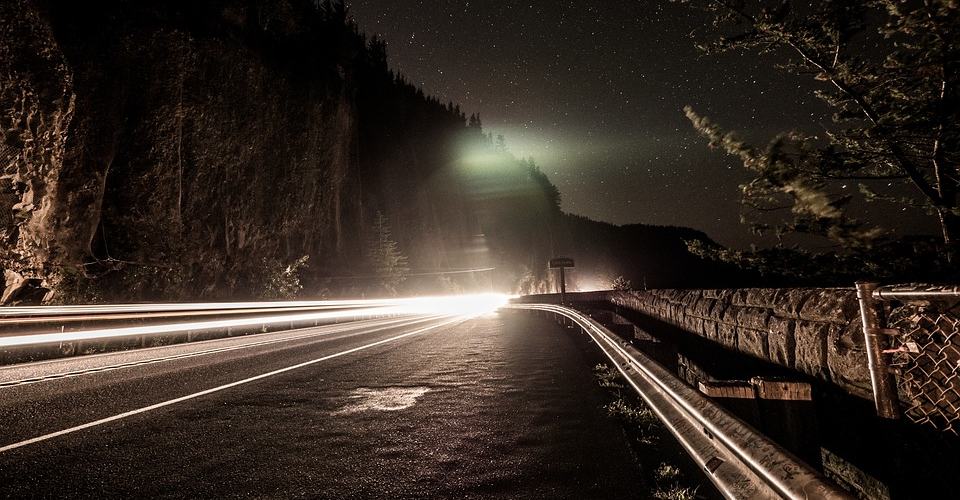
Night Lapse Photo is specifically designed to work in low light conditions. Shutter speed is decreased so that more light falls onto the sensor and more details can be captured in the dark. Night Lapse Photo also has the longest intervals between shots which can last up to 60 minutes. Using the Auto setting will sync the interval with the shutter speed.
Which resolutions and aspect ratios does time-lapse support?
Your time-lapse videos can be in one of four resolutions – 4K, 2.7K (2704×1520), 1440p, and 1080p. 4K and 1080p support an aspect ratio of 16:9 while 2.7K and 1440p shoot in 4:3.
Which fields of view are supported?
All four modes record in the default Wide view. Night Lapse and Time Lapse Photo modes support the Linear field of view as well.
What are the speeds and time intervals for each mode?
An interval is the time between video frames or time-lapse photos. They’re expressed as orders of magnitudes of speed for TimeWarp and as time intervals for the other three modes.
The video speeds for TimeWarp are 2x, 5x, 10x, 15x, and 30x with 10x serving as the default. The other three modes have intervals of 0.5, 1, 2, 5, 10, 30, and 60 seconds. Night Lapse Photo also has 2, 5, 30, and 60 minutes along with the Auto setting. 0.5 seconds is the default time interval.
Which settings should you use and when?
You should use the highest possible resolution if you’re going for professional-looking results. That being said, any of the four resolutions look great on cellphones and most computer screens. Don’t hesitate to use lower ones if you need to create longer time-lapses and don’t have a high-capacity SD card or extra batteries.
Figuring out which interval setting to use isn’t as straightforward. Thinking about your subject matter is an excellent place to start. How long will the event you wish to record last? Is it essential to capture the event continuously or will a few snaps per minute do? Are conditions likely to change, or will they stay the same throughout the video? The best thing you can do is come up with your preferred settings through trial & error. Nevertheless, here are some guidelines you can follow:
0.5-and 1-second intervals are ideal for fast-paced environments – traffic, a busy city street, or a basketball game are good examples.
Use 2- and 5-second intervals to shoot nature scenes like rustling leaves, moving clouds, or romantic sunsets.
10-30-second intervals are best for scenes that develop slowly like the creation of a painting or a time-lapse of the sun traveling across the sky.
The 60-second interval is suitable for the slowest observable developments like time-lapses of fast-growing plants or construction projects.
How to improve your time-lapse videos?
The first rule of time-lapse videos is that they can’t be stale. That means blue skies and clear lakes are out because they make your time-lapses look like still photos. However, go out to the sea or wait for the sky to become partly cloudy, and you’ll get a much more engaging video.
Remember to come prepared! An SD card with a large capacity and fully-charged batteries are essential as even a 10-second time-lapse video can require hundreds of photos or more than an hour of uptime. Be sure to bring extra batteries and have an SD card which can store all the footage without impacting battery life.
Don’t forget a tripod, especially if you don’t have the newest GoPro HERO Black! The longer you record, the higher the chances that the wind might pick up or your hand will start shaking. A tripod holds your GoPro firmly in place and eliminates these inconveniences. A gimbal like the Karma Grip works too for videos with shorter intervals.