How to Build A Small Woodworking Shop at Home

The pandemic and the resulting lockdowns have forced a lot of people to rediscover their passions or discover new hobbies. If you’re still going through this phase, how about going into woodworking? This is one of the more productive hobbies you can develop. If you get good enough, you might even make a business out of it.
Starting a woodworking shop is a fun activity, but it’s going to be a long and quite expensive process. Check out these tips to make your life easier and make sure that you get started on the right foot.
Adjust to your available space

You may have a lot of ideas on what you want your woodworking shop to have. Perhaps you want a huge workbench, a table saw, and a rack full of power tools. However, some woodworking tools will take up a lot of space. If you’re planning to set up the shop in your garage or basement, then huge space may not be a luxury you can afford.
Most guides indicate a minimum area of 75 square feet for a good workshop. The ideal size will be around 125 square feet. If you have that much space, then you won’t have any problems when it comes to laying out your tools and supplies. However, don’t get discouraged if your space is smaller than this – we’ll make do with what you have.
The first thing you need to do is to take measurements of your space. Don’t’ forget to account for the height of the room – this could be useful for installing garage lights and a tool rack. On top of your basic tools and equipment, you will also need some space to store the wood that you will be working on.
While you’re at it, go ahead and clean the space where you intend to put up your woodworking shop. When the power tools start coming, you’ll be glad that you did this ahead of time.
Buy the basic equipment
Now comes the fun part – shopping for tools. But what exactly should you have for your woodworking shop? If you have space and the budget, you can pretty much go crazy with all the power tools and hand tools. However, we’re listing down only the tools that we consider non-negotiable:
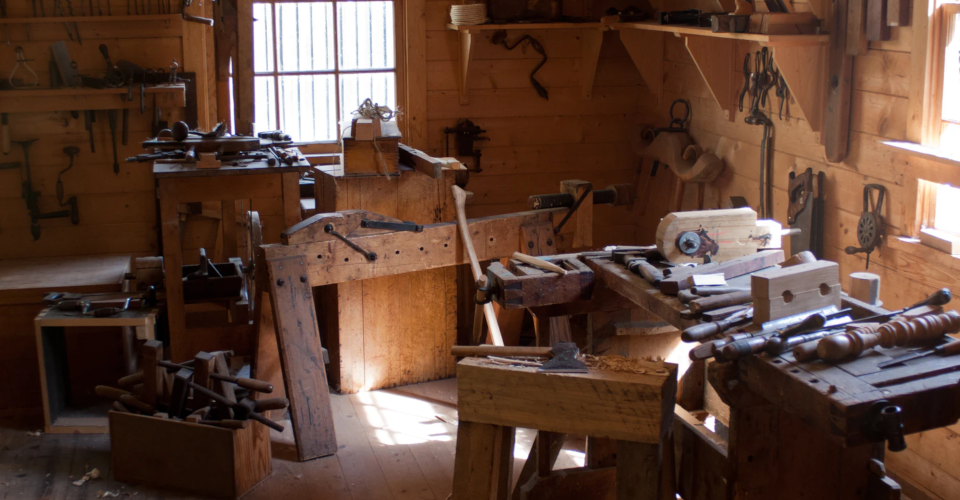
- A workbench. This will be where most of the work will be done. Ideally, your workbench will be placed against one wall of your shop. You can go for a full-sized workbench or opt for a smaller one if you’re not planning on working on huge pieces. To optimize the space, we recommend getting a workbench with integrated storage spaces.
- Handheld power tools including a battery-powered drill, a ratchet, a circular saw, and a woodworking jigsaw. This should be enough for basic woodworking jobs. Designate a spot to place a rack for the storage of these tools with some space to add a few additional tools later on.
- Marking and measuring devices including rulers, tape measures, box levels or digital angle gauges, pencils, and markers. As usual, plan ahead for space to store these tools in.
- Safety equipment such as safety goggles, gloves, ear protection, and a fire extinguisher. A major piece of equipment you should invest in is a dust collection system. This ensures that there will not be an accumulation of wood dust in your shop, which is a potential fire hazard. Having a first aid kit within the shop would also be a good idea.
- If you have enough space in your shop, a good table saw or miter saw would be a good long-term investment. While not strictly necessary, stationary gear can speed up large woodworking jobs.
- Racks, toolboxes, and chests to store all your tools and supplies. A good woodworking shop is organized. Racks keep your tools visible and handy, so they are ideal for the tools that you use the most. Toolboxes are also convenient for organizing small hand tools. Chests are generally larger than toolboxes and are meant to be stashed away. If you have items that you will rarely use, then they are best tucked away in a tool chest.
Keep the “work triangle” in mind
A “work triangle” is a concept used by architects when designing busy spaces like kitchens. The goal is to keep the workspace functional, efficient, and aesthetically pleasing. In the woodworking shop, the three corners of the triangle should be the workbench, your stationary power tools (such as the table saw), and your storage space for hand tools and supplies.
There are a few basic design rules to follow based on the work triangle concept. The first is that there should be no object intersecting the lines that connect the three corners of the triangle. Each side of the triangle must be kept between 4 feet to 9 feet, and the sum of the lengths of each side must be between 13 feet and 26 feet.
It’s best to plan this using a sketch with all appropriate distances labeled. Consider elements that cannot be moved such as electrical outlets, windows, or doors.
Ensure good ventilation
Ventilation is a key element when designing your woodworking shop. This is an entirely different matter from your dust collection system, although that helps as well. Good ventilation will regulate the temperature inside your shop. If you plan to paint or treat your finished work, then ventilation will also make sure that fumes and other chemicals don’t build up within your small space.
The best practice is to have at least two windows open in your shop, with ideally one of them having an active exhaust fan. If you don’t have two windows, then one open window and one open door will do. The point is to have cross-flow within the shop so that there is a constant supply of fresh air. This will also make working during summer a lot more bearable.
The cross-flow could get troublesome if you plan to keep working in your shop during winter. In this case, set aside a spot for a space heater.
Plan for electrical needs
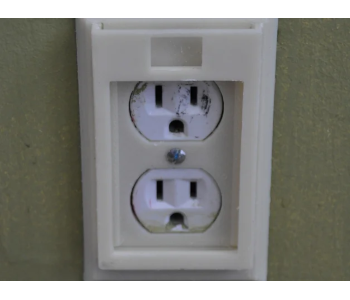
There are two elements to plan for when it comes to the electrical needs of your workshop – making sure that there are outlets exactly where they are needed and ensuring that your electrical service can accommodate all the power tools and equipment in your shop.
It’s good practice to have a separate sub-panel or breaker for your workshop with each circuit breaker connected to two or three outlets. All the lights in the shop should be connected to a single circuit breaker. This will ensure that the lights in your shop will remain on even when the other breakers trip.
The maximum current draw for the workshop should assume that the exhaust, lights, dust collection, and your most powerful tool are all running at the same time. It’s also best to install 220 V outlets for your power tools. Don’t combine the outlet for your stationary tool and handheld power tools on the same circuit breaker.
Lastly, all electrical outlets should be elevated at least 4 feet off the ground. This makes sure that they clear your workbench or any other tool chest. Try and have more outlets than you think you will need – you never known when you might end up buying another power tool.
Keeps kid and pets out
A woodworking shop is no place for a kid or pet to play around. Even if you turn down the power for the shop, sharp tools can easily fall off the racks and seriously hurt someone. Make sure that your woodworking shop has a door that can be locked and that your kids do not have access to the keys. While teaching your kids about woodworking is encouraged, they should only be allowed to enter your shop under your supervision.
Final thoughts
A woodworking shop is probably a dream come true for any DIY enthusiast. Despite its status as the ultimate goal, it’s more common to see woodworking shops that are poorly planned. This is likely because a shop isn’t something that is planned at all – it just grows organically as people start buying tools and supplies.
To make sure that you don’t fall into this trap, all you need to do is to plan early. Even if you can’t afford a full set of power tools yet, it’s prudent to start setting aside a portion of your garage or basement for your shop.
A woodworking shop doesn’t have to be something that you build all in one go. Tool by tool, it can grow through the years. When it all comes together, you will be thankful that you made a sketch and took measurements even when all you had was a cordless drill and a workbench.