
How to Make Vinyl Decals from Home

My easy-to-follow guide looks at how to make vinyl decals from home, but why bother? Well, there’s immense satisfaction when we create artistic things rather than buy them readymade. But a sense of pride in one’s achievements is only part of the appeal. You also get a design that’s 100% unique. That means you don’t have to compromise when you create your own decals.
Sticker Vs. Label Vs. Decal
Novice artists are not always aware of the differences between stickers, labels, and decals. Stickers have adhesive backs that attach them to hard surfaces like wood, metal, and plastic, etc. Stickers are typically printed text or illustrations used as decoration, or to notify. Labels are made from multiple material types. Makers of goods attach labels to give information about their products.
That brings us to decals, which is short for decalcomania and taken from the French word décalcomanie. It’s a technique where the artist transfers an engraving or pre-prepared print onto other materials. That was pottery back in the day, but now it’s used for multiple surfaces. Decals are stickers because they stick to surfaces, but not all stickers are decals.
Uses for Vinyl Decals
The uses for vinyl decals have few limits. There are countless creative ways to use these stickers at home, work, school, and anywhere else you can think of. Here are just a few of them:
- Decorate toys and models, especially RC cars, trucks, and boats, etc.
- Decorate kid’s bedrooms
- Drawer labels, including storage-draws used for knickknacks
- To customize giveaways at weddings and other events
- Promotional purposes, e.g., windows, doors, mugs, bottles, and packaging
- Mobile advertising
- Signs and posters
You get the idea. Decals are truly versatile, and you can create them in any size, shape, and colors.
Beginner’s Guide to Making Decals at Home
This section assumes you have a keen interest in making vinyl decals but with little knowledge. My beginner’s guide here walks you through the tools and procedures needed in easy-to-follow steps.
You need these essential tools to make your own decals:
- Dedicated cutting machine
- Inkjet printer
- Cutting mat
- Scissors, Tweezers, X-Acto knife
- Reusable squeegee
Materials needed for making decals include:
- Printable vinyl
- Clear vinyl laminate (optional)
Design Software: There are several programs to choose from. Here are 5 popular options:
- Sure Cuts A Lot 5
- Canva
- Maestro Label Designer
- Adobe Creative Suite
- Microsoft Word
There are others, so be sure to explore all your options before you decide. Also, some cutting machines come with dedicated software as part of the deal. Let’s now look at the above starter kit in more detail.
Cutting Machines
There’s no way to avoid computer-controlled cutting machines unless you want to cut by hand. They create decals with flawless edges as they cut to perfection. The smaller models look like regular desktop printers and are quite easy to use. The difference is that they have razor-sharp blades rather than ink nozzles. We’ll look at a few of the popular models later.
Inkjet Printers
You need an inject printer if you don’t already have one. There are lots of printable vinyl choices for use with regular desktop inkjets. Not all vinyl is equal, so make sure you buy the right material for the type of job. The best thing about inkjets is that you don’t need special inks to print on vinyl. That keeps things simple and cost-effective. The ink may take several hours to dry thoroughly, though
Decal Cutting Mat
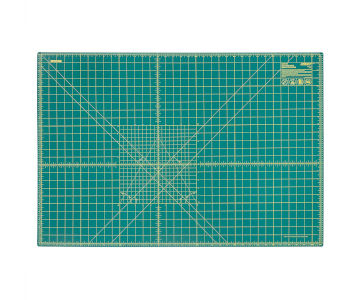
Rotary cutting mats are essential for safety and precision purposes and also extend blade life. They’re inexpensive, so try not to skimp. A decent double-sided self-healing mat should last a long time with proper use. They come in different sizes and several materials like synthetic rubbers, plastics, and rugged vinyl. Cutting mats with gridlines make light work of the trickier tasks.
Scissors, Tweezers, X-Acto knife
You need a few tools to make vinyl decals, especially if you cut them manually. A decent pair of scissors let you quickly remove the newly cut section from the vinyl. Some designs require a little finishing off, and that’s where the weeding pick, tweezers, and the X-Acto knife come into play. You risk making a botch of this process if you try to do it with makeshift tools.
Reusable Squeegee
The reusable squeegee, also vinyl application tool, is another essential part of the decal tool kit. It’s the only way to guarantee smooth substrates. A quality squeegee applies evenly distributed pressure so that the transfer tape clings perfectly to the vinyl.
OK, now let’s look at the materials needed to make your vinyl decals.
Printable Vinyl and Vinyl Laminate
There’s no shortage of printable vinyl, but you must choose the right product for your decals. Good quality vinyl is durable and uses a permanent adhesive. Most vinyl is pretty weather-resistant and should last up to one year outside. You can add another 3–4 years to its outdoor life if you use a clear vinyl laminate. Printable vinyl sheets are available in rolls and all colors and finishes.
The next section looks at 5 of the most popular software programs for decals.
#1 Sure Cuts A Lot V5
Sure Cuts A Lot V5 is a popular program for Windows and Mac. It has a smart, user-friendly interface with lots of options and tutorials. Best of all is that it’s easy to navigate and simple for the novice user to grasp. There’s even a dedicated online forum where likeminded others get to help each other and swap tips and ideas. You have a basic and a pro version available for those who need extra features.
#2 Canva Free
Canva is a free web-based drag-and-drop graphics program for entry-level users. You can choose from several hundred well-designed, customizable templates. It’s a simple WYSIWYG program and an excellent introduction for the raw beginner. You can move away from pre-designed templates and work from a blank canvas as your confidence grows.
#3 Maestro Label Designer
Maestro Label Designer has a free version for new users to try. It’s a program specifically for designing all kinds of labels, and that includes business cards and name tags, etc. Make sure ‘labels’ are your thing before you sign up. The program is super-easy to use even at the beginner level. The only con is that the free version places a watermark on all your work.
#4 Microsoft Word
So many computers already have MS Word installed. Most folks already have access to it on at least one machine. MS Word is known as a formidable word processor, but it also has a plethora of useful design tools and creative shapes. You can work from the program’s preinstalled templates or configure a custom layout. Microsoft’s Word can be finicky for novice designers to use, though.
#5 Adobe Creative Suite
Adobe Creative Suite is a unique graphics design program. However, it can be daunting for the novice and thus better suited to advanced-level users. This program is also expensive, so it makes a wise investment for those who make money from their vinyl decals. Adobe Creative Suite lets you create sophisticated designs or work from a blank template.
Make Your First Vinyl Decals
You now have a decent grasp of the tools, materials, and software needed to create decals. Continue reading, even if you don’t have your setup in place yet. A little knowledge is sure to make the entire process much smoother once you’re ready to start.
Step 1. Prepare & Print
I won’t go into the design process here. That’s because there are too many programs and decal projects to generalize. Find software you like, and then learn how to use it via its tutorials.
You have a couple of ways to prepare and print your first decal. Any photo editing program will suffice if you plan to cut your design by hand. All you do is send the project to the inkjet printer once it’s ready. Or, send the file to a dedicated software program if you use an electronic cutting tool. There will be simple instructions or tutorials to follow if you use the latter (recommended).
Point to note: Make sure you only use printable vinyl made specifically for use with inkjet printers.
Step 2. Apply the Laminate (optional)
You may want to apply a clear vinyl laminate to extend the life of any outdoor decals. A laminate finish is easier to wash too. It’s not hard to apply the clear film, but you do need to take your time. First, peel a little of the backing off, and then line it up with the straight edge of the decal sheet. Slowly smooth your laminate sheet down with the application tool, pulling away from the backing as you go.
First-timers may find this process a tad awkward at first. It shouldn’t take long to get good at. Consider a few practice-runs before you work on the printed decal sheet.
Step 3. The Final Cut
OK, your decals look fantastic on the printed vinyl, and now it’s time to cut them out. Make sure you have proper craft scissors and or a craft knife if you plan to cut by hand. Always have your cutting mat in place before you start. There’s been a lot of damage to beautiful tabletops by newbies who forgot the mat. Or, follow the instructions given by your cutting machine maker if you’re using one.
Step 4. Peel-Off and Stick-On
The crucial thing is to make sure the recipient surface is 100% smooth, clean, and dry. You then need to check and double-check that the decal is ready to go on at the correct location. There’s a risk of damage if you don’t get the orientation right from the outset. Once happy, remove the transparent carrier sheet, recheck the direction, and press the decal carefully onto the surface.
Tip: you can run over the decal with the front of your thumb to press it into place. The bottom of a plastic spoon also works. Make sure you don’t apply the spoon’s edges or fingernails to the decal.
That’s it. You now have the basics of how to make vinyl decals at home. It’s quite an art to get right, but it’s not too tricky with a little practice, patience, and persistence. It can also be a lucrative business, either as a sideline or full-time operation, but that’s nothing for this piece.
——————————————————————————————————————-
Decal Hardware Reviews
Below are mini-reviews for 3 popular vinyl cutting machines and 3 inkjet printers. I’ve categorized each of the products as Best Budget, Best Value, and the Editor’s Top Pick.
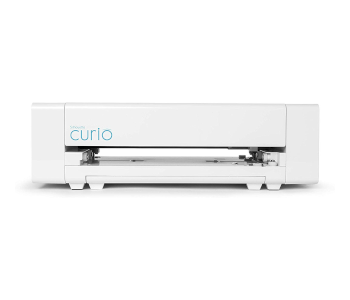
Silhouette America Curio Crafting Cutter | Best Budget
Editor’s Rating: 4.8/5
The Best Budget pick goes to Silhouette America’s popular Curio Crafter. It’s an affordable machine and an excellent choice for those new to making decals, stickers, and clipart, etc.
- Best feature 1: Cuts lots of different materials
- Best feature 2: Includes Silhouette 4 software
- Plus points: 4 unique functions, 5mm clearance, dual carriage, deep cut potential
- Minus points: Learning curve, no Bluetooth, no AutoBlade, small base
Compatible Materials: Vinyl, paper (includes specialty types), sticker paper, cardstock, iron-on, vellum, decent range of specialty type materials.
Silhouette Curio Decal Machine Highlights
The 5.5lb Silhouette Curio is a small, compact machine that takes up very little desk space. It can cut a whole variety of materials thanks to the optional deep-cut blade. The included Silhouette 4 software and Silhouette Design Store give new and experienced users lots of creative potential. Options include stippling, embossing, etching, and Dual Carriage.
A simple USB connection hooks the Curio up to any Mac computer or Windows PC. Raw beginners may want to bypass the company manuals, though. There are lots of much better how-to video tutorials.
The Not So Good
Novice users need to be patient as there’s something of a learning curve with the Silhouette Curio. The machine offers excellent value, but it’s missing a couple of features. There’s no Bluetooth connectivity or an AutoBlade as with the CAMEO 3 and above models. The Curio’s cutting base is also small at only 8.5 x 6”. Only you can know if these negatives are deal-breakers or not.
| Tech Specs |
|---|
| Brand: Silhouette America |
| Blade Type: Regular/deep-cut |
| Connectivity: USB |
| Device Connectivity: PC and Mac |
| Clearance: 5mm |
| Cutting Area: 8.5 x 6” |
| On-body Display: None |
| Dimensions: 17.2 x 5.5 x 7” |
| Product Weight: 5.5 lbs. |
| Warranty: 12 months |
| The Pros |
|---|
| Cuts multiple materials |
| Silhouette 4 design software |
| 5mm clearance |
| Dual carriage |
| Debossing & embossing |
| Stippling & etching |
| Deep 2mm cut (optional) |
| Exceptional value |
| The Cons |
|---|
| Learning curve for newbies |
| No Bluetooth connectivity |
| No AutoBlade |
| Small cutting base |
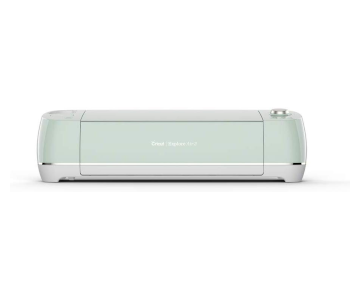
Cricut Explore Air 2 Mint DIY Cutter | Best Value
Editor’s Rating: 4.8/5
The Editor’s Choice for Best Value decal maker goes to the Cricut Explore Air 2 Mint. It’s a superb DIY cutter for those enthusiastic about creating unique artwork from home.
- Best feature 1: Quick to set up and easy to use at the beginner level
- Best feature 2: Cuts over 100 material types
- Plus points: Fast cutter, ultra-precise, intuitive app control, Bluetooth, excellent value
- Minus points: No WiFi, multicolor projects are tricky, vague online instructions
Compatible Materials: Premium vinyl, iron-on vinyl, cardstock poster board, specialty papers, faux leather, adhesive foils, and 100 other materials types.
Cricut Explore Air 2 Cutter Highlights
First impressions of Cricut’s Explore Air 2 Mint are good. It’s a fast, versatile, accurate, and affordable DIY cutter that’s quick to set up and easy to use. Decal makers can also explore the machine’s other creative uses and 100+ compatible material types. Some may find the dedicated Design Space software a tad restrictive, but it’s intuitive and so easy for the novice user.
Advanced designers get to upload and convert personal images for free. Cricut’s software comes with a plethora of readymade projects for those who want to jump right in. The updated app also lets you design and cut projects offline.
The Not So Good
This cutter is not for you if WiFi is on your list of must-have features, though it does have Bluetooth. The Cricut Explore Air 2 Mint is an easy machine to use aside from multi-color plans. Raw beginners may find the learning curve for multicolor projects frustrating at first. It’s not helped by the vague online instructions, either. New and inexperienced users should opt for video tutorials instead.
| Tech Specs |
|---|
| Brand: Cricut |
| Blade Type: Premium German carbide |
| Connectivity: Bluetooth |
| Device Connectivity: PC, Mac, mobile |
| Computer Connectivity: USB |
| Cutting Area: 12 x 12” |
| Dimensions: 24 x 9.5 x 9.5” |
| Product Weight: 14 lbs. |
| Warranty: 12 months |
| The Pros |
|---|
| Quick and easy to set up |
| Fast, quiet cutter |
| Ultra-precise cutting |
| Cuts over 100 materials |
| Limitless project potential |
| Beginner basic functions |
| App control |
| Superb value |
| The Cons |
|---|
| No WiFi connectivity |
| Multicolor projects are tricky |
| Online instructions are vague |
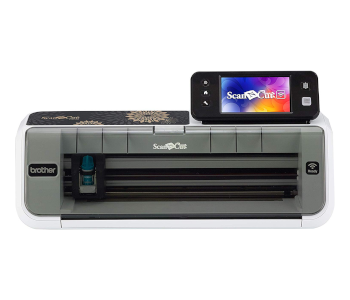
Brother CM350E Standalone ScanNCut2 | Top Pick
Editor’s Rating: 4.8/5
Brother’s CM350E ScanNCut2 makes the Top Pick. It’s a versatile scan-n-cut product and a standalone device. That means it can work without a connection to a PC or mobile device.
- Best feature 1: Perfect for decals, labels, stickers, iron-on, etc.
- Best feature 2: 630+ built-in designs ready for use
- Plus points: Large LCD touchscreen, push-buttons, WiFi, 4 cutting speeds, 4 saving options
- Minus points: Instructions not novice-friendly, limited LCD function, weak LCD support
Compatible Materials: All vinyl types, lots of fabrics, papers, foam, and much more.
Brother’s CM350E ScanNCut2 Highlights
The Brother Scan N Cut is ideal for creative types who want to make more than just decals. It’s standout features include 630+ built-in designs, a 300 DPI scanner, and a large LCD touchscreen. You can save scanned projects directly to the machine, a PC, external drives, or online. It’s an easy tool to use for anyone with basic cutter experience.
There are 4 cutting speeds to choose from and 2 blade options. The included blade is a 1.0mm standard type. You can also use an optional 1.5mm deep-cut knife if you need it. This machine comes with a 12×12” cutting mat, but a 12×24” option is also available.
The Not So Good
Experienced users should be able to follow the included instructions easily. However, they’re not written in a way that’s straightforward for the raw beginner. The LCD is a welcome feature, but it’s limited in what you can do from the touch menus. Lastly, the support that holds the LCD seems fragile and may break with an accidental knock.
| Tech Specs |
|---|
| Brand: Brother |
| Blade Type: 1mm standard |
| Connectivity: WiFi |
| Device Connectivity: PC, Mac, phones |
| Cutting Area: 12×12” and 12×24” |
| Display Type: 4.85” touchscreen LCD |
| Computer Connectivity: USB |
| Scanning Area: 12×12” |
| Dimensions: 23.5 x 11.1 x 11” |
| Product Weight: 14.3 lbs. |
| Warranty: 12 months |
| The Pros |
|---|
| Pleasing aesthetics |
| Push-button controls |
| Cuts multiple material types |
| 300DPI built-in scanner |
| Large, integrated touchscreen |
| Drag-n-drop simplicity |
| Four ways to save projects |
| Four cutting speeds |
| Wireless data transfer |
| 630+ built-In tools/templates |
| The Cons |
|---|
| Instructions hard for beginners |
| Limited LCD controls |
| Weak LCD support |
Below are 3 tried and tested inkjet printers for your home decal hobby or business.
1. Canon PIXMA TS6220 Inkjet Printer | Best Budget
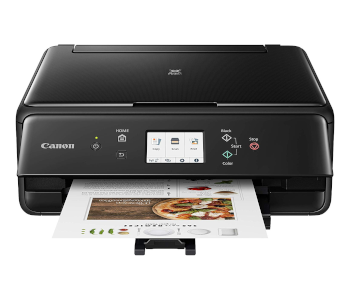
Editor’s Rating: 4.4/5
Canon’S PIXMA TS6220 Inkjet Printer is a superb choice for our Best Budget slot. It sells well and has seen some decent discounts in recent times. Let’s check it out.
- Best feature 1: Versatile all-in-one inkjet printer
- Best feature 2: Wireless connectivity
- Plus points: Perfect for decals, LCD touchscreen, 5 color ink system, compact, power saver
- Minus points: Not ideal for heavy use
Canon TS6620 Wireless Highlights
This all-in-one inkjet by Canon, prints, copies, scans, and offers wireless connectivity. It’s a capable model for printing decals using water transfer type paper. The wireless set up is quick and easy with any regular smartphone or tablet. It doesn’t take long to get familiar with the helpful built-in commands either. Controls are intuitive and easy to access via the printer’s LCD touchscreen.
The ink system uses 5 independent tanks, so you only replace the colors as they run out. Canon’s PIXMA TS6220 has a compact design that helps to keep workspaces neat and uncluttered. Other handy features include the built-in power saver, double-sided printing, and quick startup time.
The Not So Good
This inkjet printer has a small footprint and is suitable for a wide range of applications. Despite that, those into heavy-duty printing should consider a more robust machine. Also, some new users find the setting up procedure a little awkward, especially the WiFi. They’re right too. My advice would be to allow time for this and exercise a little patience to avoid frustration.
| Tech Specs |
|---|
| Brand Name: Canon |
| Printing Technology: Inkjet |
| Print Resolution: 4800 x 1200 dpi |
| Scanner Type: Flatbed |
| Auto Duplex Printing: Yes |
| App Name: Canon Print App |
| LCD Touchscreen: 3” control panel |
| Max Printable Area: 8.5 x 14” |
| Dimensions: 14.7 x 12.5 x 5.5” |
| Product Weight: 13.5 lbs. |
| The Pros |
|---|
| Versatile all-in-one printer |
| Bestselling product |
| Wireless connectivity |
| App control |
| Ideal tool for decals |
| Scans and copies |
| LCD touchscreen |
| Power saver auto-off |
| The Cons |
|---|
| Not suitable for heavy-duty printing |
| WiFi can be frustrating to set up |
2. HP OfficeJet Pro 9015 All-in-One Inkjet | Best Value
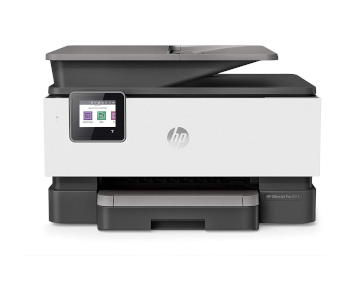
Editor’s Rating: 4.5/5
The Best Value inkjet printer goes to the HP OfficeJet Pro 9015. It’s an all-in-one print, copy, scan, and fax machine. Consider this model if you’re starting or running a home-based waterslide decal business.
- Best feature 1: All-in-one print, copy, scan, and fax machine
- Best feature 2: Wireless and Ethernet connectivity
- Plus points: Easy to use, crisp printing, touchscreen, fast, app control, voice-activated control
- Minus points: Awkward online set up, overwhelming menus for new users
HP OfficeJet Pro 9015 Printer Highlights
HP has been around for a good while and knows a thing or two about printers. Its OfficeJet Pro 9015, is a superb, feature-packed model neatly packed into a smart desktop machine. Wireless and Ethernet connectivity options make it easy to add to any network. This redesigned model even comes with voice-activated printing for use with virtual digital assistants.
Other noteworthy features include Self-healing WiFi®, Best-in-class Security, and app control. The Customizable Smart Tasks can be a real timesaver for repeat projects/jobs.
The Not So Good
The printer is easy to use once it’s up and running, but the setting up process frustrates some. That’s especially the case with those new to HP printers. You must go online, and there’s a fair amount of HP formalities to work through. Some users may have to disable their firewalls too. The device offers a lot of menu control that can make navigation and selection frustrating for new users.
| Tech Specs |
|---|
| Brand Name: HP |
| Printing Technology: Inkjet |
| Scanner Type: Flatbed |
| Copy Speed: 32 CPM |
| Fax Memory: 100 Pages |
| Auto Duplex Printing: Yes |
| Configuration: 4 cartridges |
| App Name: HP Smart |
| LCD Touchscreen: 2.65” color |
| Dimensions: 10.9 x 17.3 x 13.5” |
| Product Weight: 24.4 lbs. |
| The Pros |
|---|
| Print, copy, scan, and fax machine |
| Great for waterslide decals |
| Wireless and Ethernet connectivity |
| Voice-activated printing |
| Self-healing WiFi® |
| Best-in-class Security |
| App control |
| Customizable Smart Tasks |
| Value for money |
| The Cons |
|---|
| New users may find the online set up procedure awkward |
| Lots of menus to navigate |
3. Canon Pixma Pro-100 Wireless Inkjet | Top Pick
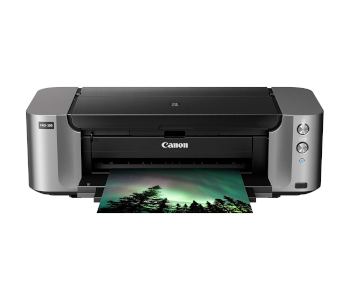
Editor’s Rating: 4.6/5
Another Canon product makes the top three, this time with its Pixma Pro-100 Inkjet printer. It’s a pro-level machine and a worthy model for those who need a reliable workhorse.
- Best feature 1: Refillable ink cartridges
- Best feature 2: Uses 8 dye-based inks
- Plus points: High-quality print head, computer-free printing, WiFi, high-speed USB
- Minus points: Heft, unintuitive bundled software, short USB cable
Canon Pixma Pro-100 Inkjet Highlights
The cost of ink is always a factor for folks who print a lot of decals, stickers, or anything else. Well, you can refill Canon’s Pixma Pro-100 cartridges. That means you only top-up those that need a refill as and when. Moreover, the machine uses 8 dye-based color inks that bring out truly vivid colors. And the print head produces outstanding high-resolution printing via microscopic droplets.
PictBridge connection lets users print computer-free. That means you can print directly from a compatible camera, smartphone, or DV camcorder. Other Pixma Pro-100 highlights include built-in WiFi, high-speed USB, and versatile paper handling.
The Not So Good
This inkjet machine is heavy, which can be a hindrance if you’re mobile and need a printer to travel with. The heft is welcome if your setup is permanent, though. There are two versions on offer here, i.e., printer only and the printer & ink bundle. The Bundle version comes with some Canon software, but it’s not at all intuitive. A lesser gripe is that the included USB cable is unusually short.
| Tech Specs |
|---|
| Brand Name: Canon |
| Printing Technology: Inkjet |
| Maximum Resolution: 4800 x 2400 dpi |
| Cartridge Configuration: 8 tanks |
| Number of Nozzles: 768 per color |
| Ink Droplet Size: 3.0 PL |
| App Name: Easy-PhotoPrint |
| LCD Touchscreen: None |
| Max Printable Area: 13.0 x 19.0” |
| Dimensions: 15.2 x 27.2 x 8.5” |
| Product Weight: 43.2 |
| The Pros |
|---|
| Refillable ink cartridges |
| App control |
| Quiet printing |
| Uses 8 dye-based inks |
| High-quality print head |
| Computer-free printing |
| WiFi connectivity |
| High-speed USB |
| Versatile paper handling |
| Excellent value |
| The Cons |
|---|
| Heavy machine |
| Bundled software not intuitive |
| Short USB cable |
Contents
- Sticker Vs. Label Vs. Decal
- Uses for Vinyl Decals
- Beginner’s Guide to Making Decals at Home
- Cutting Machines
- Inkjet Printers
- Decal Cutting Mat
- Scissors, Tweezers, X-Acto knife
- Reusable Squeegee
- Printable Vinyl and Vinyl Laminate
- #1 Sure Cuts A Lot V5
- #2 Canva Free
- #3 Maestro Label Designer
- #4 Microsoft Word
- #5 Adobe Creative Suite
- Make Your First Vinyl Decals
- Step 1. Prepare & Print
- Step 2. Apply the Laminate (optional)
- Step 3. The Final Cut
- Step 4. Peel-Off and Stick-On
- Decal Hardware Reviews
- Silhouette America Curio Crafting Cutter | Best Budget
- Silhouette Curio Decal Machine Highlights
- The Not So Good
- Cricut Explore Air 2 Mint DIY Cutter | Best Value
- Cricut Explore Air 2 Cutter Highlights
- The Not So Good
- Brother CM350E Standalone ScanNCut2 | Top Pick
- Brother’s CM350E ScanNCut2 Highlights
- The Not So Good
- 1. Canon PIXMA TS6220 Inkjet Printer | Best Budget
- Canon TS6620 Wireless Highlights
- The Not So Good
- 2. HP OfficeJet Pro 9015 All-in-One Inkjet | Best Value
- HP OfficeJet Pro 9015 Printer Highlights
- The Not So Good
- 3. Canon Pixma Pro-100 Wireless Inkjet | Top Pick
- Canon Pixma Pro-100 Inkjet Highlights
- The Not So Good