How to Build Your Own RC Car

My easy-to-follow guide outlines everything you need to know on how to build your own RC car. I cover kit options as well as building models from scratch. The latter route is what RC’ers call scratch building for obvious reasons. It makes sense to go with the kit version if this is your first project. Kit building is the best way to become familiar with the composition and construction of a vehicle.
RC Kit Cars Vs. Scratch Building
R/C kit cars are educational. They are the natural stepping stone to build-your-own models from plans. All you need is in the box, along with a set of detailed instructions presented in a logical order. You know that everything is going to fit, the parts are the right choice for the job, and that the car will work. Kit models also help you to identify the pieces, where they go, and how they work.
R/C scratch building is for modelers with experience. You get to design something that’s 100% unique if that’s what you want. You must source each individual part and know that it’s going to fit/work as intended. Some hardcore scratch builders draw their plans rather than download them. They also make as many parts as possible. Others prefer to buy pre-made parts and create their model that way.
Keep First-Time Projects Simple
There are lots of simple, fun projects, even with scratch-building. For example, it’s possible to create a basic radio control vehicle using household materials. That can be things like an old electric drill motor, PVC tubing, and a few cheap parts from your local hobby shop. Such a model won’t win any awards or have any wow factor, though. Even so, it will work, and it’ll teach you a lot in the process.
Join an RC Forum or Local Club
The world of radio control is friendly and sociable, so consider joining an RC forum or local club. These interactive environments are where members swap ideas, share tips, and answer questions. They are an invaluable support resource that make the hobby so much more enjoyable.
OK, let’s begin with RC kit cars, the things you need to start, and review a few examples.
Part 1. Building RC Cars from Kits
The 5 item checklist below shows what you need to get started on a new RC kit car project:
| 1. Radio-control kit car | ✔ |
| 2. Storage compartments | ✔ |
| 3. The right tools | ✔ |
| 4. Thread-locking glue | ✔ |
| 5. Batteries | ✔ |
#1 Not all kits are equal
Make sure you know what’s in the kit before you buy anything. Some products have everything in the box, whereas others only include the car’s framework. The reason for this is to offer flexibility for the modeler. Including some parts and not others gives builders the option to choose specific pieces. Every sales page has a ‘What’s in the Box’ and a ‘Needed to Complete’ list where necessary.
#2 Storage compartments
There can be lots of small parts when building an RC model. It’s easy to lose stuff even with a tidy workspace. A storage compartment system is a simple way to keep everything organized. There are lots of choices available. Find something that has draws of various sizes. The Greenpro 3309 Wall Mount Storage Cabinet/Drawer Organizer is an excellent example.
#3 Get the right tools
It’s frustrating when you don’t have the proper tools to build the kit. You don’t need a lot, but they do have to be right. Makeshift tools are a bad idea as you risk breaking something or injuring yourself.
Below is a list of the basic RC kit-building tools used by RC car modelers:
1. Electric screwdriver w/ bits
2. Hex Screwdriver set
3. Hex wrench w/ ball end
4. Rotary tool
5. Flush cutters
6. Heat gun
7. Soldering iron
8. X-Acto knives
9. Pliers
10. Wire cutters
11. Toolbox to store the above
You may have some of the tools already. The point is to make a list of what you still need so that you have everything to hand when it’s time to build your RC car. Some of the modeler’s toolkits are worth checking out too. There are lots of excellent choices like this toolset from Model Expo.
#4 Thread-locking glue
Don’t leave home without it if your screws go into metal. Purpose thread-locking glue is an essential part of any RC car builder’s toolbox. It prevents tiny screws from backing out over rough terrain or with motor vibrations. It’s not expensive and lasts forever, well almost.
#5 Batteries
A lot of RC kits don’t include a battery in the box. The makers should detail the options in the kit’s manual. You can also ask on RC forums for advice on batteries or battery upgrades for your model.
Steps to Building an RC Kit Car
The 7 steps below are typical procedures for building an RC car from a kit. It’s a broad explanation and not based on any particular model. Always refer to the manual for specific guidance.
- Choose your RC kit car
- Prepare the workspace
- Lock screws with a thread-locking adhesive (see below)
- Assemble the car’s wheel axles
- Assemble the car’s shocks
- Install the electronics
- Attach the shell
#1 Choose your RC car kit
There are plenty of RC car kits to choose from, and that’s fantastic news for the novice builder. They come in various types, sizes, and for all budgets. Take your time choosing if it’s your first project. Reach out and ask for advice if you need a little guidance. Newbie questions are always welcome in RC forums. Simple RC car kits can start from as little as 50 dollars and go up to 1000+ dollars.
Below are three mini-reviews of kits for the Best Budget, Best Value, and Top Pick. These models will give you a feel for what’s available though there are many others.
1. Rage C2400 Mini-Q 4WD RC DIY Kit Car | Best Budget

Editor’s Rating: 4.5/5
Meet the Rage RC C2400 Mini-Q. It’s a 1/24 Scale kit that includes everything in the box. This 4WD on-road racing car is an excellent choice for anyone just getting into RC cars—DIY style.
- Best feature 1: Easy-to-follow step-by-step assembly
- Best feature 2: Runs on indoor/outdoor surfaces
- Plus points: Fun building experience, short assembly time, 4WD system, easy to drive
- Minus points: Mediocre performance
Reasons to Consider the Mini-Q RC Kit Car
Consider the Mini-Q if you’ve never assembled an RC kit car before. It’s super easy to put together thanks to the straightforward guide and systematic steps. The total build time is around 1 hour give or take. It’s an ideal entry-level kit as the factory has done all the precision assembly work. That includes the gear differentials and suspension system.
You still get to acquire knowledge by assembling the kit. It teaches you about the parts, where they go, and how they function. You get to learn about maintenance, tuning, and the benefits of upgrades, etc. The finished project is a shaft-driven 4WD on-road race car. It’s fun to drive across indoor and outdoor surfaces. It’s also affordable at just over 50 dollars at the time of writing this review.
The Not So Good
The Mini-Q is a fun car to drive, especially indoors. However, those with experience driving RC sports cars are sure to find its 10+ mph performance mediocre outside.
| Tech Specs |
|---|
| Brand Name: Rage RC |
| Model Type: On-Road Race Car |
| Model Scale: 1:24 |
| Dimensions: 11.2 x 7.5 x 3.8” |
| Product Weight: 1.3 lbs. |
| Battery: .7V 400mAh 1S LiPo |
| Running Time: 30+ minutes |
| Recommended Age: 16+ years |
| The Pros |
|---|
| Easy-to-follow assembly |
| Runs on indoor/outdoor surfaces |
| Fun building experience |
| Short assembly time |
| Educational |
| 4WD system |
| Easy to drive |
| The Cons |
|---|
| Mediocre performance |
2. Tamiya Racing Fighter 2WD Off-Road Buggy Kit | Best Value
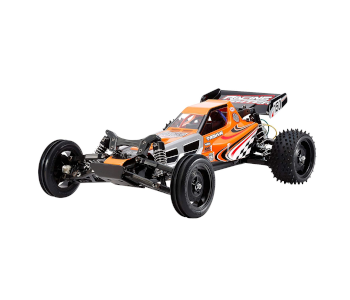
Editor’s Rating: 4.8/5
Something is enthralling about RC buggies, and this one is no exception. It’s a genuine Tamiya Racing Fighter, a 2WD 1/10 scale off-road RC kit car.
- Best feature 1: Easy to build kit w/ clear instructions
- Best feature 2: Stylish polycarbonate body
- Plus points: Lightweight & durable, sealed gearbox, built-in differential gear, customizable
- Minus points: Doesn’t include everything in the box, soft springs
Reasons to Consider 2WD Racing Fighter Kit
No one will doubt the good looks of this buggy. Tamiya has mounted the Racing Fighter onto a DT-03 chassis platform. The chassis and straightforward instructions make this kit ideal for novice builders. The stylish polycarbonate body is lightweight, durable, and sports an eye-catching design. There are even stickers in the box so that users can decorate it.
This buggy has a sealed rear gearbox and internal gear differential complete with dust cover. The rear ribbed front & square spike provides the car with a decent grip on multiple surfaces. Overall, it’s an impressive performer. It offers entry-level drivers stress-free control and smooth cornering. Another plus is the range of optional parts available to customize and tune the DT-03 chassis.
Items needed to compete:
- 2CH radio controller
- 7.2Vt battery
- Compatible battery charger
- Paint (optional)
- Tools to assemble
The Not So Good
You don’t get everything in the box with this model. That can be a pro or a con depending on the user. It’s quite normal for kits to leave out certain parts. However, inexperienced kit builders don’t always notice at the point of purchase. See ‘Items needed to complete” above for details. Another con is that the springs are a little on the soft side and tend to bottom out, even at the higher settings.
| Tech Specs |
|---|
| Brand Name: Tamiya |
| Model Type: Off road buggy kit |
| Model Scale: 1:10 |
| Dimensions: 19.1 x 9.1 x 5.9 |
| Product Weight: 3.97 lbs. |
| Battery: 7.2V (not included) |
| Running Time: Depends on the battery |
| Recommended Age: 12+ years |
| The Pros |
|---|
| Easy to build kit |
| Clear instructions |
| Stylish polycarbonate body |
| DT-03 chassis platform |
| Lightweight & durable |
| Stylish rear wing |
| Torque-tuned motor |
| CVA oil dampers |
| Sealed gearbox |
| Built-in differential gear |
| Customizable |
| The Cons |
|---|
| Needs extras to complete |
| Soft sprints |
3. Tamiya Volkswagen 4WD Beetle Rally Car Kit | Top Pick
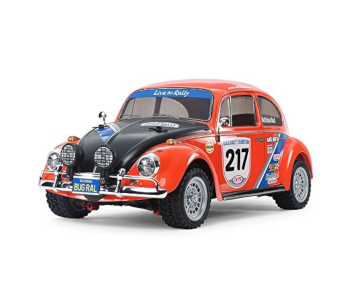
Editor’s Rating: 4.6/5
The Top Pick goes to the Volkswagen Beetle in its rally racing form. The real-world model was a regular fixture on the world’s rally circuit in the 1950s to the 1980s. This kit is a stunning replica.
- Best feature 1: Easy-to-follow assembly instructions
- Best feature 2: Authentic sound
- Plus points: Smart polycarbonate body, WD MF-01X chassis, off-road capable, rubber tires
- Minus points: Needs parts to complete, unpainted body, stock motor underpowered
Reasons to Consider the VW 4WD Beetle Kit
The Tamiya Volkswagen 4WD Beetle is a fun car to build either alone or with a parent. The instructions are uncomplicated and clear, which is characteristic of Tamiya kits. The VW body sits over the popular 4WD shaft-driven MF-01X chassis. The chassis is suitable on-road and off-road flat dirt surfaces. The finished model produces an authentic sound that adds further to its appeal.
This R/C kit car comes with rubber rally block tires that provide superb grip, even on wetter ground. It’s an impressive RC kit for anyone who loves the VW Beetle style.
Items needed to compete:
- Servo
- 7.2V battery
- Compatible battery charger
- Tamiya PS paint (optional)
- Tools to build
The Not So Good
This car needs extras to complete, and that’s typical for RC car kits. But first-time kit builders should be aware of the extras required before they buy. Also, the body has no paint and is untrimmed. Again, that’s quite usual, but something novices should be aware of. The finishing touches are all part of the fun for most builders. Finally, some RC’ers are sure to find the stock motor a tad underpowered.
| Tech Specs |
|---|
| Brand Name: Tamiya |
| Model Type: Volkswagen Beetle Rally Kit |
| Model Scale: 1:10 |
| Dimensions: 17.5 x 8.3 x 7 |
| Product Weight: 4.1 lbs. |
| Battery: 7.2V (not included) |
| Running Time: Depends on the battery |
| Recommended Age: 14+ years |
| The Pros |
|---|
| Easy-to-follow assembly |
| 4WD drive system |
| Clear polycarbonate body |
| Includes brushed motor |
| Brushless motor compatible |
| Authentic sound |
| WD MF-01X chassis |
| Off-road capable |
| Rubber rally block tires |
| The Cons |
|---|
| Needs parts to complete |
| Unpainted body |
| Stock motor underpowered |
#2 Prepare the workspace
Your workspace must always be orderly whether it’s allocated or makeshift. It’s easy to lose stuff, so make sure you always maintain a clutter-free environment. Your work area also needs to be well lit and ventilated. Consider a builder’s board to lay on top of the workbench. Some modelers also like to use an RC car stand like this workstation from Hobbypark.
#3 Lock all screws with adhesive
Lock all the screws with a thread-locking adhesive if they go into metal. Do this when the guide tells you to fasten certain parts together. You shouldn’t need to use glue if the screws go into plastic, though. Again, refer to the kit instructions and follow them by the book. Also, don’t use an electric screwdriver if your car uses tiny screws as you risk stripping the threads.
#4 Assemble the wheel axels
Follow your guide to assemble the car’s wheel axels. The process should look like this:
- Layout the model’s wheels and related pieces
- Fit the gears to the axle as per the guide
- Attach the wheels
Tip: Use a parts tray or trays for this and other procedures. Only place the pieces that you’re working with into the containers. Build the car in an assembly line fashion to keep the process straightforward and systematic. Again, avoid the electric screwdriver with tiny models.
#5 Assemble the shocks
The RC car shocks attach to the model’s wheels to support its chassis. Some may need filling with an appropriate lubricant. If so, the oil should be part of the kit. It’s a simple process, but always make sure the cap is secure before moving to the next one. The job is to then slide the springs onto the shocks. Finally, attach the shocks to the axels once everything is in place.
Get familiar with the car’s suspension system, how it goes together, and the way it works on the track. Why? Because you need to get into suspension fine-tuning if you decide to scratch build later.
#6 Install the electronics
By now, your RC model car is taking on the shape of a real vehicle. It’s now time to install the electronics. They include the servos, battery, and an electric motor. The steering servos attach to the axel at the front of the vehicle. Screw the electric motor into its precise place at the back of the model. The last job is to position the battery as per the instructions and attach all the wires.
#7 Attach the shell
It’s now time to attach the shell providing everything has gone to plan thus far. The kit should include clips (not glue) to hold the body secure over the chassis. The shell should come off as easily as it went on. That allows you to change components, make any adjustments, and perform repairs as necessary.
OK, you’re almost done, but there’s something you need to do before the trial run.
The Pre-Drive Inspection
Don’t try to run your newly built model without performing a final inspection—or two.
| All screws and nuts are properly tightened | ✔ |
| Thread-lock adhesive secures screws that go into metal | ✔ |
| Transmitter/receiver batteries have a full charge | ✔ |
| Breaks tested and passed | ✔ |
| Throttle tested and passed | ✔ |
| Anything else that pertains to your model | ✔ |
Post-Drive Procedures
All responsible RC’ers should get into the habit of post-drive procedures.
| First, turn off the receiver followed by the transmitter to prevent runaways | ✔ |
| Let hot batteries cooldown for a few minutes before handling | ✔ |
| Always replace dented batteries or those with threadbare wires | ✔ |
| Always keep the model RC car clean and free from excess dirt or grease | ✔ |
OK, you now know the basic procedures on how to build an RC car from a box. Parts and processes vary between kits, especially with scale models. Despite that, the principle guidelines are the same.
OK, the second half of this guide looks at how to scratch-build and the options available.
——————————————————————————————————————-
Part 2. Scratch Build Your Own RC Car
Welcome to the incredible world of RC scratch building. There are few limitations as to what you can do here. You have plenty of free plans to download, and others for a small fee. A scratch building project starts with goal setting. You can’t begin until you first have a clear vision.
Design Goals
Experienced scratch builders know what they want from the outset. First-timers need to give the project some careful consideration. The best approach is to use simple lists.
Some ideas for a goals list might look something like this:
- Type of R/C car, i.e., off-road, on-road, sports, buggy, truggy, truck, etc.
- Anticipated time scale for the project
- How much of the car you intend to build yourself?
- Scale replica or totally unique model?
- Materials, e.g., metal, carbon fiber, plastic, other
- Crash-resistant properties (also relates to materials used)
- Build the car for under X amount (your max budget)
- Purpose of end model, e.g., show, leisure use, competition
RC Car Plans
A serious scratch builder will design his or her RC car using specialized design software. The pro-grade tools are excellent, but they’re not cheap. Make sure you’re serious about creating RC cars before committing. It’s beyond the scope of my guide to go over the options or how to use them in any detail. Some pro-grade tools include AutoCAD, Autodesk Inventor® CAD, and SOLIDWorks.
Amateurs should check out Autodesk Fusion 360. It’s free for non-commercial hobbyists and students at the time of writing. There’s a learning curve with all computer-aided design (CAD) tools, but it’s immensely rewarding. It’s also much easier to learn if you have a genuine passion for what you do.
Alternatively, you can search for free plans or those that sell for a nominal fee. RC car plans are harder to come by than model aircraft, but they are out there. Ask on RC forums if you need help.
Prepare the Parts List
You can start to source or make the parts for the project once you have the plans. Again, have a list handy so that you can work in an organized fashion. An R/C car parts list looks something like this:
- Ball Ends
- Body
- Metal chassis
- Driveshaft
- ESC
- Front Axle
- Gearbox
- Gears
- Link Rods
- Motor
- Rear Axle
- Servo
- Shocks
- Wheels (Front)
- Wheels (Rear)
- Others
You may want or need to source parts and materials from different suppliers and keep track of the costs. Put the items above into a simple 3 column table like the one below:
| NAME OF PART/COMPONENT | LINK TO SUPPLIER | EST. COST |
|---|---|---|
| R/C car body | Link to the potential supplier | $100.00 |
| Next part here | Next link here | $1.00 |
| Cont.…. | ||
| Estimated total: $101.00 |
How to Order Custom Parts
OK, let’s say you want to use custom parts from your design, but you can’t make them yourself. Consider using services like SHAPEWAYS and 3DHubs. What you do is upload your file to any of these platforms. They should let you know if any areas of your design are unprintable or need refining. You can then choose materials and surface finish, etc., and get a quote for the project right away.
It’s possible to get the shells and decals customized at the same time as the parts creation. Alternatively, you can keep the finish of your design 100% unique and decorate it yourself.
Start to Scratch Build
You have the plans and have bought or made the parts for your RC car. How you put everything together depends on the model, its complexity, and the scale, etc. Assembly should look like this:
- Attach the wheels to the front of your chassis
- Secure any screws that go into metal with lock-thread adhesive
- Attach the steering component and servos for the front wheels
- Fix the electric drive motor to the back wheels
- Secure the rear wheels to the chassis
- Connect the electronics (receiver, speed controller, battery) to the motor and servos
- Attach and secure the shell to the vehicle
Make sure you follow the pre-drive checks and post-drive maintenance (see kit car above).
Summing Up
Scratch building can be simple or complex, fast, or time-consuming, but it’s always rewarding. My advice would be to start with a modest project that uses few parts and is void of details. If you get the bug—and you probably will—each plan you choose gets bigger, better, and more complicated. That’s a good thing because modelers like nothing more than a challenge.