Podcasting 101: How to Create a Podcast that Works

This guide looks at how to create a podcast that captivates an audience. But why bother with podcasts in a world obsessed with audiovisual? The answer is that audio provides an intimacy not found with moving pictures. The listener can feel a real personal connection with the podcaster. Furthermore, podcasts are portable and allow audiences to listen in at any time, and anywhere.
A professional podcaster can get people to listen even if they’re not interested in the topic. That’s because they’ve found a way to communicate that’s both entrancing and entertaining. It’s a skill, and like all skills you can learn to master it by following a few basic rules.
What You Need to Podcast
There are specific things to consider when preparing for that first podcast. The list below may not make much sense right now, but it will do by the end of this no-nonsense guide.
The Podcaster’s Checklist
✔ The physical equipment
✔ Audio editing software
✔ Reliable hosting
✔ The target audience
✔ The goal (be specific)
✔ Create an outline
✔ Captivating titles
✔ Taglines
✔ Cover art
✔ Social media
Podcasting 101 — the First Steps
The biggest mistake many novice podcasters make is to jump in without thought. People may sit up and listen to you in the visual world, but this is different. There are no images or body language to back up your presentation. You must give the listener something they want and avoid anything they don’t. Let’s get the 6 don’t dos out of the way first so that you don’t fall into bad habits.
- Don’t skimp on audio equipment
- Define your niche, know your audience
- Don’t ramble on, stay on topic
- Don’t use jokes that you find funny. It’s not about YOU
- Don’t forget the metadata as it’s how others find you
- Don’t skimp on bandwidth
Content is king and always has been, but there are no shortcuts here. Even an excellent podcast presentation will fail if the delivery sucks. The next segment looks at the first point, equipment. The following sections get into preparing, creating, and testing your first podcast.
#1 Don’t Skimp on Podcasting Equipment
Don’t skimp on the equipment if you’re serious about podcasting. You may have the best voice, the perfect delivery, and a topic that everyone wants to hear. But potential listeners will hit the back button faster than a scalded cat if your audio equipment falls short. The physical gear starts with the microphone. I want to quickly go over polar patterns before we get into the mics, though.
Polar Patterns for Podcasting
All microphones pick up sound, but they don’t all hear the same way. You must speak directly into some mics from the front. Others are sensitive from all sides (360°). And some hear equally from the front and back but ignore sound from the left and right sides. These are the polar patterns. It’s an invisible audio pickup field that surrounds the capsule or head of all mics.
The image below shows the various polarity patterns of modern microphones.
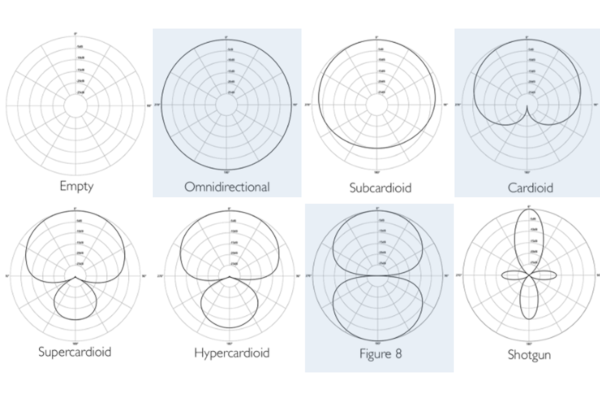
The most used patterns for podcasting are cardioid, omnidirectional, and bidirectional (figure-8).
The cardioid mic is ideal if you’re the only voice in the podcast. Think monologues, online interviews, or discussions where the other person has their own mic. Omnidirectional patterns are used for recording people around a table who share the same microphone. And bi-directional pickups are perfect for on-location or studio conversations between two people.
Not all Ambient Noise Is Bad
Both cardioid and bidirectional pickups focus on the sound source and minimize ambient noise. Background clamor is often a distraction. But it can also make a podcast sound more real in some situations. That’s as long as it doesn’t dominate or distract from the main speaker(s). Distant background sounds of an event—for example—can add to the atmosphere of a quality podcast.
The Podcasting Microphone
The microphone to use depends on the type of podcast and personal style. One thing to avoid is the tinny built-in mics found on smartphones, tablets, and laptops, etc. You don’t have to spend much on an external mic, but you may want to later if your podcast journey takes off.
Let’s now explore your podcasting microphone options.
- USB mics for podcasting
- XLR mics for podcasting
- Dynamic mics for podcasting
- Condenser mics for podcasting
The next section looks at the pros and cons for the microphone types above.
USB Mics Vs. XLR—Which Is Better?
One of the most common newbie questions is what mic to buy, USB or XLR? Start by asking yourself a couple of straightforward questions. Do you want a mic that connects to a computer or smart device and is ready to go right away? Or, do you need a more versatile mic that you can upgrade and have more control over the sound it produces?
Not sure? I’ll highlight the main pros and cons of each type to help you decide, starting with USB.
USB mic pros and cons
A USB mic is plug-n-play, often shortened to PnP. All you do is secure it into a USB port and start to record. Most USB mics don’t need drivers, configuring, or complicated adjustments to function. That makes the USB microphone perfect for beginners and podcasters who prefer simplicity. The performance of a USB mic tends to be consistent across devices, which adds to its appeal.
USB cons
There are a few downsides to USB microphones, though. First, you need a computing device for these products to work. No computer, no mic. Also, some USB models run into issues with Windows 10. Always check for compatibility updates before you buy any USB mic for Win 10. Also, it’s hard or impossible to upgrade USB mics. Lastly, they’re difficult to troubleshoot if anything goes wrong.
XLR mic pros and cons
The biggest advantage of XLR type microphones is the huge variety available. USB mics are now more plentiful, but they’re still way behind the XLR choices. The range of XLR microphones means there’s something for anyone, at any budget, and for any recording application. They’re also easy to troubleshoot if anything goes wrong. That’s due to their removable and exchangeable parts.
You’re not tied to a computer with XLR mics. They can work with a pocket-sized portable audio recorder. You can also plug them into DSLR cameras and other devices with an adapter. This versatility makes sense for folks on the move or those who want full control over their microphone system.
XLR cons
One notable downside is that all this versatility makes XLR mics more expensive than USBs. It’s not only the mics but the hardware needed to run them. They need a decent interface or mixer to function. There are other considerations too. Cables, configuration, phantom power, and tweaking make XLR mics overwhelming for some people.
Final thoughts
Are you a solo voice podcaster who works at home, from one desk, and uses the same computer? If yes, then it might make sense to go with a USB microphone. There’s a place for XLR mics among podcasters too. For example, your shows include multiple guest interviews. Or, you want a versatile home studio to produce more creative shows and live music performances.
Now let’s look at why you may want to choose a dynamic or condenser mic for podcasting.
Dynamic Microphones
Most dynamic microphones are handheld and desktop varieties and cost less than condensers. They’re incredibly rugged compared to condenser mics and can handle lots of abuse. Shure’s SM58 dynamic vocal microphone even survived being run over by a truck. Dynamic mics are also able to handle deafening noise. Excellent background noise rejection is another quality worth a mention.
Dynamic mic cons
On the downsides, dynamic mics have low sensitivity or output level. That means they need a decent—preferably dedicated—preamp to get the best sound. Most dynamic mics also lack a full frequency response. Another consideration is heft, which can be considerable with some products.
Condenser Microphones
Most USB mics are condenser types. They are more complex than dynamic models, which has its good and not so good points (see next). They have a higher output level and a wider frequency response too. The sound of condenser mics is warmer, crisper, and more natural than the dynamic alternatives. Another plus point for the condenser mic is that they can be incredibly small in design.
Condenser mic cons
These mics are more physically fragile than dynamic types due to their complex construction. They can also suffer from higher self-noise due to the internal electronics. Lastly, condenser microphones are more prone to climate problems and RF type interference.
Final thoughts
Dynamic mics are the perfect choice for live events. That’s because they’re durable and can handle loud noise well. Such environments are best suited to broadcasters rather than podcasters. However, a dynamic mic’s ability to reduce background noise is something for podcasters to consider. Also, dynamic mics have a characteristic broadcast sound that some podcasters aim for.
Condenser mics are ideal if you have a controlled, sound-treated studio setup. Most professional podcasters like to have more control over the audio too. That’s what they get with a condenser mic. And there’s also the more natural sound that many find appealing.
Below are a few excellent examples of USB and XLR mics, both dynamic and condensers
——————————————————————————————————————-
USB Mics for Podcasting
USB mics are beginner-friendly, plug-n-play PRODUCTS and what most newbies opt for. These simple products plug into your computer or laptop’s USB port and are ready to go. USB microphones are ideal for solo podcasters sitting at a desk. They’re great for interview productions too.
Here are three of the current favorite USB mics for podcasters:
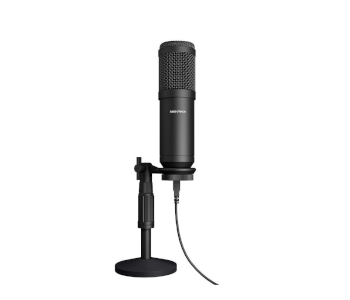
1. SUDOTACK ST-850 Entry-Level Podcast Mic | Best Budget
Editor’s Rating: 4.8/5
The all-metal Suditack ST-850 is an excellent choice for first-time podcasters. It’s a USB mic with a cardioid pickup pattern and a professional look. You can adjust the detachable metal upright desktop stand by 180° to get a perfect position. You can use this mic with a variety of mainstream systems. Some of those include Windows and Mac computers, smartphones, and various other devices.
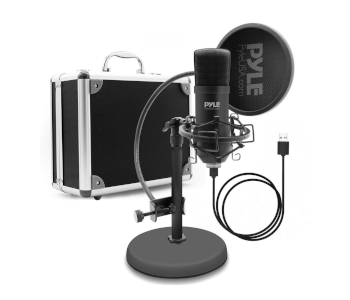
2. Pyle USB Podcast Mic Recording Kit | Best Value
Editor’s Rating: 4.9/5
This is the Pyle USB Plug-N-Play Podcast Microphone Recording Kit. You get a full podcasting set in one box. The mic has a high-frequency response with clear audio and the right amount of bass for speech. The set includes a sturdy upright, flat-based stand, foam windscreen, pop filter, and a shock mount. And the aluminum storage-travel case keeps the kit protected and together.
3. Apogee HypeMiC Studio Quality Podcast Mic | Top Pick

Editor’s Rating: 4.7/5
The Apogee HypeMiC is a professional microphone for pro-level podcasters. You don’t need a mic like this if you only produce monologues. There are cheaper alternatives for that which are just as good. But keep reading if your podcasts include interviews and live performances from musicians. This versatile, studio-quality mic is perfect for vocalists, instruments, speech, and specialist recording.
Apogee’s Hype MiC isn’t cheap, but it is excellent value if you can exploit all that it offers. It’s incredibly rugged and should last a long time. The accessories include a custom pop filter, premium desktop stand, and a smart storage come carrying case.
XLR Mics for podcasting
XLR microphones are not something to consider if you’re a novice. They cost more than USB mics for one. That’s because they have pro-level advantages over audio quality and sound manipulation. XLR mics are not plug-and-play as they need other equipment to function. That includes things like an audio interface, dedicated preamp, and mixers.
Here are three of the current favorite XLR mics for experienced podcasters:
1. MXL Mics 770 XLR Cardioid Condenser Mic | Best Budget

Editor’s Rating: 4.6/5
Our Best Budget XLR microphone is the all-metal MXL Mics 770. The body has two useful switches. One is a handy -10dB pad and the other’s a bass roll-off used to reduce low-frequency rumble. The audio produced is warm and natural-sounding. It’s a versatile microphone suitable for multiple applications. They include vocals, speech, string, and percussion instruments.
You get a rugged case with foam cutouts for the mic and its MXL 70 shock mount. The shockmount is not as well-made as the mic, but it’s better than nothing.
2. Audio-Technica AT2020 Studio XLR Mic | Best Value
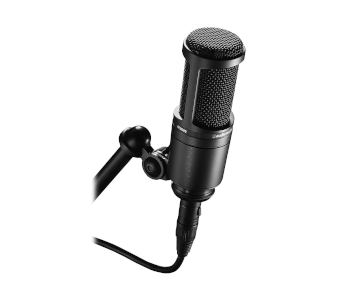
Editor’s Rating: 4.8/5
The AT2020 XLR microphone by Audio-Technica offers excellent value for its price category. It’s another all-metal product with a rugged construction which looks, feels, and sounds fantastic. The mic is a favorite among podcasters who work from the home studio. Some of its best features include high SPL handling, a wide dynamic range, and a low mass, custom-engineered diaphragm.
This microphone checks a lot of the right boxes for vocalists and instruments, as well as speech. Two of its main criticisms are that it lacks a little bass and is sensitive to plosives. The former is subjective based on user and applications. And the latter is easy to fix with an inexpensive pop filter.
3. Shure SM7B Dynamic XLR Microphone | Top Pick
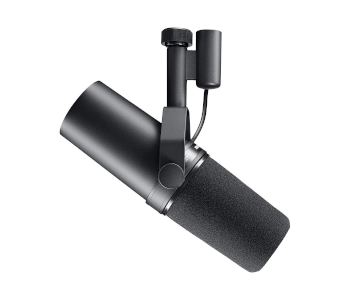
Editor’s Rating: 4.8/5
Shure’s SM7B XLR is another of the company’s legendary microphones. It’s nothing for the amateur podcaster just starting their journey. It’s an incredible and reliable workhorse for semi-pro and professional podcasters, voiceover artists, and vocalists. But you wouldn’t choose it if solo podcasts were all you did. This mic has useful tone switches that let you change between different sounds.
The SM7B ships with an A7WS detachable windscreen, specially designed to diminish plosives. It also gives the mic a much warmer tone for those close-talk, intimate sounding vocals. On the downside, it requires a lot of gain, and thus needs a decent preamp or mic activator.
——————————————————————————————————————-
#2 Define Your Niche, Know Your Audience
Online listeners are on the rise. Both talk radio and informative or entertaining podcasts are becoming increasingly popular. There’s a growing market out there and plenty of room for new competition. But you still need to stand out if your podcasts are to gain momentum and captivate an audience. Thus, never assume anything, and always strive to meet the expectations of your listeners [1].
Podcast advertising is also on the up according to a recent Ad Revenue Study. There’s the potential to grow an audience and revenue with the right approach. Give your niche lots of careful consideration and try not to make it too broad. How can you provide solutions to problems, answers to questions, and addictive listening? Think carefully, and seek advice from others if you’re unsure [2].
#3 Warning! Don’t Ramble, Stay on Topic
Being concise is an art, and if you haven’t got it it’s time to learn. The biggest newbie podcasting mistake is inappropriate delivery. No listener will stick around or revisit your audio files if you ramble. Most podcasters don’t even know when they’re doing it. Step outside of yourself and try to hear your podcasts how others hear you. There are a few proven ways to identify an unintentional ramble.
The way to avoid rambling with monologue podcasts is to perfect your script.
The 7 points below should help to keep your podcasts in check:
- Introduce yourself from the outset
- Know what you’re talking about; do the research
- Get to the point dammit
- Avoid the I, I, I, me, me, my approach unless it’s vital to the style
- Don’t revisit points already mentioned unless it’s necessary
- Don’t go off on a tangent unless it benefits the style
- Watch the time. Shorter is usually better
There is no fixed time, but the longer your podcast, the better it needs to be to keep the listener. A general guide is to stay within 10–15 minutes absolute max if you provide daily podcasts. Weekly and monthly podcasts can be longer, but only if they’re packed with extra value.
The ABCs of an Interview Podcast
The success of any podcast is contingent on the time you spend on it.
A podcast interview is trickier to control than a solo address. You must monitor yourself and the other person or people. Nervous guests have a habit of rambling. You should know when to let them talk and when to intervene. It’s a good idea to go over the podcast and questions with a guest before the recording when possible. The podcast interviewer should have a fixed format to follow.
The interviewer’s safety net
Try to keep things simple. Here’s a basic outline for guest interviews:
- Research: When you know your stuff, you sound confident
- Prepare a list of questions
- Know things that are relevant to your guest and the interview
- Learn how to keep the conversation on track and flowing
- Have a glass of water for you and the interviewee if in the same room
A list of pre-prepared questions is invaluable for podcast interviewers. It acts as a safety net if you don’t end up needing them. The type of questions you ask should depend on the interviewee, their personality, and politics. Always do some research on the person you interview. That includes simple things like getting their name right, specific title, and company/profession.
#4 Avoid Jokes Unless it’s a Comedy Podcast
Perhaps being funny is part of your personality. Even so, avoid jokes, witty remarks, and one-liners, unless you’re producing a comedy podcast. You can always let the funny side of your character shine through over time. First, build an audience. You’ll soon know when—or if—the time’s right for humor. Always remember that what’s funny to you may not be so amusing to your audience.
Jesting also runs the risk of being offensive, especially when body language is absent. Your listeners may have different cultural, ethnic, and religious backgrounds to you.
#5 Don’t forget the Metadata
Online metadata is text written in a way that provides information about your podcast. It lets search engines like Google and online searchers find relevant data about your MP3 files. A podcast with no metadata is lost. Let’s look at ID3 tags and how they work.
- MP3 files contain embedded track data
- This data goes into something called an ID3 metadata container and may include:
- Title of the podcast
- Name of the artists/author
- The podcast cover art
- Recording date
- Comments
- Genre, and so on
- The podcast creator can add metadata at the beginning or end of the file
It’s all quite simple. All you do is add the correct information to the appropriate fields. Then—when you export the podcast file—your metadata information exports with the MP3.
How to Add ID3 files to MP3 Files
You need a software program to add and edit your ID3 tags. It’s possible to do this using Apple iTunes or Windows’ own Media Player. However, you’re better off using a dedicated ID3 editor. That way, you have total control over your data and its accuracy. There are free or paid programs available. Check out EasyTag, MP3Tag, and ID3 Editor as a few examples.
#6 Don’t Skimp on the Bandwidth
Find a decent host where you can upload your MP3s. Then, make sure you have sufficient bandwidth. You can look at bandwidth as the fuel for your files. There’s nothing more frustrating when a potential visitor can’t listen to your podcast because the bandwidth has run out. Try to avoid shared web hosts. Most of them won’t provide the speed or the bandwidth you need to present your files.
How to Choose a Web Host
Don’t worry. There are plenty of beginner-friendly web hosts for podcasters. There are two things you need to look for. One is the amount of file space they provide, and the other is the bandwidth. Also, take a package that you can upgrade seamlessly if or when your file collection and audience grows.
So, how much space do you need? Well, a podcast averages around 1MB for every minute recorded. That should give you some idea of how much space to consider.
Below are a couple of examples of what to look for in podcast hosting:
- $6+/Mo. should give you around 50MP of space and unlimited bandwidth
- $12+/Mo. should give you unlimited bandwidth and 100MB of space
You get the idea. The point is to ALWAYS make sure you have more bandwidth than you need. You’re then ready to promote your first podcast, and social media is an excellent place to start.
Good luck, and happy podcasting.
Resources
1. https://www.marketingcharts.com/industries/media-and-entertainment-82693
2. https://www.iab.com/wp-content/uploads/Podcast-Advertising-Study/