Beginner’s Guide on How to Fly a Drone

This article covers the ABCs of how to fly a drone. It’s primarily for people who have never flown a quadcopter before. It’s also an excellent refresher piece for novice pilots. The guide is easy to read and void of unnecessary waffle. I’ve also included a small review section at the end of the page. There you can find 3 superb examples of beginner quads for Best Budget, Best Value, and the Top Pick.
First, let’s look at some terminology before we get into the basics of flying.
Essential Drone Terminology
You’ll often come across the drone-related vocabulary below. There’s more, but these are the ones you need to know as a newbie to the hobby. Get familiar with these basic terms, acronyms, and abbreviations. Reading product descriptions and reviews becomes much easier when you do.
Drone buying options:
RTF (Ready to Fly): RTF drones arrive with everything you need in one box.
ARF (Almost Ready to Fly): ARF drones don’t include a transmitter and may need some assembly.
BNF (Bind N Fly): BNF drones don’t include a transmitter but are ready to bind with one.
Drone flying functions:
Altitude Hold: This function keeps the drone at a steady hover at a set height.
Acro: This is short for Acrobatic Mode which pilots use for freestyle tricks.
Headless Mode: Craft flies according to stick movements regardless of drone’s orientation.
Fail Safe: Includes 1-key return to home (RTH), low battery, and out of range alarms.
FPV (First Person View): Pilot sees what the camera sees with FPV goggles or via a screen.
Obstacle Avoidance (OA): Drone can avoid obstacles using sensors.
Follow Me Mode: Drone follows and films. It’s a hands-free flying mode.
Drone parts:
Landing gear: The legs of a drone. Some advanced models have retractable landing gear.
Controller, also transmitter or radio: A handheld device used to control the drone.
Prop: Short for propeller.
LiPo (Lithium Polymer): Favored battery type due to its lightweight and charge capacity.
Camera gimbal: Camera holder that steadies the camera to produce smooth results.
Get to Know Your Drone
Flying drones has never been this simple or so much fun. However, it’s important to get to know your quad and the control functions before the maiden flight. A lot of broken models and flight frustrations are the results of overenthusiasm and too much rushing.
Read the Drone Manual
Most user guides are easy to read and include illustrations with the text instructions. Flicking through the guide can be an expensive mistake, though. My advice is not to read the manual and fly on the same day if it’s a camera quadcopter. It’s better to sit down with the drone in front of you and read the guide at a comfortable pace. Go slowly and get to know the bird before taking to the skies.
Put the controller in your hands and study its layout, the way it feels, and how it functions. Make sure you understand details like flight times, charging times, and flight range. Also, become familiar with any flight modes and failsafe features. You get the idea.
Get to Know Your Remote Controller
Controllers or transmitters can vary in style and functions, but they all share some standard features. They have left and right joysticks and various buttons that perform specific tasks.
Joysticks control the way the drone flies. Flight movements include rotation, ascend, descend, fly left, right, forward, and back. The buttons and dials of a controller vary between models. They can control things like camera functions, flight modes, and acrobatic movements, etc. Most controllers are intuitive and comfortable. People with large hands may find micro/nano controllers hard to use, though.
The typical parts of a drone transmitter (Tx) include:
- Antenna
- Power switch
- Power light
- Handle
- Landing gear/gyro switch
- Flaperon/screw pitch
- Elevator/rudder control rod
- Aileron/throttle control rod
- Power trim
- Elevator trim
- Rudder trim
- Aileron trim
Point to note: Trim buttons on a drone’s remote controller are vital. Pilots need them to adjust roll, pitch, yaw, and throttle when they get off balance, as they can do.
Pre-Flight Checks Matter
Everyone wants to start flying as soon as possible, but pre-flight checks are vital. The first one is to study the drone rules and regulations for the place you intend to fly. Carry a simple checklist for the drone to make sure you don’t miss anything (see below). It looks time-consuming, but it’s not. These inspections shouldn’t take more than a couple of minutes once you get into a routine.
Tip: It’s better to carry out the physical checks before you leave for the flight field
- Is the weather forecast favorable?
- Is the drone in good physical condition, i.e., no cracks or broken props, etc.?
- Are the flight batteries fully-charged?
- Have you’ve packed fully-charged spare batteries?
- Is the controller and drone connected?
- Is the camera set up how you want it?
- Is the memory card in the drone, and is there enough space to save new footage?
Weather checks are necessary for flight and drone safety. See ‘Safe Flying Practices’ below.
There are a couple of things to remember before you take off. First, check that it’s safe before you launch. Second, announce the take off if there are other people close by. That’s it—you’re good to go. It’s then a simple case of monitoring the settings as you fly and film with your quad.
Pre-Launch Preparation
Find somewhere to practice that doesn’t have many or any people around. This way, you won’t feel under pressure to perform well on that maiden flight. Your practice area can be anywhere if it’s a safe zone to fly and free from obstacles and obstructions.
It’s useful to have checklists with you until pre-take off inspections become second nature. Drones can differ between models, so modify the one below to match your requirements.
| Turn on the transmitter (remote control) | ✔ |
| Turn on the quadcopter | ✔ |
| Verify the connection between transmitter and drone | ✔ |
| Verify FPV screen is working if applicable | ✔ |
| Calibrate compass | ✔ |
| Verify battery levels for drone and transmitter | ✔ |
| Verify GPS location from at least 6 satellites | ✔ |
Find a Flat surface
Decide on a takeoff spot and position your drone as per the guide. A flat surface is the best option but go for short grass rather than concrete. Grass gives the drone some protection if you experience a hard landing. The quadcopter needs to be in front of you as you prepare for takeoff.
Connect the Controller to the Drone
There are vital sequences to follow both pre-flight and post-flight. You must connect the controller to the drone before flying. That typically involves a 3 step process. 1) Push the throttle down, 2) turn the transmitter ON, and 3) connect the quad’s battery. After landing the drone you must 1) disconnect its battery, and 2) turn OFF the transmitter. Always follow the maker’s instructions to the letter.
It’s Time to Fly—Almost
Let the fun begin. It’s now time to get airborne, but there’s no need to fly high into the sky just yet. First, it pays to practice the following 3 exercises at low altitude:
- Takeoff and landing
- Hovering
- Rotating
Practice Takeoff/Landing
You can take off without going too high. Eye level or below is advisable at the start. Again, refer to the instruction manual for specific guidance on the model. It should look something like this:
- Push the controller’s throttle (left joystick) slowly upwards
- Stop when you get to a few feet in height
- Use the controller’s right stick to keep the drone steady
- Push the controller’s throttle slowly downwards to land
Do this a few times to get a feel for the controller and hand-eye coordination. Remember, you’re not moving to the side or forward at this stage. Be gentle and take your time. You also want to check a few things during this exercise. Again, keep a list handy so that you have everything covered.
| Takeoff to eye-level or just below. Hold for 10-15 seconds | ✔ |
| Check for any irregularities or imbalances in the quad | ✔ |
| Listen carefully for any unusual sounds | ✔ |
| Test roll, pitch, and yaw control response | ✔ |
| Check for interference or software irregularities/warnings | ✔ |
| Repeat the above to get familiar with pre-flight checks | ✔ |
It’s time to practice hovering once you’re comfortable with basic takeoff and landings.
Practice Hovering
Hovering is an essential part of flying quadcopters. You’re already familiar with takeoff and landings so use the throttle to get airborne again. This time only take the bird one or two feet off the ground. You may need to make minor adjustments using the right stick to achieve the perfect hover. And use the left stick (yaw) if the quad starts to turn. Bring the quad back down once you’re happy with the hover.
Rinse and repeat the above procedure until you’re confident with your hovering skills. Don’t cut the throttle too soon when landing. The quad should be almost on the ground before you let it drop.
Practice Rotating
Rotating a quadcopter is another essential yet easy-to-learn skill. Use the throttle to get the drone airborne and into a steady hover (see previous). Now push the left joystick in any direction to rotate the quad 360°. Push it in the other direction to turn it 360° the opposite way. Repeat the exercise a few times until you’re comfortable with rotating.
Continuous Flying
OK, you’re now familiar with pre-flight checks, takeoff & landing, hovering, and rotating. It’s time to practice regular flying. This requires you to fly in all directions, i.e., forward/back/left/right. It may be tricky for a while, as the drone faces different ways. Some models have a feature called headless mode, though. In that mode, you don’t have to worry about which way the nose points.
The points below breakdown the close flying startup procedures.
- Take off and bring the quad to a steady hover
- Rotate the drone to a slight angle (yaw)
- Gently fly the quad forwards and backward using the right joystick
- Gently fly the quad to the left and right using the right joystick
- Rotate it to another angle and repeat the previous exercises
- Continue to practice at different angles before moving to the next step
It’s time to fly further out once you’re okay with the close flight exercises. The quad moves away as you push the right joystick slowly forward (pitch). Also, push the same stick to the left or right as you move it forward. This will get you familiar with changing course. Other controls you need to know are:
- Use the left joystick (yaw) to change the direction the drone faces
- Adjust the drone’s height by moving the left joystick forward/backward
Your continuous flying skills will soon become second nature if you practice the above drills.
Structured Practice Routines
It’s necessary to practice various flying techniques to become a competent quad pilot. Below are 7 learner exercises that all drone beginners should take time to master.
| 1. Hover in position | ✔ |
| 2. Hover & rotate at different angles | ✔ |
| 3. Fly left/right/forward/backward | ✔ |
| 4. Fly in a circle | ✔ |
| 5. Fly in a square | ✔ |
| 6. Fly the quad at different heights | ✔ |
| 7. Mark 2 or 3 spots on the ground then fly/land/fly between them | ✔ |
You can try more complex flying techniques once you master all the basic skills. Here are a few suggestions that can help you to improve your advanced skills as a quadcopter pilot.
- Bank turns, breaking turns, and funnels
- Figure of 8 patterns
- Backward flying, back turns
- Take a proper training course
- Learn from instructional videos
- Use multiple landing targets
- Precision flights around points of interest (POI)
- Fly in First Person View (FPV)
Never stop practicing. Most drone pilots own several models or upgrade to better, more sophisticated birds. Flying is much more fun when you’re a confident, skilled pilot. You get to do things and go places others wouldn’t dare, and that’s the point.
The Importance of Milestones
It’s a good idea to set new targets so that there’s always something fresh to aim for. This way, you’ll maintain enthusiasm and explore new horizons. Below are some examples of piloting milestones.
| Get to know all the parts of a quadcopter and their functions | ✔ |
| Learn how to fine-tune using the transmitter trim buttons | ✔ |
| Practice high-precision landings | ✔ |
| Learn how to spin the drone at 180° | ✔ |
| Engage in immersive FPV racing | ✔ |
| Learn how to take stunning photos and aerial videos | ✔ |
| Master cinematic style shooting | ✔ |
| Develop advanced acrobatic skills | ✔ |
| Join a flight club to share ideas and tips with others | ✔ |
It’s up to you how far you want to take your drone piloting skills. Today’s quadcopters can fly for longer, fly further, and move faster than ever. The sky really is the limit.
Beginner Drone Pilot Blunders
No one wants to crash their precious new drone, but you should expect to have a few accidents. It’s all part of the learning curve, and everyone experiences a few mishaps. Those who take their time encounter fewer incidents than those who rush. Below are some of the avoidable beginner blunders:
- Ignores drone alerts and warnings
- Lost signal: drone flies out of range
- Flyaways: pilot loses drone because of the above
- Drone runs out of battery power mid-flight
- Failure to perform pre-flight checks
- Poor judgment
- Fails to update firmware
- Fly too fast for skill level
- Fly too high
- Pilot panics and fails to respond to a situation
You WILL have a few accidents as a newbie pilot. However, you can vastly reduce novice mishaps. Just be mindful of the above blunders and maintain checklists as you learn.
Use a Flight Simulator (SIM)
Beginner drones are so easy to fly now that anyone can take to the skies. Still, you may want to practice with a flight simulator if your first quadcopter is expensive. Simulators—SIM for short—are brilliant tools for learning flight basics. They can help to prevent embarrassing first flights and costly accidents. Manufactures may boast of crash-resistant builds, but no drone is indestructible.
There are two types of flight simulator. One is for quadcopter racing in First Person View (FPV). The other is for learning how to fly and control camera drones. Taking aerial photos and video is hugely popular nowadays. Pilots who learn to fly well tend to achieve the most impressive results.
There are lots of free and fee-based drone flight simulators available. The best ones give the most realistic experience and offer a variety of custom features. Some of those may include:
- Customizable flight areas
- Customizable drone settings
- Open field scenarios
- Obstacle courses
- PC and Mac compatible
Below is an example of an excellent flight simulator by Horizon Hobby.
RealFlight RF8 w/ Interlink-X Controller (Horizon Hobby Edition)
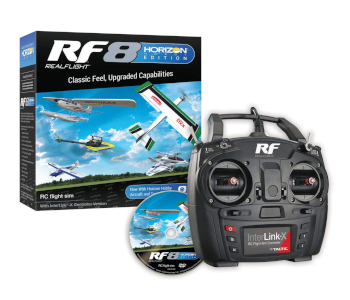
EDITOR’S RATING: 4.8/5.0
RealFlight RF8 is a superb multi-functional SIM for all kinds of aircraft. This mini-review can give you a good idea of what’s available and what to look for. The most impressive feature is the incredible realism. Its true-to-life physics guarantee to install confidence in new pilots whatever their drone. It also has Virtual Reality (VR) capability so that pilots can train in First Person View (FPV).
The software has 50 types of aircraft that include drones, planes, and helicopters. The 40+ different flying sites are what make this program so incredible. It also has several challenges like avoiding obstacles, flying through gates, low flying, and race courses. There’s a Ghost Run feature too that lets you compete against your best times. It has so much to offer for every conceivable flying scenario.
Safe Flying Practices
Make sure you’re familiar with all the controls if you haven’t practiced using a SIM. You’re now ready to fly the drone properly outdoors, but you can’t fly anywhere you want. Ideally, you need an open space with few trees, people, or pet dogs around. Seriously, some playful hounds can be a problem for drone pilots and their craft. OK, you’re good to go once you have your flying site.
Use the 4 point checklist below to cover your site safety checks:
| 1. Check for any structures, trees, wires, and other potential obstructions | ✔ |
| 2. Check for any pedestrians and or animals in the flight area | ✔ |
| 3. Go over the planned flight mission with others if you’re unsure | ✔ |
| 4. Set up drone safety perimeters if necessary | ✔ |
Also, make sure you’re familiar with local flying rules and regulations. Plus, you need to be familiar with the local weather forecast. The last thing a newbie wants is for strong winds and heavy rain to trash their precious quad. And few beginner drones are water-resistant, so take heed. Bad weather can also interfere with transmission signals and hinder visibility.
Use the 6 point checklist below to cover your weather checks:
| 1. The chance of rain should be 10% or less | ✔ |
| 2. Wind speed is no more than 20mph (15 knots) | ✔ |
| 3. Cloud base should be 500 feet or above | ✔ |
| 4. Make sure visibility is 3 SM (statute miles) or more | ✔ |
| 5. Check for potential electromagnetic interference | ✔ |
| 6. Determine takeoff/landing/emergency hover zones | ✔ |
Point to note: Some ultra-lightweight drones won’t be able to fly in anything above a light breeze.
Know the Rules & Regulations
It’s your responsibility to be up to date with drone rules and regulations. These can—and sometimes do—change, so make sure you stay informed. Also, different regions may have some of their own dos and don’ts. Recreational drone users must also register crafts that weigh more than 0.55 lbs. (8.8 oz.) It’s a simple, quick process and costs only $5 for a 3-year registration period at the time of writing.
Visit the Federal Aviation Administration (FAA) website for details.
Knowing how to fly a drone legally is as much about the rules as it is controlling the craft. They exist to make piloting fun and safe for the user and other people. Get familiar with the dos and don’ts below.
- Keep the drone under 400 feet (122 meters)
- Keep flight speeds at or under 100 mph (161 km/h)
- Only fly during the daytime in public spaces
- Only fly drones that weigh 55 lbs. or less
- Manned aircraft must always have the right of way
- Always fly the drone within line of sight (LOS)
- Fly in keeping with community-based guidelines
- Notify air traffic control if you plan to fly within 5 miles of an airport
- NEVER fly over people or animals
- NEVER fly from a moving vehicle
- NEVER fly in ‘No Fly Zones’
Understanding No-Fly Zones
No-fly zones exist for good reasons, and drone pilots must always acknowledge them. Ignorance is no excuse either. There are several ways to find the no-fly zones in any area. The best way is to use a mobile app. There are some great apps around, and they do more than just highlight no-fly zones.
Here are 3 of the best drone apps at the time of writing:
HOVER App
I’ve put the HOVER app at the top as it’s an excellent choice for beginner pilots. That’s because it’s void of bells, whistles, and overwhelming options. The simple display shows no-fly zones (permanent and temporary), real-time weather reports, and flight logs. HOVER is available for iOS and Android.
B4UFLY Mobile App
The FAA partnered with Kittyhawk to create B4UFLY. It lets recreational drone pilots know where they can fly and where they can’t. There are other valuable features like a planner mode and interactive maps, to name two. The current B4UFLY is available for iOS or Android. There’s a new app on the way any time soon, but this is the one to use for now. I’ll update this page once the new app’s available.
UAV Forecast for UAV Drone Pilots
Don’t let the name fool you as this drone app does more than forecast the weather. It enables you to see GPS satellites, no-fly zones, flight restrictions, and even solar activity. You can select iOS or Android from the App menu at the top of the maker’s home page.
Best Beginner Quadcopters
Below are three quick reviews to illustrate the characteristics of a quality beginner drone. I have included models in three price categories so that you can see what each has to offer. Refer to the ‘Essential Drone Terminology’ at the top of the page if you need to recap on drone expressions.
| Make and Model | Flight Time | Charging Time | Price |
|---|---|---|---|
| Spacekey DC-014 Beginner Camera Quad | 8 minutes | 60 minutes | Check Price |
| Holy Stone HS120D Beginner FPV Drone | 18 minutes | 120 minutes | Check Price |
| DJI Spark Beginner Camera Quad Combo | 16 minutes | 90 minutes | Check Price |
1. Spacekey DC-014 Beginner Camera Quad | Best Budget
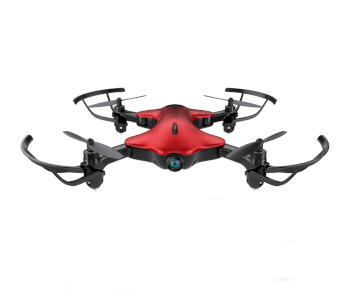
Editor’s Rating: 4.6/5
Meet the Spacekey DC-014. It’s an excellent first drone with a durable PA plastic fuselage and aerofoil. This bird is a small, lightweight camera quad that you can fly indoors or outside.
- Best feature 1: Beginner-friendly drone
- Best feature 2: Multiple speed modes
- Plus points: Foldable design, 1-key takeoff/landing, headless mode, camera, LED lights
- Minus points: Short flight time, not wind-resistant
Beginner-Friendly Highlights
The Spacekey DC-014 packs a lot of features into an affordable package. It has a foldable design which protects the quad and makes it easier to store. The multiple speed modes are ideal for learners. They let new pilots progress at their pace as confidence and handling skills improve. Novice-friendly flight features include a headless mode, altitude hold, and 1-key takeoff/landing.
Bright LED lights look cool and let you fly the quad in the dark. There’s also a 360° flip & roll feature that adds another layer of fun for newbies. The built-in 720P/30 fps (frames per second) HD camera doesn’t produce award-winning footage, but it’s impressive for the price.
The Not So Good
The battery life is miserable giving 8 minutes at best. The drone comes with a bonus battery, though, so that lessens the disappointment somewhat. Charging time is also quite fast at 60 minutes. The other downside is that the quad won’t fly well in anything above a gentle breeze. It’s small and light enough to fly indoors if you have space, but make sure you’ve mastered its controls first.

| Tech Specs |
|---|
| Brand: Spacekey |
| Dimensions: 4.3 x 4.3 x 2.5” |
| Product Weight: 9.6 oz. |
| Camera: 720p/30fps HD |
| Max Range: 328 ft. (100 meters) |
| Battery: 7.4V 450mAh Li-Po |
| Running time: 8 minutes |
| Charging time: 60 minutes |
| The Pros |
|---|
| Beginner-friendly drone |
| 3 speed modes |
| Foldable design |
| 1-key takeoff/landing |
| Headless mode |
| Altitude hold |
| App control |
| 360° flips & rolls |
| LED lights |
| The Cons |
|---|
| Short flight time |
| Not good in winds |
2. Holy Stone HS120D Beginner FPV Drone | Best Value
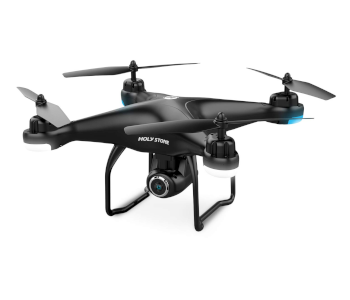
Editor’s Rating: 4.7/5
The Holy Stone HS120D is a perfect camera drone for beginners. It comes with novice-friendly and failsafe features. The HS120D also has a long flight time for a quad in its class.
- Best feature 1: Ideal drone for beginners
- Best feature 2: Headless mode
- Plus points: 1-key takeoff/landing, HD camera, follow mode, FPV, TapFly, return to home (RTH)
- Minus points: Not good in winds, longish charging time
Beginner-Friendly Highlights
It’s easy to fly the Holy Stone HS120D, even if you’re a raw novice. The instructions are clear too, and that’s not something all drone makers can boast. It has a headless mode, 1-key takeoff and landing, and altitude hold. You also get an auto return to home (RTH) feature for low battery and a weak or lost signal. And the decent 18 minute flight time is better than most rival quads in this category.
Superb Camera Quadcopter
This drone is an excellent introduction to aerial photography and videography. There’s even a GPS Follow Me mode. The First Person View (FPV) HD camera shoots video at 1080p. It has a 120° field of view (FOV) and 75° adjustable angle. Holy Stone even includes an SD Card to save your aerial footage. Not all drones do. You can enjoy live video feed on a smartphone screen up to 984 ft. (300 m) away.
The Not So Good
Holy Stone’s HS120D only weighs 7.8 ounces, so it’s not great in the wind. Still, it’s small enough to fly inside on bad weather days. Flying indoors is not a good idea unless you have prior flying experience though. The charging time is 2 hours, which is quite long. Most owners of this drone are sure to invest in an extra battery or two so that they can continue to fly.
| Tech Specs |
|---|
| Brand: Holy Stone |
| Dimensions: 10.6 x 10.6 x 4.7” |
| Product Weight: 7.8 oz. |
| Camera: 1080p Full HD |
| Max Range: 984 ft. (300 meters) |
| Battery: 7.4V 1200 mAh |
| Running time: 18 minutes |
| Charging time: 120 minutes |
| The Pros |
|---|
| Ideal drone for beginners |
| Headless mode |
| Altitude hold |
| 1-key takeoff/landing |
| Built-in camera |
| Follow Me mode |
| First Person View FPV |
| Return to home (RTH) |
| GPS positioning |
| TapFly |
| Decent flight time |
| Outstanding customer support |
| The Cons |
|---|
| Too light for winds |
| Quite a long charging time |
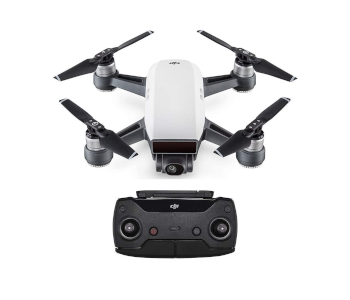
3. DJI Spark Beginner Camera Quad Combo | Top Pick
Editor’s Rating: 4.8/5
No novice-friendly drone lineup would be complete without a DJI. My choice here is the DJI Spark. It’s a powerful little camera quadcopter for advanced beginners and above level users.
- Best feature 1: Simple Control features and hand gestures
- Best feature 2: Gimbal stabilized 12MP camera
- Plus points: Intelligent Flight Modes, DJI GO 4 app, First Person View, automatic RTH
- Minus points: Doesn’t fold, low-average battery life
Beginner-Friendly Highlights
There’s so much to like with the DJI Spark. It’s small, travel-friendly, and packed with amazing features. It comes with a 12MP camera that takes stabilized video at 1080p. The Simple Control features lets pilots take aerial photos using hand gestures. It also has DJI Intelligent Flight Modes. They include Active Track (Follow ME), TapFly, Tripod, Gesture mode, Quickshot, and others.
The intuitive DJI Go 4 App is another welcome and super easy feature to use. Its built-in auto-editing templates let you edit the footage and share it on social media in seconds. Pilots can live stream to their smartphone or enjoy a First Person View (FPV) experience with goggles (not included).
Spark’s Auto Return to Home (RTH)
All pilots appreciate the Spark’s auto and manual return to home (RTH), especially beginners. Auto RTH brings the quad back safely before it can get into trouble. It has two RTH protections. The low battery RTH kicks in once its power level falls below a certain point. Failsafe RTH occurs when the Spark loses its signal. And pilots activate Smart RTH by tapping the RTH button on the app or remote.
The Not So Good
DJI’s Spark is small and compact, but it doesn’t have foldable arms like the DJI Mavic Air. It’s not a space issue, though. It’s just that foldable drones provide better protection when traveling. Maximum flight time is disappointing at 16 minutes. The Spark’s Intelligent Flight Batteries are expensive at around $80—at the time of writing. And the charging time takes about 90 minutes.
| Tech Specs |
|---|
| Brand: DJI |
| Dimensions: 5.6 x 5.6 x 2.2” |
| Product Weight: 10.56 oz. |
| Camera: Fixed 12MP 1080P 30fps |
| Camera Gimbal: 2-axis |
| Max Range: 1.2 miles (2 km) |
| Battery: 11.4V 1480mAh LiPo |
| Running time: 16 minutes |
| Charging time: 90-minutes |
| The Pros |
|---|
| Simple control features |
| Hand gestures |
| Decent camera |
| Intelligent Flight Modes |
| First Person View (FPV) |
| Automatic/manual RTH |
| TapFly |
| Active Track |
| The Cons |
|---|
| No foldable arms |
| Low-average battery life |
Contents
- Essential Drone Terminology
- Get to Know Your Drone
- Read the Drone Manual
- Get to Know Your Remote Controller
- Pre-Flight Checks Matter
- Pre-Launch Preparation
- Find a Flat surface
- Connect the Controller to the Drone
- It’s Time to Fly—Almost
- Practice Takeoff/Landing
- Practice Hovering
- Practice Rotating
- Continuous Flying
- Structured Practice Routines
- The Importance of Milestones
- Beginner Drone Pilot Blunders
- Use a Flight Simulator (SIM)
- RealFlight RF8 w/ Interlink-X Controller (Horizon Hobby Edition)
- Safe Flying Practices
- Know the Rules & Regulations
- Understanding No-Fly Zones
- HOVER App
- B4UFLY Mobile App
- UAV Forecast for UAV Drone Pilots
- Best Beginner Quadcopters
- 1. Spacekey DC-014 Beginner Camera Quad | Best Budget
- Beginner-Friendly Highlights
- The Not So Good
- 2. Holy Stone HS120D Beginner FPV Drone | Best Value
- Beginner-Friendly Highlights
- Superb Camera Quadcopter
- The Not So Good
- 3. DJI Spark Beginner Camera Quad Combo | Top Pick
- Beginner-Friendly Highlights
- Spark’s Auto Return to Home (RTH)
- The Not So Good