
Beginner’s Guide to iPhone and iPad Filmmaking

No one would have taken you seriously if you set out to create a feature-length movie masterpiece with an iPhone or iPad five years ago. Technology has advanced rapidly since then, as have our preconceptions of what tools one needs to create a movie worthy of Hollywood.
More & more movies use phone footage to enhance tension or offer a new perspective. Prominent directors like Steven Soderbergh are entertaining audiences in movie theaters worldwide with thrilling flicks shot entirely on phones. In short, mobile movie-making is here, and it’s here to stay.
It’s the perfect time to embark on your own filmmaking adventure, and this guide covers all the basics if your camera of choice is an iPhone or iPad. Discover what to expect before getting stuck in, what accessories you’ll need, and how to film a movie worth watching.
Things to consider before you start
There are two things you need to accept before starting to film with an iPhone:
Treat it like a camera, not a smartphone. While you’re shooting, the iPhone should be treated as a filmmaking tool and nothing else. That means you need to put it into airplane mode to avoid distractions and focus on the capabilities and limitations of its camera. Read up on your model’s specs, look at video examples shot with it for cinematic purposes, and get to know each setting at your disposal.
iPhone moves will never look the same as ones shot on a DSLR or movie camera. The sooner you come to terms with this inevitable truth, the faster you can take an unburdened approach to making your film. If you check out trailers for movies like Tangerine or Unsane, you’ll notice that something’s off. However, that doesn’t mean these movies are bad or that yours will be just because it was shot on an iPhone or iPad.
Get to know your device’s strengths and weaknesses
Knowing the limitations of your iPhone or iPad goes a long way when planning a movie. Keep them in mind, and you’ll be able to structure the plot, scenes, and overall execution in a way that brings out your device’s filmmaking potential. Here are the advantages and shortcomings of iPhone & iPad filmmaking at a glance:
Pros:
The iPhone is exceptionally lightweight and compact. It’s near you the entire time, which means you can whip it out to shoot B-roll or an establishing shot the moment inspiration strikes you. Its small size also makes the iPhone ideal for action shots. Attach it onto a gimbal, strap it to a car, and enjoy thrilling chase scenes that would otherwise be expensive to create.
It’s inexpensive. While it’s a top-tier phone with a corresponding price, the iPhone costs as much as a low-budget DSLR. The price is still considerably smaller even when you add up the cost of all the accessories you’ll need to turn it into a serviceable camera. You’re likely reading this article on an iPhone or iPad already, meaning your highest gear expense is already taken care of.
It’s unobtrusive. Smartphones and tablets have been an everyday occurrence for more than a decade. No one will bat an eyelash if they see you using one in public. This lets you record authentic scenes of city life or any other activity you wish to capture.
The camera is adequate for filmmaking. Newer iPhones and iPads are capable of shooting in 4K. This makes them both futureproof and allows you to pan or tilt by cropping the footage to 1080p without moving the device.
Cons:
Low dynamic range. Smartphone and tablet cameras, in general, are notorious for their lack of dynamic range. Having high dynamic range means you can shoot in high-contrast environments without losing detail. Your Apple devices will require soft, low-contrast lighting for best results. Otherwise, there will be a glare on bright parts of a scene while shadows will become harsh and overly dark.
Poor sound quality. DSLRs and mirrorless cameras meant for filmmaking have low-quality onboard microphones, and the situation is much worse for tablets and smartphones. Their mics are serviceable for phone conversations or FaceTime but aren’t suited to delivering movie-grade audio.
Fixed Wide-angle lens. The lens on your device is perfect for capturing breathtaking visas or group photos, but it falls short when you’re going for close-ups. The aperture size is fixed as well, meaning you have one less means of controlling how much light hits the sensor. Another side effect of a fixed aperture important for filmmakers is a shallow depth of field. It makes sense in photography since both close and far-away parts of the scene are in focus, but it limits your creativity.
Low-capacity battery. Shooting video consumes more power than any other activity. A full battery on your iPhone is enough for four hours of continuous shooting, more if you turn off GPS and unnecessary apps. Even so, one battery won’t be enough for a full day’s shoot, especially since the phone has to cool down periodically.
Essential accessories
You can mitigate many of the iPhone’s limitations by investing in some aftermarket accessories. Here’s what you’ll need if you hope to approach professional-level quality:
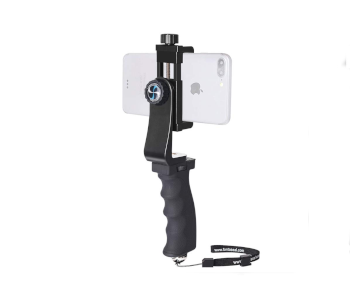
A stabilization device
iPhones have reliable optical image stabilization. They’re small and light too, so footage you recorded while holding one in your hand is bound to be shaky. You need a gimbal to keep your shots smooth and uniform.
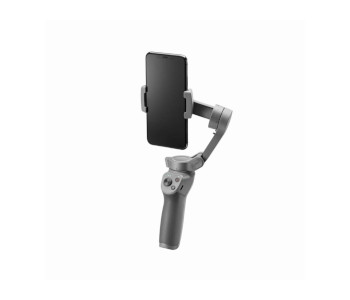
We recommend the DJI Osmo Mobile 3. This versatile gimbal has a sturdy clamp that attaches to your phone and won’t let go. It’s made from nylon and sturdy without impacting the phone’s portability. The gimbal has a 15-hour battery life and can even act as a powerbank when the iPhone needs extra juice. It has intuitive controls and does a great job of keeping the phone level at all times.
A dedicated microphone
Relying on the phone’s microphone is a bad idea. You can use it in a pinch to record conversations. However, you’ll have to keep the phone close to the action and listen to the audio every so often to make sure it can be heard properly. You’re better off recording audio separately using studio equipment or investing in a lavalier microphone.
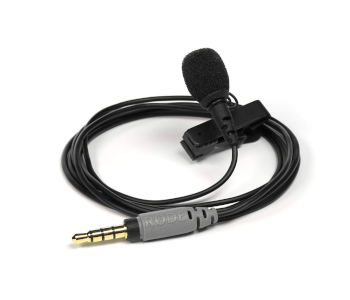
The Rode SmartLav+ is an omnidirectional lavalier microphone which plugs into your phone or tablet. It excels at capturing the audio in a room while eliminating background noise. The microphone is forgiving to amateur actors since it reduces excessive hissing sounds and plosives. There’s an app you can use to adjust equalizer settings and manage recordings. Be aware you’ll need a 3.5mm to Lightning converter to use it though.
Lenses
Apple’s cameras are geared towards quality photography, not professional filmmaking. Even newer iPhone models with two cameras struggle with a movie’s demand for versatile shots, so your only option is to go with a separate lens. Moment is the leading smartphone lens manufacturer on the market, and three of their products will make a massive impact on the way your movie looks.
The first is the Moment Tele 58mm Lens. It’s perfect for close-ups since it has a 2X optical zoom, letting you zoom in 4x if you have an iPhone X. The lens creates no distortions on its edges in spite of this.
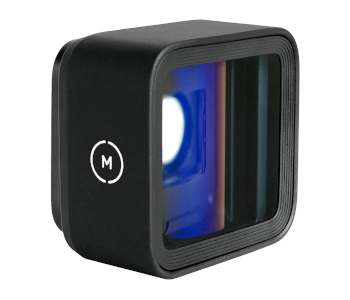
The second Moment product you’ll want to take a look at is the Anamorphic Lens. It offers a wider angle without cropping the picture or altering the resolution. Combined with Moment’s app, it creates videos in a widescreen format used for cinema projections. Another artistic advantage of the Anamorphic Lens is its lens flare effect. Point it towards the sun or other strong enough light source, and you’ll get the characteristic flare complete with blue lines without having to add it in post.
The last part of the equation is the Moment Photo Case. It attaches easily and lets you place any Moment lens over your iPhone’s existing ones. The case features a rubberized grip for more comfortable holding as well as an attachment for neck and hand straps. Just make sure you get the right case for your model.
A light diffuser
Getting the lighting right is crucial for setting your movie’s atmosphere and feel. You can buy an inexpensive yet effective three-point lighting system, but these take up space and are cumbersome to transport. It’s a better idea to invest in a diffuser if you’re on a shoestring budget.
The 5-in-1 diffuser from Neewer is a reasonably-priced and wonderfully versatile choice. It’s useful for working with existing light sources and directing them in a way that makes shadows softer and lighting smoother. Is the shot overexposed? Switch to black and reduce the glare. Need a warmer glow? Gold is there to add a subtle tint and make the scene more inviting.
Neutral Density filters
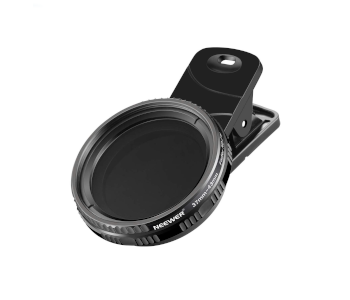
Neutral Density or ND filters are essential to maintaining natural-looking motion blur in any situation. You have to increase exposure to achieve this effect, but doing so also lets more light shine on the sensor and makes the image brighter. ND filters uniformly lower image brightness and have the added benefit of eliminating color inconsistencies caused by infrared pollution.
Neewer has the answer yet again. Their ND 2-400 Cellphone Camera Lens Filter Kit contains an adjustable filter that snugly clips onto your iPhone’s lens. The filter has nine filtration stops ranging from ND 2 to ND400 and letting in from 50% to 0.25& light. It is durable and made of quality glass.
The right camera app
The iPhone’s native camera app is by no means bad. However, its main drawback is lack of nuanced control essential to pulling off a cinematic look. There are a lot of competing apps on the App Store, but our favorite is Filmic Pro.
The app pushes your phone’s camera to its limits and unlocks a ton of customization options. These include manually adjustable light levels, dynamic range, shutter speed, and exposure. Filmic Pro also lets you customize the framerate and shoot at 24fps for the authentic cinematic experience. Filmic Pro helps you determine which focus point to use, warns you of overly-exposed areas with zebra stripes, and lets you export movies to mobile editing apps like LumaFusion.
The best thing about Filmic Pro is its price. It’s a steal at a mere $15. Pay $10 more, and you’ll get access to a log2 profile that extends the iPhone’s camera to twelve stops of dynamic range! That still won’t help in low-light or highly contrasting situations, but it’s a definite improvement over standard options.
Filming your movie
With everything you need at hand, it’s time to start thinking about what kind of movie you want to make and how you’ll film it. We talk about the movie-making process from start to finish extensively elsewhere. The next segment is a condensed version of the article in question with pointers about challenges you might face due to recording with a tablet or phone.
Conception and pre-production

What is your movie about?
That’s the essential question an audience needs a clear answer to by the time the credits roll. Your idea needs to appeal to your target audience and be simple enough that the film’s premise can be summarized in a small paragraph. That’s not to say the movie itself should be simple. You’ll need to create personalities and backstories for your characters, structure the film so that it flows logically from beginning to end, and ensure that the audience is entertained.
You expand upon the initial idea by creating the screenplay and storyboard. The screenplay explains the flow of your movie’s narrative, how scenes are set up, what the actors say & in what way, and what the audience’s experiences should be. The storyboard gives the screenplay substance by laying out your vision of individual shots in the form of photos and sketches with accompanying comments.
With the movie’s concept fleshed out, it’s time to assemble your actors and a film crew if your project is more ambitious. You’ll want to do some research before starting the shoot. This involves visiting locations and making sure you’re allowed to film there. It’s wise to go on location during different times of the day to optimize for your iPhone’s lighting needs.
The production stage
Now you can start production, the process of filming and accumulating other multimedia you’ll use. How smooth production goes depends on how much time you spent planning out the movie. Similarly, the more diligent you are when shooting, the less time you’ll have to spend in post.
Always record more footage than you need – Having extra footage to fall back on is the fundamental rule of filmmaking. Always shoot five seconds before the action starts and after you call for a cut. It’s a good idea to shoot one scene multiple times, both to cover more angles and have two instances of dialogue from which to choose the better delivery.
Set shots up with clear intent – You are a storyteller. That means you’re in control of what the audience experiences in a given scene. Each shot should be framed so that nothing in it, is distracting or irrelevant.
Note that there’s a difference between an element that adds nothing to the scene and one that will help attentive viewers discover subtle messages. A man standing on a far-away corner might bring nothing to the scene and can easily be avoided by shifting the camera. On the other hand, a messy room with crusty pizza boxes and a band shirt in the background can say a lot about a character’s personality and values.
Structure scenes logically – Audiences are very perceptive at spotting inconsistencies and react negatively to them. If a character is looking to the left at their conversation partner, make sure that the next scene has the other person looking to the right. Remove everything that doesn’t belong in a scene, especially if you’re making a period piece. Get rid of all reflective surfaces that could show the camera and parts outside the scene you don’t want the audience to see.
Be creative and mix things up – Audiences quickly lose interest if your movie is monotonous. Conversely, they might get confused or upset if you don’t follow ingrained filmmaking conventions. Mix up shot sizes but don’t jump from an establishing shot to a close-up without a transition. Avoid jump cuts, but don’t be afraid to rapidly switch camera angles to portray a dynamic conversation.
Make use of your phone’s features – The iPhone has an incredible camera, so test its limits for amazing results. Record some footage in 4K and tilt or pan by cropping it. Use slow-motion to focus on a character’s expression or capture a split-second moment in more detail. Time-lapses are great for establishing shots and B-roll, so bring a tripod and record some while you’re working on other aspects of the movie.
Adding the finishing touches in post
The post-production stage is when all the materials you assembled & created come together to be turned into a unique audiovisual experience. You’ll spend most of your time in post editing the movie in various ways. It’s best to do so on a computer. iMovie is an excellent free program at your disposal if you’re completely immersed in the Apple ecosystem. Final Cu Pro is there for your advanced editing needs. Don’t feel left out if you use a PC though as Adobe, Cyberlink and Filmora offer worthy alternatives.
First, you’ll have to sort all of its components so they’re easy to find. Stick to a logical nomenclature and back up all files on at least three separate locations as one malfunction is enough to lose all your hard work. Then comes the task of arranging clips in a coherent order as well as trimming them to be more engaging. You follow that up with adding special effects to wow the audience.
Color correction and grading deserve a special mention. They’re instrumental in transforming your movie from something that was clearly shot with an Apple camera to a work of art worthy of festival buzz. You first have to color correct the film, i.e., establish a color baseline that makes the movie look natural. Color correction addresses issues like color balance and IR interference. It ensures that white is white in all lighting situations and other colors don’t look out of place.
Color grading happens after color correction and is necessary for enhancing a scene’s mood. It involves adding tints & gradients, masking distracting elements of the shot, and focusing the viewer’s eye with subtle color choices. Color grading is vital for ensuring consistency between scenes. Two scenes shot back-to back happen in a matter of seconds in the movie, but might have been recorded hours or days apart. Grading each scene preserves the illusion of continuity and gives the film a uniform visual identity.
Sound is as important as video in telling your story. Syncing sound with editing clips and adding different effects is a delicate and painstaking process. It involves balancing general audio levels, making sure that music is never as loud as speech, and adding authenticity to the movie by simulating phone conversations, acoustic spaces, etc.
Finally, there’s the matter of creating supporting graphics. These include an intro, opening & closing credits, text information that helps establish a scene, and subtitles if needed. Pay close attention to the size and positioning of these graphics and ensure that fonts and color choices compliment the movie’s theme.