What are ISO Numbers and How to Choose the Right Settings?

Did you ever set everything up for the perfect shot only to realize that the end result was too dark? A low ISO setting is a likely culprit. ISO is a vital yet often overlooked part of photography. Along with shutter speed and aperture, it is the cornerstone of how a photo’s exposure will turn out! Selecting the right ISO for the job can make the difference between a perfectly balanced shot and one that’s too bright & riddled with noise.
What exactly is ISO & how can you make it work to your advantage? In this guide, you’ll learn all about the origins of ISO in photography, its relation to aperture & shutter speed, and what you can do to find the perfect ISO number for any situation. Read on and discover how paying attention to this one setting can drastically improve the quality of your photo art!
What is ISO?
To understand ISO, we need to look at the term’s historical origins. ISO used to denote the speed of films in analog photography. Here speed refers to the film’s sensitivity to light – the quicker the film was, the more light it could gather in a given time and needed less exposure.
A film’s exposure rate was given a numeric value by the American Standards Association or ASA. The values started at 100 and were linear, i.e. a film with an ASA value of 400 had an exposure rate twice as fast as one marked as ASA 200. ASA and an alternative logarithmic system called DIN were merged in 1974 by the International Organization for Standardization into a single ISO standard expressed with numerical values and degrees but commonly shortened to just numbers like ISO 800 etc.
In digital cameras, ISO values refer to the brightness correction your camera makes when you’re taking a photo that’s independent of aperture size or shutter speed. ISO is often misinterpreted as a sensor’s sensitivity to light and believed to have an effect on exposure. In truth, all camera sensors have a single sensitivity – changing the ISO setting only amplifies the light signal received by the sensor. Think of ISO as a form of image post-processing which happens in the camera and increases brightness after the exposure has already been determined.
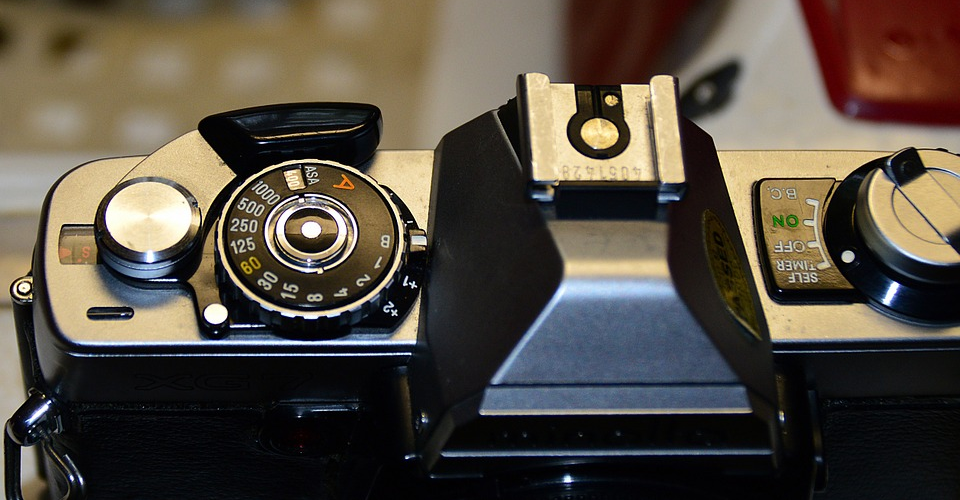
What are ISO numbers?
ISO numbers are fixed, standardized values used to determine the amount of signal amplification an image will receive. The lower the number, the less the signal will be amplified. This makes the image darker but also causes minimal noise. The lowest ISO value on your camera is known as base ISO. Most digital cameras have a base ISO value of 100. Some high-end models go a step down to ISO 50 while older ones start at ISO 200.
ISO numbers increase in steps. Each higher ISO value is twice as large as the last, so ISO 1,600 is followed by ISO 3,200, etc. The maximum ISO value a camera is capable of varies greatly by manufacturer and model. It is common for high-end DSLRs to be capable of reaching ISO 3,200 or 6,400 and can be expanded even further.
How to choose an ISO number?
Modern digital cameras are adept at assessing your shooting situation and will come up with an adequate ISO value on their own in Auto mode. You’ll need to select a manual mode if you wish to experiment with different ISO settings. How you can do so depends on the specific camera you’re working with. More affordable models let you choose the setting from a digital menu. Professional cameras have multipurpose dials that can adjust ISO settings while you’re holding down the appropriate button or even have dedicated ISO dials which speed up on-the-fly-adjustments.
Why is choosing the right ISO number important?
You need to balance three factors when taking any kind of photo: aperture, shutter speed, and the right ISO setting. Photography is built on tradeoffs – you’ll always need to sacrifice either exposure time, brightness, or picture quality. Understanding which ISO value to choose and when is the key to minimizing imperfections and ending up with a quality photo. You need to understand the relationship between aperture, shutter speed, and ISO before you can pick the right ISO value for a given shot.
Aperture
A lens’ aperture is a tiny hole through which captured light travels into the camera. A large aperture means that the camera’s sensor is exposed to more light, which results in a brighter picture. You’ll want a large aperture when shooting in poorly-lit conditions while a small one helps to eliminate excessive brightness from photos shot in direct sunlight. Aperture is measured in numbers called f-stops. The larger the aperture, the smaller the f-stop! So, an aperture whose f-stop is f/11 is smaller than one with an f-stop of f/4.
The problem with aperture is that it also has an effect on the lens’ depth of field. Big apertures have a thin depth of field and vice versa. A thin depth of field requires you to focus on an object a specific distance away from the camera while blurring everything in front and behind it. Such a depth of field is used in animal photography when capturing insects or when shooting artful photos with a single focus. A large depth of field puts everything in the picture into focus no matter the distance. It is used in landscape photography where equal importance is placed on subjects that are both close and far away.
Shutter speed
Shutter speed is the amount of time the lens is exposed to light once you hit the shutter button. It is measured in seconds. A long exposure can last several seconds while short exposures can last milliseconds or less. Shutter speed is another factor that affects a photo’s brightness – the longer you expose the lens, the more light it will gather and the result will be a brighter picture. However, if you want a sharp photo while using a long exposure, the subject needs to be still or their movement will show up as motion blur.
Both high and low shutter speeds have their uses. You’ll need a high shutter speed to capture split-second events like wildlife scenes or a sports action shot. Long exposures are excellent for situations where you need to capture as much light as you can like space photography or when you want to contrast moving and stationary parts of a scene like traffic at night.
OK, but where does ISO come in?
You can get away with using the lowest ISO setting in the right lighting conditions. Things get more complicated when there isn’t enough light to shoot a quality photo while relying on shutter speeds and aperture size alone.
Let’s say you’re trying to capture a wildlife scene in the savannah. There are lots of animals both close to and far away from you, and many of them are running. You’ll need a small aperture size to bring the entire scene into focus and take the photo at a high shutter speed. The resulting image will probably be darker than you’d like since the small hole couldn’t gather enough light in the short time it remained open. That’s where switching to an ISO number higher than the base setting can make the image brighter while eliminating motion blur and keeping everything sharp.
What is image noise?
Using high ISO values comes at the cost of increased image noise. This noise or grain manifests in the form of blotches or dots that are inconsistent with their surroundings. For example, subjects like a clear sky or the surface of someone’s skin appear grainy and textured instead of smooth. The effect is easiest to observe on large parts of the photos which are supposed to be of one color and on transitions from lighter to darker areas. Higher ISO settings mean brighter pictures but also increase the amount of noise exponentially.
How to decrease image noise?
The most reliable method of decreasing image noise is to shoot in a well-lit environment. That way, you can use the camera’s base ISO and get no discernible noise. When proper lighting isn’t an option, you can fall back to using long exposure or a large aperture. The former is safer since it doesn’t affect your field of view, but you’ll still want a stationary subject and a tripod to eliminate blur caused by camera shake.
You can also take steps to figure out the right ISO setting for any situation. Changing the aperture will do you the least good once you’ve chosen a shot, so the first step is to lock the aperture in and use it as your starting point. Next, determine how long the exposure should be by taking a few test photos to see whether there’s any motion blur. Finally, experiment with different ISO values until the image is bright enough while keeping noise levels down. If you still aren’t satisfied, consider a larger aperture at the expense of depth of field.
Why not just use the camera’s flash?
The flash is a sound alternative to other light sources. However, you’re bound to encounter situations where using a flash isn’t an option; knowing what ISO setting to use then will be of great help. Many museums and historical buildings forbid the use of flashes to prevent their exhibits from deteriorating due to light radiation. There are also times when a flash can ruin the photo altogether like when you’re taking a picture of something inside a display case and want to avoid the glare a flash would cause.
Which ISO to choose and when?
While there’s no clear-cut definition of the ideal ISO setting for each situation, photography professionals agree on a few general guidelines.
ISO 100 is the value you should strive for. It’s the one to use when you’re shooting outdoors on a beautiful day with plenty of sunlight. Going with a higher value in such a situation would only result in unnecessary noise.
ISO 200 to 400 work great on overcast and cloudy days when natural light needs a slight touch-up. They’re also adequate when you’re shooting indoor scenes with a lot of natural light like promotional photos for a real-estate agency or someone’s portrait close to a window.
ISO 800 is the most common setting for indoor use. It goes well with artificial light sources like flashes or light bulbs. A keen eye will start to see noise at this point, but the photo’s quality will be good enough for general use.
ISO 1,600 is the setting to use when you’re shooting indoor events like basketball games, dance recitals, or concerts. ISO 3,200 is the last commonly-used setting and works best in situations where there’s minimal light, or you intentionally want the photo to have a grainy effect that adds to its artistic value.
What to consider before choosing an ISO number?
There’s plenty you can do to prepare before a shoot to make choosing the right ISO easier. First of all, consider your subject. Are you capturing a panoramic shot of the Milky Way or need to create lasting memories of a kids’ birthday party? A long exposure can let you get away with lower ISO settings even in poorly-lit conditions.
Will you be holding the camera or using a tripod? Always use a tripod if you can take your time framing the shot and don’t need to move. That way you’re eliminating camera shake and can use lower ISO with longer exposure.
Is artificial lighting available and allowed? Ramping up your external light source is preferable to increasing the ISO number. You won’t be able to do much about available light in concert halls or medieval monasteries, but be sure to bring a good flash and some portable photography lights if you have the need and permission to use them.
Is noise really such a bad thing? The answer is yes in most cases – your photos should capture the subject in as much detail as possible, and noise detracts from their quality. However, artistic photography allows you to experiment more freely with different amounts of grain, so some noise might be what the shot calls for.
What will be the end product? Even the most sophisticated LCD screens can’t predict how much noise there will be in your photo, especially if it is going to be blown up and used for posters or billboards. It’s better to err on the side of caution and select a lower setting than to risk unwanted noise. Brightness is something image editing software can fix – noise is not.