How to Deal with Shrinkage When 3D Printing with PLA

3D printing has always been lauded as this revolutionary technology for creating accurate prototypes, models, or copies of other objects. However, there may be geometrical inaccuracies in 3D printed objects as a result of shrinkage.
All 3D printing filaments, including PLA, experience shrinkage because of cooling. This shrinkage can be minimized by printing at lower temperatures or allowing the print to gradually cool down inside an enclosure. You can also compensate for shrinkage by deliberately designing your models to be slightly bigger.
The degree of PLA shrinkage can vary based on the specific brand or filament you are using. With a bit of patience, PLA shrinkage can be managed.
The problem with shrinkage – can it be avoided?
Unfortunately, all 3D printing methods that rely on ¬heat are prone to shrinkage. This is a natural consequence of the material being heated up to make them more pliable and conform to the digital model as processed by the slicer. This material then needs to cool down to develop rigidity and strength. During this cooldown step, the material shrinks in volume but gains increased density.
Compared to other 3D printing issues, shrinkage is relatively minor and often ignored. If you’re just 3D printing an item for display, then a 2% shrinkage is hardly noticeable. However, this issue becomes a concern if you need to 3D print functional objects such as gears, brackets, replacement parts for appliances, or a simple cellphone protective case.
Shrinkage actually does not happen when the filament cools down its printing temperature – it is the cooldown from the glass transition temperature that creates this problem. Below this temperature, PLA starts to become rigid and unable to conform to thermal stress.
This means that shrinkage is more pronounced in materials that have a high glass transition temperature. This is something we can observe in the examples that will be discussed later on. ABS has one of the highest shrinkage margins, while the shrinkage of PLA or PETG is less pronounced.
How much do PLA prints shrink?
The good thing about working with PLA is that it does not shrink as much as other 3D printing filaments. The average rate of shrinkage of PLA is 2% but a range of 0.8% to 3% is generally assumed. The actual shrinkage can vary depending on the printing temperature, cooling rate, or the additives in the filament.
In comparison, a high-temperature filament like ABS can shrink by up to 8%. This is also one of the contributing factors for why high-temperature filaments are prone to warping. The thermal stress caused by shrinkage can cause significant distortion of the geometry of the final print.
It’s not just about the temperature, though. PETG prints at a slightly higher temperature than PLA but generally shrinks less at less than 1%. This emphasizes the importance of considering differences in chemistry when attempting to predict how much a 3D printing filament will shrink upon cooling.
Despite the small shrinkage margin, a 2% difference can still make a difference for PLA parts that require a precise fit. You can either tolerate this shrinkage, attempt to minimize it, or anticipate it as part of your design.
How to control or compensate for PLA shrinkage
Knowing now that PLA shrinkage is an unavoidable problem, we can set up our 3D printer or digital model to anticipate it. Here are some measures you can take, depending on how diligent you intend to be.
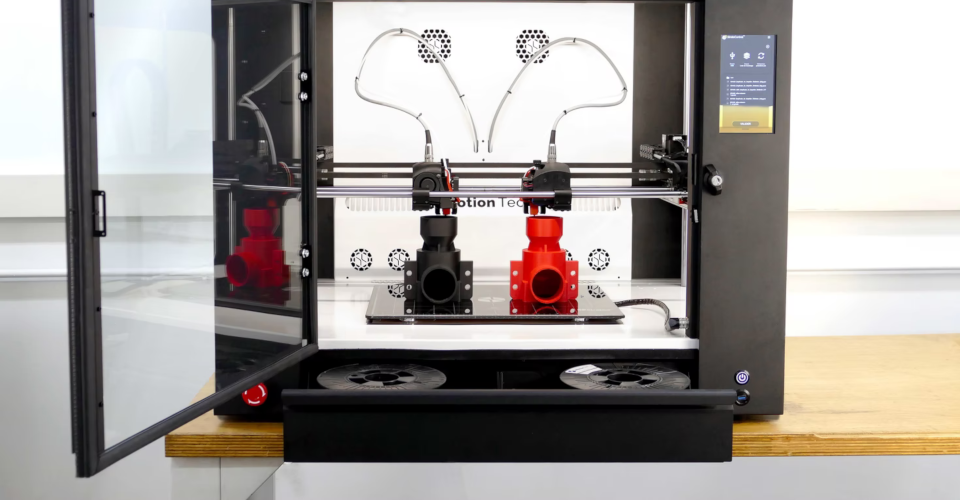
Print with a heated bed
Printing with a heated bed is not common advice when working with PLA, but we would recommend it in this case. With a heated bed, the first layer of the print is kept close to the glass transition temperature of the PLA. This makes it less likely to shrink while still providing a rigid base to support the rest of the print.
For printing with PLA, we suggest setting the bed temperature to within 50 to 55 °C. You will notice that this is slightly lower than the glass transition and usual bed temperature setting for PLA. The goal here is not to promote bed adhesion, but rather to create a stable foundation. This solid base will help the succeeding layers resist the effects of shrinkage.
Print in an enclosure
Again, a bed enclosure typically is not something that you would use when printing with PLA. However, it can help reduce shrinkage by maintaining an elevated temperature inside the build platform.
There are multiple benefits to using a bed enclosure. By slowing down the cooling process, thermal stress accumulation is done more gradually. Keeping the PLA at an elevated temperature also makes it more flexible and able to absorb the effects of thermal stress without irreversible deformation.
A bed enclosure also helps by promoting even cooling of the whole print. Without an enclosure, drafts in the room can cause localized cooling. This makes it even more difficult to predict how much a print will shrink, as different parts of the print can shrink to different degrees.
Scale up your model

The simplest and most intuitive solution to shrinkage is to simply scale up your model by an amount that is equivalent to the shrinkage. This is a great idea but is easier said than done. If you’re using a new PLA filament, you will likely have to do multiple trials before you can get the final 3D printed dimensions just right.
There are some ways that the geometry of a model can be altered to minimize the effects of shrinkage. Rounded corners are typically better than sharp corners as they allow for more even distribution of thermal stress. Large continuous slabs of plastic can have holes cut into them to reduce the effects of shrinkage. This strategy can be useful for faces in your model that are not visible.
If you would like to try the shrinkage compensation strategy, we highly recommend this Dimensional Calibration model that you can download for free from Thingiverse. The model accounts for errors both due to shrinkage and radial compensation. Once you have printed the model, take the required measurements and input them into the Google Sheet that is linked on the Thingiverse page.
Once you have provided the values, the spreadsheet will calculate a compensation value that you can input into your slicer. This should make the error far less pronounced. The maker of the model states that you can run this trial twice if you need very high accuracy, but just doing it once can yield a huge improvement.
The degree of shrinkage is almost impossible to predict without doing trial runs, even if you’re working exclusively with PLA filament. Different additives and dyes can also have an effect on the degree of shrinkage. If you need to make parts with precise dimensions, we suggest sticking to one particular brand and model of PLA filament and perfecting your technique with it.
Final thoughts
Filament shrinkage due to cooling is a product of the fundamental laws of physics. This emphasizes just how unavoidable it is. While it cannot be prevented, it can certainly be anticipated or managed.
The best approach to shrinkage in 3D printing is to embrace it. Models can be scaled up or altered to minimize the effects of shrinkage. With some planning, it is entirely possible to create 3D prints that are within 0.1 mm of your intended measurements.