Qidi Tech X-one 2 Review

The X-one 2 is the upgraded version of the X-one. It’s from Qidi Tech, a Chinese brand known for its catalog of affordable, high-quality 3D printers under $1,000. You might recognize Qidi Tech as the company behind the Qidi Tech I, a cheap derivative of the popular FlashForge Creator Pro.
A recommended 3D printer for beginners and those who want a plug-and-play machine, the X-one 2 sells for just $400. Its main competition in that price range is also a product from FlashForge: the Finder. Both have an easy-to-use setup. Their technical specifications are even similar in several areas. While the Finder is the more suitable 3D printer for kids, the X-one 2 is more capable and offers more long-term value.
The X-one 2 doesn’t have a large user base. But on the plus side, Qidi Tech provides outstanding customer service. The company offers one-on-one technical support via Skype, so you will never be alone when dealing with issues with the X-one 2.
The Design
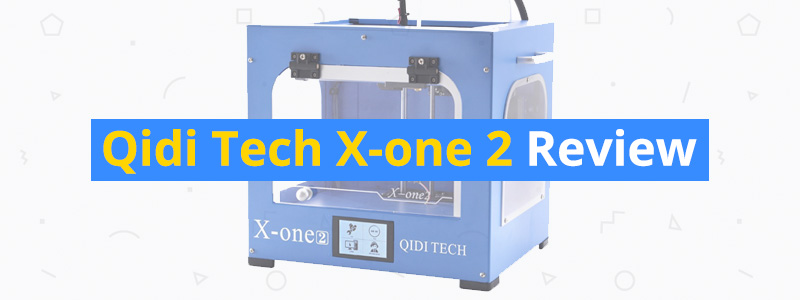
Qidi Tech didn’t do much with the original X-one design. The X-one 2 is still housed in a rigid aluminum frame, complete with the familiar bright blue colors, and has the same limited build volume. The locations of the key components, such as the USB port, the SD slot, and the power switch, are still the same. But while the core design is intact, the X-one 2 does feature one notable component its predecessor lacks: acrylic covers.
At first glance, X-one 2 appears to be a fully enclosed 3D printer. It has a top-hinged door and a pair of side panels, all of which are transparent, allowing you to easily monitor your print progress. But unlike the Qidi Tech I and the X-pro, the X-one 2 doesn’t come with a top cover. Also, the side panels are not the easily removable magnetic windows the 2018 Qidi Tech I now comes with, so you can’t just pop them in and out when you’re switching materials from PLA to ABS, and vice versa.
Out front, the X-one 2 has a 3.5-inch touchscreen interface. It has easily recognizable icons and is very responsive and easy to operate. The USB port and the SD card slot are located on the side while the power switch is at the back, which can be awkward to reach when the X-one 2 is placed in a corner. The spool holder is also at the back of the machine and feeds the extruder through the uncovered top.
Inside its heavy frame, the X-one 2 has a single extruder, which is made of quality parts and has adequate ventilation. The heated print bed is made of aluminum alloy and has a sticker on the print surface. Sadly, the build plate is non-removable, so it can be difficult to remove completed prints, especially the large ones. Just like the Qidi Tech I, the X-one 2 has interior LED lights, which makes it a lot easier to monitor your prints.
In all, the X-one 2’s design is good but not exactly groundbreaking. It’s a well-constructed machine. It has a rock-solid frame, which makes it more stable than an open-frame 3D printer, and has all of its moving parts neatly secured in their respective locations. It’s got a pair of sturdy handles on either side as well, which makes it easy to move around.
The Features
As with most budget 3D printers under $500, don’t expect to see a lot of features on the X-one 2. It’s not in the same league as the Original Prusa i3 MK3 or even the BIBO2. But despite being light on convenient features, the X-one 2 is still very easy to use.
Its most notable feature is the touchscreen interface. There aren’t many cheap 3D printers that come with a touch-based display. Most products have a knob- or button-operated LCD interface, which now look outdated. Some products don’t even have an integrated interface – like the M3D Micro.
The 3.5-inch touchscreen interface shows a number of parameters, such as the print progress and the print bed temperature. Using the onboard controls, you can also pause your print anytime and then resume it at a later date. Just make sure to save your progress, though. Because without a save point, the X-one 2 won’t be able to continue where it left off, forcing you to start over from scratch, which can be heartbreaking. The pause-resume function is also handy when loading a new filament – either because the 3D printer is out of filament or because you want to switch to a different color.
The removable acyclic covers also count as features. Aside from helping the X-one 2 with temperature stability in the print chamber, the panels also protect the moving parts from dust and other particles. Moreover, the panels act as the last line of defense against overly curious kids. Remember, the X-one 2 has a heated print bed, so it’s not as safe around kids as 3D printers with non-heated print beds, such as the FlashForge Finder and the XYZprinting da Vinci Jr. 1.0.
Like all the other Qidi Tech 3D printers, the X-one 2 has an open material system. It’s compatible with filaments from other brands, but do make sure the filament diameter (1.75 millimeters) is correct. As noted by other users, Hatchbox filaments tend to produce the best results on the X-one 2. But if you’ve had great experiences with other brands, give them a go as well.
For connectivity, the X-one 2, as mentioned in the design section, has a USB port and an SD card slot, which are both located on the side. Both options seem to be reliable and don’t encounter a lot of issues. Similar to its predecessor, the X-one 2 can’t connect via Wi-Fi, so starting and monitoring prints remotely are off the table.
The Setup
The X-one 2 is fully assembled out of the box. Unlike with the Qidi Tech I, the extruder is already installed inside the frame. That’s why the X-one 2 makes for an excellent starter 3D printer for total newbies who have never seen a 3D printer in real-life.
Setting up the X-one 2 is incredibly straightforward. Depending on the type of material you want to print out of the box, the initial setup can take either 15 minutes or 30 minutes. If you want to print with PLA, all you have to do is attach the spool holder, load the filament, and you’re good to go as soon as you finish installing the software, which only takes a few minutes.
But if you want to be more daring and start with ABS right away, you also need to install the top-hinged door and the side panels because the X-one 2 needs to be enclosed in order to produce successful results with high-temperature materials. Oh, and the handles also need to be installed in both cases, but that’s the least of your concerns.
Everything you need is in the box, including a USB cable, an SD card, and an SD card reader. The instruction manual, software, and test models are all on the SD card, along with several tutorial videos on how to solve the most common problems you’ll encounter. The instruction manual and the printed quick start guide are written in broken but still coherent English. Although there are missing steps and unclear instructions, you should be able to go through the entire initial setup with the provided documentation.
Qidi Tech also includes a sample filament, along with a glue stick. You should throw away both items as soon as you get your hands on them. The sample filament is junk while the glue stick is too sticky and leaves a lot of residue on the build platform, which can be difficult to remove. When you order the X-one 2, make sure to buy filaments as well.
Leveling the print bed is easy. Although the X-one 2 has a manual leveling system, which can be a turn-off for beginners, it only takes a few minutes to get it done. On the flip side, loading the filament can be difficult because of the way the extruder system is set up. But overall, the entire initial setup is quick and easy.
The Performance
The X-one 2 surprised us with its ability to print smooth and detailed 3D models, even with the stock print settings. It’s nowhere near the Ultimaker 3, of course, but it’s definitely better than some 3D printers that go for double the price.
It can print the test models with little issues, both with PLA and ABS. The included slicer is a custom Qidi Tech software. It’s user-friendly and has a good number of options for you to play around with. You can also use third-party slicers such as Cura and Simplify3D. If you want to make everything a lot easier, both in the beginning and in the future, we recommend that you invest in the Simplify3D, which sells for $150.
According to the official specs, the X-one 2 can only print with PLA and ABS, the two most common materials used in 3D printing. But with a few tweaks in the settings, you can actually print with other materials even without heavy modifications to the hardware. The X-one 2 can also print with TPU, Nylon, and PETG, as pointed out by other users, but you have to make sure you have the correct settings, especially with the temperatures.
We like that the build plate doesn’t need to be constantly re-leveled after just a few prints. Lots of 3D printers have that issue. Although it only takes a few minutes to do the manual bed leveling process, it’d be really annoying if you had to do it after just three or four prints.
All 3D printers produce noise when running, and the X-one 2 is no different. But unlike most open-frame 3D printers, the X-one 2 is fairly quiet. You can still have a clear conversation with someone or watch TV without getting distracted while the X-one 2 is printing in the background.
Our biggest gripe is that adhesion on the build platform is lackluster. As mentioned, the included glue stick is not recommended because it’s too sticky. With the stock build plate, you also have to use painter’s tape and/or hairspray for the best results, especially when printing large 3D models. For a long-term solution, you can replace the stock build plate with a glass bed. And for more convenience, you can also go for a removable magnetic bed setup.
Although the X-one 2 is easy to use and doesn’t require a lot of tweaks to get the job done – unless you’re going to print with more advanced materials – you do need to be diligent with the maintenance. More specifically, you should check the extruder after every print because, as other users have also pointed out, the X-one 2 seems to regularly run into clogging issues. Other than that, the X-one 2 is solid.
The Verdict
| Tech Specs |
|---|
| Resolution: 100 microns |
| Volume: 5.5 x 5.5 x 5.5 in |
| Filament: 1.75 mm |
| Types: ABS, PLA |
| Weight: 41.9 lb |
| Connect: USB, SD card |
| The Pros |
|---|
| Outstanding customer service |
| Well-built metal frame |
| Fully assembled and easy to set up |
| Heated aluminum print bed |
| Good print quality |
| Touchscreen interface |
| Comes with acrylic covers |
| Build platform is easy to level |
| Has pause-resume feature |
| Compatible with third-party slicers and filaments |
| The Cons |
|---|
| Limited build size |
| Stock build plate has adhesion issues |
| Filament can be tricky to load |
| Documentation is confusing in some areas |
It’s easy to fall in love with the X-one 2. It’s a cheap 3D printer that brings real value to the table. It’s extremely easy to use, comes in a sturdy metal frame, and prints really well for a budget 3D printer. The small build size can be a deal-breaker for some people, though. But if you want an excellent entry-level 3D printer that comes with an enclosure, can print ABS out of the box, and is made by a company that provides outstanding customer support, get the X-one 2.
Rating: 4.3/5