RC Parts List for Building a Drone

Why should you buy a Ready-to-Fly (RTF) drone when you can build your own model? One of the RTF advantages is that you can take to the skies straight away—with minimal fuss. But RTF quadcopters typically cost more than kits. Other choices are Almost-Ready-to-Fly (ARF), and Bind-and-Fly (BNF).
OK, let’s look at those last two options before we move on.
ARF and BNF
An almost-ready-to-fly drone is just that. An ARF kit means the user must at least do some assembly before their model can fly. You may also need to buy a controller separately depending on the deal. The manufactures sometimes refer to ARF drones as DIY (Do it Yourself) projects. ARF copters should cost less than their RTF counterparts. Users also get to customize ARF craft, at least in part.
Bind-N-Fly (BNF) means users need to connect their RC drone’s receiver to a controller. The user must buy the controller separately as it’s not part of the kit. The drone usually arrives intact with a BNF arrangement. The advantage of BNF kits is that you can save money if you already have a compatible controller. The other benefit is that you can choose the best controller for the craft.
Build Your Drone from Scratch
You now know your RTF from your ARF and BNF. To get any of these options airborne requires no or minimal effort. To build a copter from scratch, though, is an entirely different ball game.
DO NOT BUILD a drone if the only reason is to save money. Drones are easily affordable these days, so it’s not worth the hassle. DO BUILD your own drone if you love to tinker and want to learn the ins-and-outs of what makes these puppies fly. It can be a truly rewarding experience.
The Cost of Building a Drone
There are as many choices for building a drone as there are buying them pre-assembled. It depends on what you want, need, and expect. Stick to something basic if you’re a complete novice. You can move onto bigger, more sophisticated projects once you gain some experience. It’s entirely possible to construct a basic quadcopter for less than 100 dollars.
Choose How to Build Your Drone
You need to know what the end model is going to be before you decide to build a drone. There’s no point putting together a highly-sophisticated craft if you’re a beginner pilot. Likewise, you don’t want to assemble a toy if you’re an expert flyer. That’s unless you want to grasp the building basics before you construct your dream flying robot.
Kits come in three flavors, namely:
- Ready-to-build kits
- Custom kits
- Parts kits
A ready-to-build kit is perfect for the novice. It has all the parts and instructions you need to make a drone in one handy box. Think of it as a drone jigsaw. Custom kits are for the more adventurous or experienced hobbyists. You source each part separately to build a craft of your design or to follow a pre-written plan. These can be simple play drones or complex First Person View (FPV) models.
The third option is for the highly-experienced or ambitious builder. Some hobbyists like to make parts to create custom pieces—the ground-up approach. An example would be to build a homemade frame. Frames are typically metal, plastic, or wood. They are the foundation of every unmanned aerial vehicle (UAV). There’s a special section on frames and other parts toward the end of this guide.
Essential Parts to Build a Drone
The first thing to decide is what kind of drone you want to build and then choose a frame. The frame is your foundation so it must be right from the start. They come in four types:
- Quadcopter (four arms and the most popular)
- Tricopter (three arms)
- Hexacopter (six arms)
- Octocopter (eight arms)
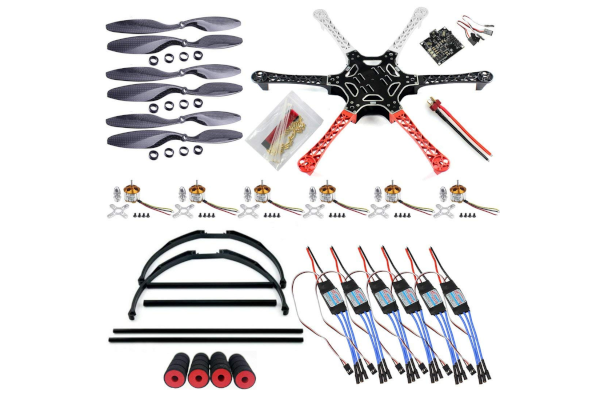
Below is a quick list of the seven essential components required for any drone project of any size. I’m going to use the popular quadcopter as an example and to keep things simple:
- 1 x 4-armed frame (see above)
- 4 x motors
- 4 x propellers (2 x clockwise, 2 x counterclockwise)
- 4 x Electronic Speed Controls (ESC)
- 1 x flight control board
- 1 x radio transmitter and compatible receiver
- 1 x battery and compatible battery charger
All the above parts come in different sizes, strengths, quality, and capabilities. A custom-built drone can have many extra add-ons too. There are options to upgrade as you gain more experience. The basics of each drone are the same, though. The most important thing here is to make sure all parts are compatible. Parts compatibility won’t be an issue if you buy a pre-prepared kit.
Tools You Need to Build a Drone
Having the right tools for the job makes everything so much easier. The good news for hobbyists is that the toolkit is small and basic. Here’s what you need:
- A decent set of hex keys (choose sizes based on frame requirements)
- An 8mm (M5) nut spinner or nut ratchet
- Pair of wire cutters/strippers
- A quality soldering iron and some solder
That’s your toolkit. If you’ve never soldered before, don’t worry. There are plenty of helpful video tutorials on sites like YouTube. A few other necessary bits include heat-shrink tubing, cable ties, and some nylon standoffs. Get some electrical and double-sided tape too, and Loctite (thread locker).
TIP: Don’t try to build your first drone without a full parts lists and detailed instructions. You can put a custom plan together once you become familiar with each part and its vital function.
Below are five popular kits (drone jigsaws). These are ideal introductions to building drones.
#1 Force Flyers Bog Basic Building Block Drone Kit
Editor’s Rating: 4.5/5
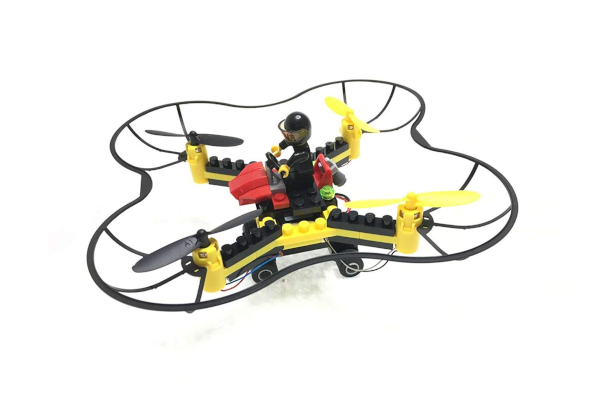
This is one of the most basic drone kits around. It’s a toy-grade project and the sort of thing a parent can enjoy building with their kids. It’s a fun and affordable package that lets you create any design you like. It may be simple, but it’s still educational and an excellent place for young minds to start. It’s ideal for developing STEM skills as it teaches about weight distribution, aerodynamics, and more.
In the box of a new DIY Building Block RC Drone Fly-n-Drive Kit:
- 1 x USB charging cable
- Building blocks
- 1 x controller
- 1 x interchangeable battery
- Spare set of rotors
- Easy-to-follow, detailed user guide
Go here for full product details and best price check
#2 LHI Pro Carbon Fiber Quadcopter Kit
Editor’s Rating: 4.3/5
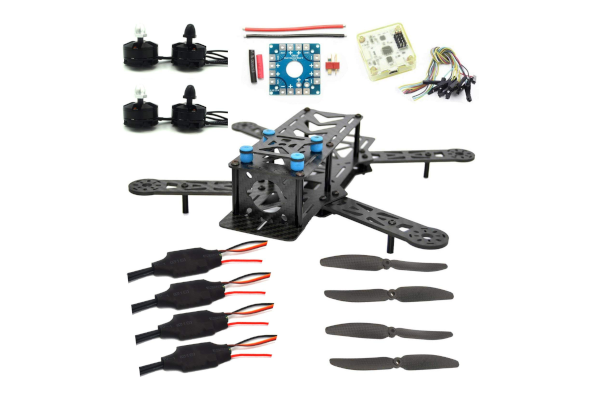
The LHI Pro is an exciting DIY drone kit that uses pure carbon fiber parts. It comes with active rubber damping to reduce flight vibration. It’s a lightweight, affordable, reliable, learn-as-you-go craft. The quad kit has most of what you need to get airborne but not everything (see below).
In the box of a new LHI Pro Carbon Fiber Quadcopter Kit:
- 1 x carbon fiber frame
- 1 x 4-axis mini quadcopter
- 1 x CC3D flight controller
- 4 x multi-copter motors (MT2204 2300KV)
- 4 x propeller (2pcs CW, 2pcs CCW)
- 4 x Simonk 12A ESC
What’s not in the box:
You need your basic drone building toolkit and accessories (see intro for details). You must also buy the transmitter, receiver, batteries, and a battery charger as extras. These extras are quite typical for drone kits. Look for 3S 1800-3000mah batteries w/ over a 45C discharge rate. Consider at least a 6-channel (CH) controller system, or 8–10CH if it’s within budget. Finally, get some vinyl spacers/screws.
Go here for full product details and best price check
#3 Woafly LHI 220 Quadcopter Full Kit
Editor’s Rating: 4.5/5

This is a brilliant first-time DIY quadcopter kit for the total novice and has most of what you need. It’s a builder-friendly racing drone with First Person View (FPV) capability. Yes, that means you get a camera as part of the kit as well. The package also comes with links to helpful online video tutorials.
In the box of a new Woafly LHI 220 Quadcopter Kit:
- 1 x full carbon fiber racing quad frame
- 1 x F3 Flight Controller (FC) board
- 1 x FPV 700TVL camera
- 1 x 5.8Ghz FPV antenna (aerial)
- 4 x brushless motors (2CW + 2CCW)
- 4 x protector caps (motor guards)
- 4 x Littlebee lightweight 20A mini ESC
- 4 x LED motor pads
- 4 x 5045 propellers
What’s not in the box:
You need your basic toolkit to build this puppy (see intro section). You also need to buy a remote controller (RC) and a capable battery to finish the project. Look for a 6CH controller system or above. Choose from 3s–4s 1200mAh up to 1500mAh for the battery.
Go here for full product details and best price check
#4 Qwinout DIY RC Quadcopter Drone Kit
Editor’s Rating: 4.6/5
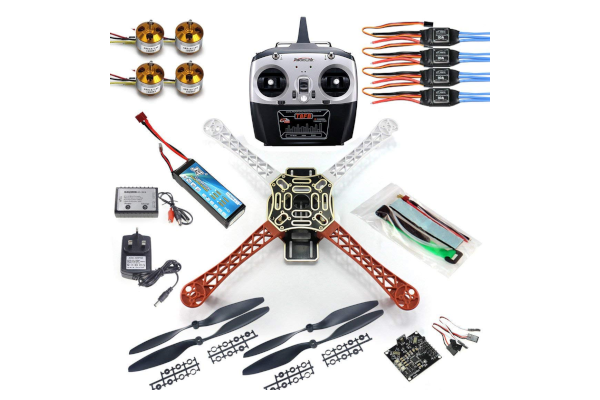
The makers have done all the soldering at the factory end for this project. Choose a different kit if you like to solder. This model costs more than the previous picks but the quality is higher. It also includes a remote-control system, battery, battery charger, and other extras. There’s an online video tutorial to help guide users in the assembly process.
In the box of a new Qwinout DIY RC Quadcopter Drone Kit:
- 1 x HJ 450 multicopter 450F tough nylon fiber frame
- 4 x JMT 920KV brushless motors (2CW, 2CCW)
- 4 x 30A brushless ESC
- 4 x 1045 carbon fiber propellers
- 1 x PIX PXI PX4 flight controller (FC)
- 1 x 6M GPS w/ compass L5883, 25cm cable
- 1 x DJI GPS (folding) metal antenna mount holder
- 1 x LCD transmitter FS-i6 2.4G 6CH AFHDS 2A & iA6 receiver
- 12 x 3.5mm banana plug bullet connectors
- 1 x hook-n-loop fastening tape
- 1 x male connector T plug
- 1 x compact balance charger (IMAX RC B3 Pro)
- 1 x battery, 11.1V 4400MAH 30C 3S1P
- 4 x landing gear skid wheels (black) 140MM High
Go here for full product details and best price check
#5 QWinOut F550 Airframe RC Hexacopter DIY Kit
Editor’s Rating: 4.4/5
Quadcopters are not the only drone kits available. This DIY model is a hexacopter (six propellers) option and a decent kit for beginners. It doesn’t have written instructions, but there’s a video tutorial to help guide builders. Many of these boxed kits are without written guides for some reason. It’s still a fun project that’s quite easy to assemble from scratch.
In the box of a new QWinOut F550 Airframe RC Hexacopter DIY Kit:
- 1 x F550 hexa-rotor airframe
- 6 x A2212 1000KV brushless outrunner motors w/ mounts
- 6 x 30A brushless ESC
- 3 x carbon fiber propellers (2CW, 2CCW)
- 1 x KKMulticopter flight controller (FC) V5.5
- 1 x tall universal landing skid PTZ
- 4 x 65mm skid proof (impact resistance) sponge foam tube ball
What’s not in the box:
You need your basic drone building toolkit (see intro section for details). You must invest in a 4CH radio and receiver, batteries, and battery charger to complete the kit. Some enthusiasts like to upgrade the flight controller to one with an LCD.
Go here for full product details and best price check
OK, that’s a few of the boxed options. These are standard kits that show you what to expect if you don’t want to source each part separately. The next section is for those who want to choose each piece and build a drone that meets their exact requirements.
The RC Drone Sample Parts Build List
The sample list below names each part with a brief description. The cost to the right of the piece is an estimate only and accurate at the time of writing the guide. You can use all the parts in this list to build a small, simple First Person View (FPV) mini camera quadcopter. It’s a great first-time project.
| Drone Part | Part Description | AVG. Cost |
|---|---|---|
| Quadcopter Frame Lisam LS-210 210mm Carbon Fiber Frame Kit Mini Quad | It’s a 210mm carbon fiber frame kit with a 20° camera mounting angle. It has a 210mm wheelbase and a net weight of 3.5 ounces (100g). The lightweight, simple design is efficient and stable. | $19.00 |
| Quadcopter Brushless Motors Racerstar 2205/2300 kV Motors | 4 x Racerstar BR2205 2300KV Brushless Motors. Brushless motors are more efficient than brushed counterparts. They last longer and need almost zero maintenance. Each unit here is 31.5mm high, 27.9mm wide, and weighs only 28g. | $27.00 |
| Electronic Speed Controller Racerstar 20A 4-in-1 ESC | These 4-in-1 ESCs work well with the Racerstar brushless motors above. They handle straightforward flying very well with the right set of props. I’d suggest upgrading if you intend to fly harder and push the quad to its limits. | $50.00 |
| Flight Controller (FC) OMNIBUS Betaflight F3 AIO V1.1 Flight Controller | The OMNIBUS Betaflight F3 AIO V1.1 FC comes with an OSD Barometer Support SD-Card. It has Japanese NMB ball bearings (known for their long life) and a stainless-steel motor shaft. Other features include the CNC machined aluminum case and oxygen-free copper wire. The F3 processing power provides a fast FC loop time which results in smoother flying. | $23.00 |
| Mini First Person View Camera Foxeer XAT600M HS1177 600TVL Mini FPV Camera | This is a tiny and capable first Person View (FPV) 600TVL camera with a 2.8 lens. It comes with a mounting bracket and a camera cable w/ male servo end. There’s also the OSD joystick cable and an IR-Cut for daylight use. At just 12g it’s ultra-light, and that means longer flying times. | $20.00 |
| The Video transmitter Eachine VTX03 Super Mini FPV Transmitter | The Eachine VTX03 is an affordable, tiny video transmitter. It comes equipped with switchable power outputs: 25, 50, 200mW. That’s plenty for FPV racing and general flying needs. The transmitter has 72 channels so there are no issues with channel conflicts. It’s small size and light weight means it takes up little space and adds to longer flying times. The antenna is a dipole design attached with U.FL connector making it more versatile. | $20.00 |
| Receiver (Full Range) Frsky XM Plus Mini Lightweight Full Range Receiver | The XM+ is a dual antenna receiver that boasts a 1.5 km full range. You won’t need that range with a mini quad, but it’s nice to know it’s there. It’s also much smaller and lighter than other full range receivers. And the XM+ only costs five bucks more than the lesser range XM. Telemetry isn’t needed as you have OSD support with the flight controller above. | $17.00 |
| Propellers Mini Drone Kingkong / LDARC 5040 5x4x3 3-Blade Propellers | Propellers are cheap for micro and mini-drones. This pack has ten pairs for under seven bucks. They’re a perfect choice for the beginner. More advanced users will want to invest in something with a tad more punch though. Either way, props are affordable and will last a long time. | $7.00 |
| Lipo Battery AHTECH Infinity 4S 14.8V 1300mAh LiPo Battery | These lithium polymers (Lipo) batteries are cheap at just over $22. This is a 1300mah 85c 4s Lipo with a 14.8V voltage. It has a silicone-line, XT60 connector and weighs only 5.2 ounces (150g). It’s certainly a good choice for our mini-drone kit here. | $22.00 |
Design from Scratch and Take to the Air
You can build a drone based on your unique design. Always remember to check the parts you choose with great care. Not all parts are compatible with all components. Verify that the part you need works with your model. Look out for wording like Part name for model, e.g., Carbon fiber propellers for DJI… Also, make sure the drone parts are easy to get hold of for when you need replacements.
Quadcopter Example Specs
Let’s say you want to build a hobby grade quadcopter. The first thing to decide is the size of your craft. Favorite sizes are 450mm and 550mm. The diagonal distance between the motors determines these sizes. Let’s look at the suggested specs for 450mm and 550mm models.
Typical 450 Quadcopter Specs:
- Brushless motors: 2212, 2216 800kv–1200kv
- Brushless ESC: 20amp–30amp
- Propellers: 8” to 10”
- APM/Pixhawk/DJI V2
- Battery: 5000mah 3S/4S LiPo (120–200amps)
- FPV equipment
Payload: 2-axis or 3-axis gimbal w/ small action camera like a GoPro
Typical 550 quadcopter specs:
- Brushless motors: 2212, 2216, 600kv–900kv
- Brushless ESC: 20amp–30amp
- Propellers: 10” to 15”
- APM/Pixhawk/DJI V2
- Battery: 5000mah 3S/4S LiPo (120–200amps)
- FPV equipment
Payload: 2-axis or 3-axis gimbal w/ small action camera like a GoPro
I’ve written this guide with the popular quadcopter in mind to keep things simple. You can find similar specs guidelines online if you plan to build a hexacopter or octocopter model.
Build Your Own Drone Frame—Why Bother?
Why would you want to build a drone frame when you can buy one readymade? The answer is because you can, you want to, and it’s something else to take great pride in. It adds another layer of achievement knowing that your frame supports the motors, speed controllers, and payload. You’ve balanced the propellers and got all the electronics onboard and working. It’s an achievement for sure.
There are plenty of low-cost readymade frames for sale but take heed. Cheap anything is likely to break easily and not last long. That’s not only frustrating but a false economy. You must also add a few extra tools to the toolbox to build a frame. These typically include a hacksaw (fine-toothed saw for cutting metal), a drill, and some screws. The main frame parts are its center plates and arms.
Another exciting option is to design and print your drone frame using a 3D printer. It’s a less hands-on approach, but it’s still your design and one you get to create from scratch.
Know Your Needs and Expectations
You should consider the purpose of your drone before you start anything, for example:
- Is it a lightweight racer or a high-flying freestyler?
- Are the arms detachable or part of a one-piece design?
- How much space do you need for all the extra components (see frame types below)?
- Do you need space to mount a camera?
- Where’s the battery to go, top mounted or underslung?
- What maximum payload do you need to carry?
- What flight time do you hope to achieve from a fully-charged battery?
Here are four things to pay close attention to before you buy a frame kit:
- Material: usually lightweight aluminum, carbon fiber, or even wood
- Frame stiffness: a stiffer, less flexible build provides a smoother flight
- Arms: typically, aluminum or sturdy plastic tubing
- Frame type
That last point is important because different frame types serve different purposes.
Know Your H from Your X
The H frame has more space than other kinds. That makes it an ideal choice if you plan to add a GPS module and other parts that need the room. The H frame is literally in the shape of an H with a center spoke connecting two horizontal sections. The X Frame is a popular choice when you want to keep the weight down. Other types are the Plus Frame, the Stretch Plus Frame, and Stretch X Frame. You can explore the options once you decide on the kind, size, and payload of your flying robot.
The multicopter is to be your creation. Therefore, it’s vital to learn the pros and cons of structures and materials for your ‘specific’ design. Only you can know what that is. Choices can be easy or difficult. There are many DIY drone and quadcopter forums around for help, tips, and ideas.
The table below gives you some idea of sizes. The first column shows the propellers in inches. The second column is the frame size (estimate). The third column is the minimum arm thickness. And the fourth column suggests the motor to use based on the other specs.
| Propeller Size | Frame size | Arm thickness (min) | Motor |
|---|---|---|---|
| 2 inches | 100mm | 2.5mm | 1102 – 1104, 6000+ KV |
| 3 inches | 120mm | 3mm | 1104 – 1106, 4000+ KV |
| 4 inches | 150–180mm | 3mm | 1306 – 1408 3000+ KV |
| 5 inches | 200–220mm | 4mm | 2204 – 2306, 2100 – 2800KV |
| 5–6 inches | 235–280mm | 4mm | 2205 – 2308, 1600 – 2500KV |
| 7 inches | 300mm plus | 5mm | 2205 – 2308, 1600 – 2500KV |
The Configuration List
Frame kits may or may not come with predrilled holes. The holes must be 100% precise so decide whether you want to drill yourself or have them done in advance. Frame kits usually come with a recommended configuration list too. Such a list includes essentials like:
- Motor suggestions
- Propeller sizes
- Recommended battery
- Electronic Speed Control (ESC)
- Type of receiver
- Camera settings
- HD camera suggestion(s)
- Video Transmitter
- Others
These recommendations are ideal for first-time builders. The items on the lists are only suggestions and not usually set in stone. It’s still nice to have a blueprint to fall back on all the same.
Here are a couple of examples of popular frame kits:
YKS Carbon Fiber Mini 250 Quadcopter Frame Kit
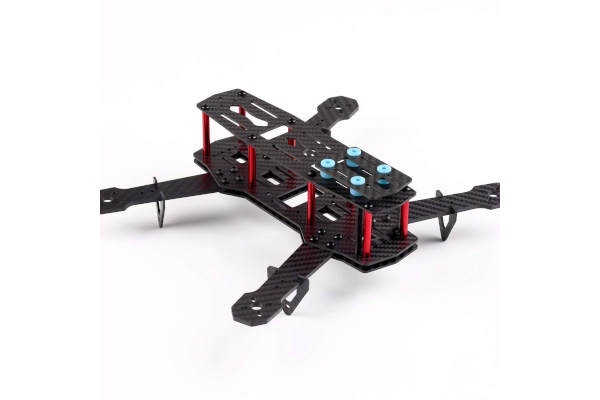
The material used for this quadcopter frame is ultralight carbon fiber. It has plenty of available space for an FPV camera. The kit includes a rubber damper, 3mm machine arms, and assembly instructions. It’s an excellent choice for beginners yet still offers lots of scope for more experienced hobbyists. It also comes with a recommended configuration list (see previous section)
Go here for full product details and best price check
X525 V3 Multirotor X-copter Foldable Frame Kit
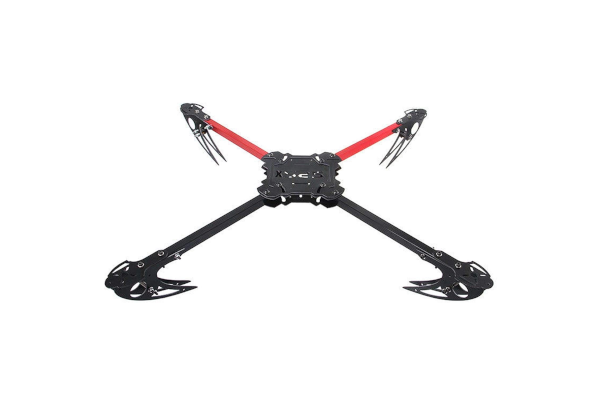
This simple foldable frame kit is by the maker Hobbypower. You can use it for various flight modes, but it’s especially practical as an FPV platform. The ultra-lightweight of this foldable fiberglass frame helps to extend flying time. Flight time is a major consideration for drone builders and pilots.
Go here for full product details and best price check
Optional Extras to Consider
One of the joys of building a drone is the potential for modifications and upgrades. You can start off simple and end up complex with the right design—learning as you go. The kinds of things enthusiasts like to tweak and upgrade include frames, motors, and ESCs. Others are cameras, gimbals, and obstacle avoidance sensors. Transmitters are something else pilots like to experiment with.
First Person View (FPV) Cameras and Gimbals
Some drone cameras are built-in to the design and others are detachable. There are lots of drone cameras on sale. Some builders add action cameras to their drones like the GoPro Hero5 Black or the YI Action as two examples. Image stabilization is another thing to consider and where camera gimbals come into play. Gimbals are vital for keeping images and video footage steady during the flight.
A quality gimbal means little with a below average camera. Likewise, a subpar gimbal won’t do much to enhance the quality of an expensive UHD camera. Stabilization comes in many forms. There’s the cheap to the pricy and everything between the two. You generally get what you pay for.
The three most important gimbal considerations are:
- The weight of the equipment
- The number of axes (more is better)
- The camera the gimbal needs to work with, i.e., action, DSLR, Pro RED
Open Source Software For Drones
You’re not alone if you plan to build a drone. The online drone building community has gotten big in recent years. They’re a friendly bunch too. There’s a plethora of open license hardware and software projects for enthusiasts. It’s a community for anyone who wants to build, customize, experiment, or repair their beloved craft. This section highlights a few of the more popular projects.
I won’t go into too much detail here as all these open source teams have their own websites. They’re in a much better position to describe their programs and what they offer than I am. You should find everything you need in the four examples below, but there are others to explore if you need to.
LibrePilot Free
This is an entire software suite designed to develop all types of radio-controlled drones. There’s a lot of interesting software and hardware to explore here. There’s also a friendly interactive forum where folks go to swap ideas, seek advice, or just chew the fat with fellow enthusiasts.
ArduPilot
Professionals and hobbyists have dedicated more than five years of time and updates to Ardupilot. The result is a reliable, full-featured open source software project for autopilot.
Paparazzi UAV (Unmanned Aerial Vehicle)
This is a GPLv2 (General Public License) project for hardware as well as software. Look at Paparazzi UAV if you’re interested in building and flying an open source craft under open licenses.
Dronecode
Whatever you need for your UAV project is all available at Dronecode. That includes autopilot software, flight-controller hardware solutions, ground control station, and more.
Thanslot for introducing us to this amazing world .I am an electronics technician (radio & TV servicing). I can build any circuit if given the schematic. Unfortunately, I cannot transfer money abroad to buy components for projects I am interested in and components are not available in this country…it is tragedy !!Sorry for the misprint : thanks a lot.