10 Tips for Resin Printing with SLA Printers

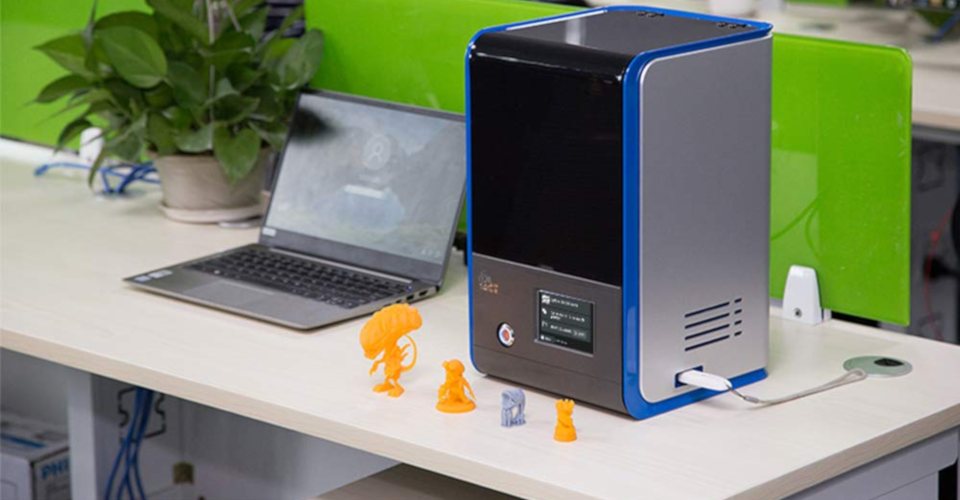
Although it’s no longer commonly used nowadays, SLA printing holds the distinct position of being the oldest form of 3D printing technology. In contrast to FDM printing which recreates models using molten plastic filament, the material for SLA printing is liquid resin. Just from this basic distinction, SLA printing offers its own unique strengths which have managed to keep the technology relevant until today.
The minority of people who prefer SLA printing over FDM printing attest to the method’s reliability and quality of output. However, it’s no secret that SLA printing is a little more complex, especially for those who have no 3D printing experience. To help you get started with resin printing, here are ten of the most essential tips:
What is an SLA printer?
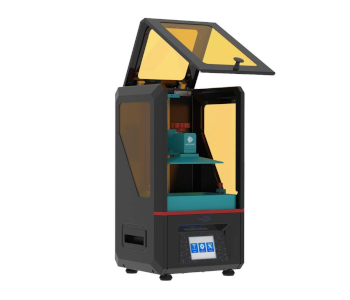
SLA stands for Stereolithography, a 3D printing process that is based on the principle of photopolymerization. The raw material used for SLA is liquid resin, typically contained in a large vat integrated into the printer. A concentrated beam of light is emitted on specific locations in the resin vat, causing a rapid process of polymerization which turns the liquid resin into solid plastic.
The build platform adjusts to allow the fresh resin to come in contact with the light emitter and for the next layer of the model to be printed. Depending on the model of the printer, the light source can be located either on the top or underneath the resin tank.
Resin printing remains a highly viable alternative to filament-based printing, especially for professional applications. It’s faster, can recreate smaller details, and produces prints with better quality than FDM. It’s also not as prone to the layer lines that are highly visible in prints made using FDM, although a bit of post-processing may still be necessary.
The main reason for the drop in popularity of SLA printing is the cost of the technology. Not only is the SLA printer itself expensive (not to mention that there aren’t many desktop-scale FDM printers), but even the resin is a lot more expensive by weight than plastic filaments.
Top 10 tips for resin printing
More than the associated costs, the general unfamiliarity with SLA printers make them even more intimidating. If you’re interested in getting into SLA printing and would like to have a good start, then here are our tips for you:
1. Pick an inexpensive and beginner-friendly printer
Although you obviously want to get an SLA printer with the highest possible quality, the reality is that you don’t want to invest too much on it if you’re still a beginner. Fortunately, there are now a couple of desktop-scale SLA printers that are quite inexpensive. A solid option is the ANYCUBIC Photon, a fully assembled resin printer that costs less than $300.
You can also get the upgraded version, the ANYCUBIC Photon S, which is about $200 more expensive. The recent upgrade boasts of slightly better stability while retaining most of the other features which has made its predecessor successful. Either way, you’ll end up with an SLA printer that has been recognized as being very friendly to beginners. It has a USB option to receive files for printing, comes with a proprietary slicer software, and has an LCD touchscreen interface.
Another worthwhile option is the Creality 3D printer which costs around $700 and comes with a 250-gram bottle of resin. This is a similarly reliable model with user-friendly features. Its main advantage is that it can be controlled wirelessly, so you can use your laptop remotely to print a digital model. It also has an automatic bed leveling feature, although its slicer software is far from being the best.
2. Cover your work surface with paper towels or plastic sheets
One of the biggest drawbacks of resin printing is the fact that working with resin can get very messy. Even if you manage to fill your resin vat without losing a single drop, you will almost certainly end up with a mess when it’s time to lift the finished print off the vat. Resin is also highly reactive and will likely leave permanent stains on your desk or floor.
If you don’t want to end up with permanent splotches in your working area, then it’s best to line the whole place with paper towels or plastic sheets. Plastic sheets are better because you can reuse them, especially if you have several projects lined up.
3. Level your build plate
Just as with FDM printing, maintaining a level build plate is also highly essential in resin printing. Some printers may have auto-leveling features, but don’t worry if yours doesn’t have one. Leveling a build plate is as simple as setting the plate at a distance from the glass that is about as thick as a sheet of paper. Simply place a piece of paper between them and tighten up the screws to hold the build plate in place.
Fortunately, you don’t have to repeat this process so often with a resin printer. Outside of any major maintenance, you probably shouldn’t even need to level your build plate again. Just make sure to do it correctly – a three-point leveling technique is considered the best.
4. Wear gloves and goggles and work in a well-ventilated room
Whenever you’re working with plastic resin, keep in mind that you should not let the resin come in contact with your skin. Make sure to put on a pair of nitrile or neoprene gloves, as well as goggle to protect your eyes. Uncured resin is pretty nasty, and we’d like you not to experience it firsthand.
As with any type of 3D printing, printing with resin releases a slew of fumes that can range from irritating to toxic. In any case, you would want to avoid letting any of these fumes enter your respiratory system. At the very least, you need to place your resin printer in a room with good ventilation. At times when you need to work with the resin closely, such as during curing or post-processing, we also suggest wearing some form of respiratory protection.
5. Slice your model for resin printing
As with other 3D printers, a good resin printer should come packaged with its own slicer software. This allows the printer to divide the model into very thin “slices” which determine exactly where the concentrated light will hit the resin vat.
If you’ve worked with FDM printers, the first thing you need to know is that the strategies with resin printing are quite different. For instance, you may set infill lower on the slicer so that you can save on how much resin, which is quite expensive, will be used. It also means that you won’t need to refill the resin vat with fresh resin as many times during the course of printing a project.
If your model has internal cavities, make sure to add a few drainage holes on the underside of your model so that uncured resin can flow out. These holes should be as big as possible as long as they don’t result in weakening your model’s structural integrity. You can simply print a plug to fill in the holes after printing or just let them be since they should be hidden.
6. Consider angling your print
The position of supports, as well as their number and density, have to be deliberated carefully in resin printing. Not only do support structures increase the resin requirements of printing a model, but an improperly positioned structure can make removal and post-processing very difficult.
Since there is a risk that support removal can make a finished print look less than perfect, a compromise worth considering is to set your model at an angle such that most support structures will be placed on the bottom and rear sides of the finished print. Should support removal not be done perfectly, then the consolation is that these imperfections only show up on the areas of the print that are rarely seen.
Another advantage of angling your model is that you’re likely to end up with more supports. This may use up more resin but can also be helpful if you’re having problems keeping your partially finished print from detaching the build plate.
7. Look for the best printer settings online
Finding the optimal settings for any resin-to-printer pair is always difficult and always comes down to a lot of trial and error. This takes a lot of time because of the number of parameters that you can play around with, including the layer width, exposure time, curing time, and special settings for the bottom layers.
Fortunately, many SLA printers maintain a crowd-generated database of the best settings for a huge number of different resin brands. These community-driven initiatives pool expert advice to help ease beginners into the hobby. A good example is the Photonsters GitHub group which consolidates all the recommended settings and open-source software that are compatible with the ANYCUBIC Photon resin printers.
If you’re not so fortunate to have a GitHub community dedicated to your specific printer model, then you can also try looking around in Facebook Groups and Reddit. Ideally, all these data can eventually come pre-built into resin printers.
8. Clean your finished print
Cleaning a newly finished print is a lot messier in resin printing than in FDM printing. On the flip side, it’s also highly necessary. No matter how cleanly your printing process is executed, there will still be a thin layer of residual uncured resin on the surface of your finished prints. You’ll have to remove this residual resin right away, lest it starts to harden and distort the intricate details of your model.
First, you’ll have to remove your finished print from the build plate. Wear your gloves and goggles, make sure your working area is lined with plastic sheets or paper towels, and use a plastic scraper to gently lift the print off the build plate. If you have supports, then you might need a knife or tweezers. In any case, removing the print should be a little easier in resin printing that it is in FDM printing.
Prepare a jar or plastic container and pour in enough isopropyl alcohol to submerge your print. Transfer the print gently into the container. Use tweezers if needed. This will remove any uncured resin from the surface of the print. Leave the print submerged in the alcohol for about five minutes.
After the five-minute period, lift the print gently from the alcohol solution, making sure that all the excess alcohol and uncured resin flow out of any drainage holes. Place the cleaned print on top of paper towels and allow the alcohol to evaporate completely. If you can still observe some leftover uncured resin, you may repeat the alcohol submersion step but make sure that you are using a fresh batch of alcohol.
9. Remove supports before curing
Supports are necessary for many designs, but they can be a huge headache in 3D printing. Fortunately for resin printing, you can make your life easier by removing the support structures before fully curing the resin. This means that the support structures are softer and should be snipped off easily.
Pliers are the best tool for this job, although you may also need a small knife to get rid of small nubs of excess plastic. Keep in mind that your print hasn’t cured fully yet, so you’ll need to very gentle in handling it.
10. Cure your print

Finally, you’ll need to expose your finished print to more ultraviolet light for it to be fully cured. This allows your print to develop maximum strength and durability. You can get commercial UV curing solutions such as the Form Cure from FormLabs. This costs around $700 and is a convenient and reliable option if you have the budget.
If you’re not eager to spend that much money, then you can just make your own. FormLabs also provides a tutorial on how to DIY a curing box for less than $30. If you have an FDM printer, then you can print this design from Thingiverse for a UV curing platform. These alternatives are much more labor-intensive but are also very cheap.
BONUS TIP: How to dispose of your waste liquid resin
Unlike the filaments used in FDM printing, liquid resin is very reactive and can irritate your skin upon contact. Aside from exercising precautions in handling, you also need to treat all residual uncured resin as hazardous waste. This includes any excess resin left in your vat after printing, support structures that you removed, and uncured resin rinsed off during cleaning.
If you have plastic sheets, paper towels, empty bottles of resin, failed prints, or gloves contaminated with uncured resin, you will have to treat them in the same manner.
The proper way to dispose of liquid resin is to eliminate any of its reactive properties simply by curing them fully. Lay all these objects out in the sun and let them fully harden before disposal. Depending on the volume of resin you have, full curing can take one to two days. Make sure to dispose of the trash according to local segregation rules. Waste plastic resin is generally not recyclable.
Final thoughts
Resin printing, despite being superior to filament-based printing in a lot of aspects, is not as popular. Aside from the higher costs associated with the hardware and the material, the learning curve for resin printing is also a lot steeper. Thus, trying out resin printing often becomes too intimidating, especially for those with no prior experience.
As with any new trade, the best way to be good at resin printing is to just go in there and give it a shot. With the tips we have outlined here, we are hoping that your first time won’t be a disaster.
Dear Sir,
We are looking for the SLA printer at printing size around 65mm x 65mm x 90mm at 20 um optical resolution. Please response to this email ASAP. I prefer you have local vendor at Singapore.
Thanks and Best Regards
CP
Thanks