How to Fix Stringing in Your 3D Prints

People who dabble with 3D printers go through a constant struggle of adjusting printer settings to solve problems and to improve the quality of their prints. In fact, learning how to solve the most common problems with 3D printing is one of the essential skills in the arsenal of a 3D printing professional.
One of these common problems is called stringing and is something you’re bound to encounter sooner rather than later. What is stringing, and what causes it? In case you encounter it, what printer settings should you adjust to avoid it in future prints?
What is stringing, and why does it happen?
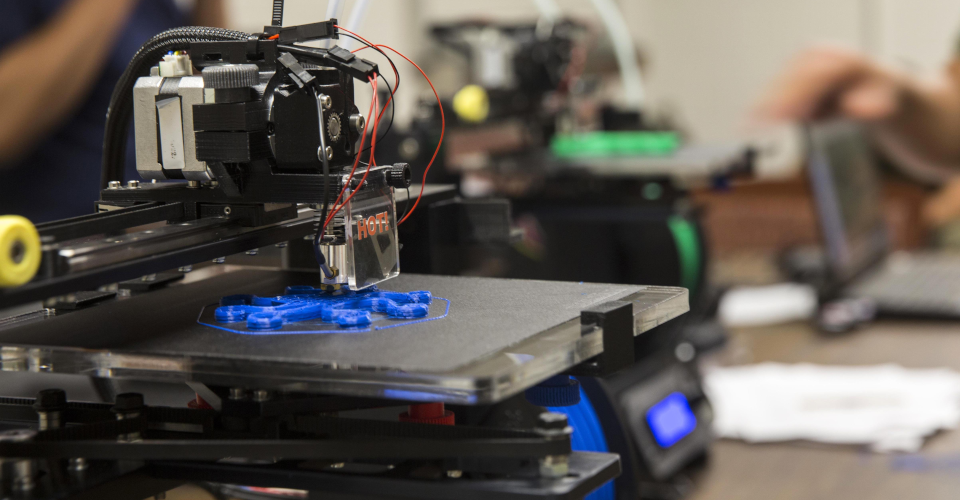
From the name itself, it’s easy to imagine what a 3D print that has suffered from stringing looks like. You’ve probably seen prints with very thin strands running from different parts of the print. These unwanted strands are the telltale sign of stringing. These strands can resemble cobwebs or thin strands of hair, depending on how severe the problem is. In any case, a 3D print in which stringing has manifested will look so bad that it’s practically unusable.
Stringing happens when the plastic filament oozes out of the nozzle in places where there should be no printing taking place (thus, the other term for stringing – “oozing”). This often happens when the nozzle head needs to move from one section of the print to the other. Stringing can also happen at the middle of a gap, leaving small pillars or globs of filament which are then connected by strings to the rest of the print.
Why does the filament ooze out of the nozzle? This is because a portion of the filament has already been exposed to the heating element and is essentially in a molten state inside the nozzle. While the extruder exerts no pressure on this molten portion, it can still exit the nozzle by sheer gravity. For this reason, molten filament exits the nozzle at a very slow rate and in very small amounts, giving “strings” their characteristic appearance.
Are there filament materials that are more prone to stringing?
All filament materials have a prescribed range for the printing temperature to get the best results out of them. For PLA, this range is somewhere on the lower end of the temperature spectrum, at 185 to 205 °C. Other filaments print at much higher temperatures, such as PETG (220 TO 245 °C) or Nylon (230 to 260 °C).
Since higher temperatures tend to decrease the viscosity of the molten plastic, filament materials that print at higher temperatures are typically more prone to stringing. This doesn’t mean that a filament like PLA is immune from stringing, as there are several other factors aside from printing temperature that can contribute to stringing becoming a problem. In any case, the corrective actions we have listed below should be effective no matter what filament material you are working with.
What are the best ways to avoid stringing?
Since there are several factors which can ultimately result in stringing, there are also several ways to possibly solve this perennial problem. We start with the simplest solutions – those that don’t require adjustments in your printer settings. More often, you’ll need to dive in and play around with your printer’s parameters.
1. Make sure your filaments are free from moisture
All 3D printing filaments are prone to moisture pickup when exposed to open air. This moisture can be present in microscopic bubbles within the filament which can expand and burst when subjected to the temperatures of a hot end nozzle. Although the most common result of using a high-moisture filament is a pockmarked print, these moisture bubbles can also increase the chances of stringing.
Basically, a bubble of moisture can expand and burst inside the hot end nozzle. As the bubble expands, it exerts pressure in all directions – including the portion of molten filament that is barely hanging on to the nozzle. This pressure may be enough to cause the molten filament to flow out the nozzle, creating the stringing effect.
To avoid stringing and a host of other problems associated with moisture in filaments, it is best to store them in airtight containers with a few packets of desiccant. It is also possible to dry filaments in an oven or inside a food dehydrator. Just make sure that you use an oven that can hold a set temperature, as the last thing you would want is to overheat your filament and fuse them together.
2. Clean the nozzle
After many hours of printing using any filament, the filament material will tend to leave a thin residue on the inner surface of your nozzle. If you continue printing using a nozzle with a layer of residue, this residue can reduce the ability of your new filament to “hold on” to the nozzle. This means that the molten filament can more freely flow out of the nozzle, increasing the chances of stringing.
To avoid this problem, we recommend cleaning your nozzle after every printing session that lasts several hours or days. There are several ways to do this. The easiest is to brush the nozzle using a brush with metal wires. You can also use a piece of filament to do the “cold pull” method or disassemble your nozzle and soak it in acetone. Our article on cleaning your nozzles provides more details on the possible ways to clean your nozzle.
3. Decrease printing temperature
If you’re still encountering stringing problems after you’ve ensured that your nozzle is clean and that your filament is sufficiently dry, then it may be time to tweak your printer settings. As we’ve mentioned, higher printing temperatures can increase the chances of stringing. Intuitively, this means that reducing the printing temperature should help avoid the stringing problem.
When you do this, make sure that your new temperature setting still falls within the range of prescribed printing temperatures for the filament you are using. Setting it too will cause extrusion problems, which is a whole another can of worms that you do not want to open. You may also have to reduce the extrusion speed since your filament will take a slightly longer time to melt because of the reduced temperature.
It is best to set your printing temperature at the highest temperature possible that does not cause stringing. You can try to find this “sweet spot” by reducing the printing temperature at 5 °C increments. You can also do a temperature calibration test print.
4. Enable retraction
There’s a pretty reliable secret weapon that you can fall back on if you’re still not having any luck solving your stringing problems. Most 3D printers have a retraction mechanism that allows for some of the portions of the filament to get “pulled back” from the end of the nozzle. This works by the extruder gears rotating in the opposite direction, retracting a small amount of the filament away from the nozzle.
Now, retraction does not pull back the portion of the filament that has already been melted – there is simply no way for that to happen. What it does is to relieve the pressure that the filament is experiencing form the semi-solid filament that is directly above it. In many cases, simply enabling retraction is enough to help avoid the stringing problem.
3D printers engage the retraction mechanism whenever the print head needs to travel across an empty space. Most slicer software have retraction turned on by default, but it’s worth the time to confirm anyway right before you start your print.
5. Adjust retraction settings
There are two settings that you can play around with regards to retraction if you’re still having problems with stringing – retraction distance and retraction speed. These would likely have some built-in default values, but these default settings may not work in all situations.
Retraction distance refers to the distance that the filament travels as the drive gear pulls it back. Generally, a larger retraction distance should be more effective in reducing stringing. However, setting the retraction distance to the maximum might isn’t the recommended recourse in all circumstances. After all, the filament will need to be available to the hot end immediately as soon as printing resumes.
It’s also possible to adjust the retraction speed settings, or how fast the drive gear pulls back the small section of filament. A faster retraction speed means that the molten filament is relieved from the extra pressure faster. It only takes a fraction of a second for a print head to travel between gaps, so a little increase in retraction speed should make it less likely for stringing to occur.
As with retraction distance, there’s also a “sweet spot” you need to target when it comes to retraction speed. A higher setting may be great for avoiding stringing but setting it too fast can result in your filament getting stripped by the extruder’s drive gear. This can result in extrusion problems or, worse, jam the nozzle. A clogged nozzle is a much bigger problem that you would not want to deal with in the middle of a print.
6. Increase travel speed
The travel speed of the printhead is considered by many 3D printing professionals to be the least critical printer setting that contributes to stringing. After all, adjusting the travel speed doesn’t contribute to solving the problem if your temperature and retraction settings have not yet been optimized. However, hitting the perfect travel speed can be the last step you need to take to completely solve the stringing problem.
Most slicer software offer the option of setting a higher travel speed for the print head when it is no printing (or when moving across gaps, in other words). Setting a faster travel speed for the print head as it moves across gaps in the print reduces the time in which no printing is happening. This means that there is less time for the molten filament t ooze out of the nozzle and create unwanted strings. A setting somewhere in the range of 150 mm/s to 200 mm/s seems to work best for most materials.
As with many printer settings, setting the travel speed at the maximum value isn’t the solution and may lead to bigger problems. A print head that travels too fast can more easily overshoot its target destination, resulting in lower quality prints. The additional vibrations due to the fast movement speed of the printhead can also compromise the structural integrity of the print. We recommend starting at the lowest acceptable values and working your way up by increments of 10 mm/s until you get acceptable results.
Testing your printer settings
With so many parameters to fine-tune, how will you know if you’ve got the perfect settings before committing to printing your design? After all, doing trial and error on full designs can waste a lot of filament.
Luckily, you can download a design for retraction cubes right here. This design simply consists of several identical cubes separated by gaps of varying sizes. This design is a good torture test for determining if you have the most optimal settings for your printing temperature, retraction, and printhead travel speed. Because the cubes are so small, the whole design can be printed in just a few minutes and uses up a very small amount of filament.
Final thoughts
Experienced 3D printing professionals are the masters of troubleshooting. There’s no single combination of 3D printer settings that will work across different filaments, designs, and environments. Thus, 3D printing professionals constantly have to adapt and understand problems so that they may come up with solutions.
As with many problems related to 3D printing, addressing an issue with stringing takes a multi-pronged approach. The condition of your filament and nozzle can cause stringing, and these factors are the first ones that you should address. You’ll then have to play around with printer settings, with temperature and retraction taking the spotlight. Finally, you can fine-tune your settings by adjusting the travel speed of the print head when moving across gaps.
To be fair, stringing is far from being one of the more complex issues you’re bound to encounter in 3D printing. As long as you understand the process, stringing should be one of the easiest problems to solve.