Tolerance in 3D Printing – What It Is and How It Can Be Controlled

The tolerance in 3D printing is a measure of how far a measurement deviates from the target value. There is no fixed standard for 3D printing tolerance – it is up to you and the requirements for your application. Tolerance can be optimized by using high-quality filament and making sure that your extruder has been properly and recently calibrated.
If you have never taken the time to measure the dimensions of your 3D printed projects, you might be surprised to know that the actual measurements do not actually match those of the reference 3D model. This deviation may be acceptable in some cases, but only to a certain degree. What is the secret to getting tighter tolerances?
What is tolerance in 3D printing?
The discussion of tolerance can be confusing at some points, mostly because it is often mistaken as similar to other concepts like clearances, resolution, and accuracy. The simplest way to define tolerance is that it is the margin of error of a dimensional measurement of a 3D print.
Tolerance is always expressed as a range. For instance, a column with a length of 5 centimeters can have a tolerance of 0.05 centimeters. This means that the actual measurement of the length of the column can range from 4.95 centimeters to 5.05 centimeters.
If you’re just 3D printing an object because it looks nice, then a few millimeters of deviation likely would not matter. However, functional parts designed for engineering typically will require very tight tolerances. This can also be the case if you’re designing parts that are designed to fit into each other during assembly.
Clearances and tolerances are two closely linked concepts. When you design a part with very small clearances, you need to be certain that this can be achieved based on the tolerance of your 3D printer. Otherwise, there is a risk that the clearance or gap will be fused because of very small measurement deviations.
Factors that affect 3D printing tolerance
The tolerance of any 3D printed project is affected by several factors. Knowing these factors and how they contribute to any dimensional deviations is the key to being able to optimize the tolerance as needed.
Technology
The 3D printing technology that you use plays a huge role in determining tolerance limits. Filament-based 3D printers usually get the short stick in this discussion, as the tolerance of this technology is limited to about 0.15 mm. SLA printers can have much tighter tolerances (up to 0.01 mm) because of how small and precise lasers can be.
Material
Another factor that contributes to measurement deviations is the material for 3D printing. Some materials tend to shrink more during cooling or in post-curing, contributing to poor tolerance values. Cheap filaments can also be problematic, as they can cause issues in extrusion that translate to dimensional inaccuracies and poor surface finish.
Movement and calibration
Poor tolerance values cannot be ascribed to just the equipment or materials – a 3D printer can be tweaked or adjusted for optimal tolerance. The specific parts that need to be calibrated can vary from one type of 3D printer to another. For instance, the extruder of a filament-based printer plays a huge role in controlling the amount of filament that goes into a layer, thereby also affecting tolerance.
If you want to optimize tolerance, the approach should be multi-pronged. You will need a good 3D printer and high-quality materials, but proper maintenance and calibration are equally essential.
Measuring the tolerance of your 3D printer

Checking the tolerance values of your 3D printer is essential if you’re designing a part for high-precision use. This is also a great way to check for improvements after you have done some tweaks or calibration with your 3D printer.
Fortunately, there are several free models you can use to check for tolerance. The simplest would be this Customizable Tolerance Test that provides seven columns, all with gaps of different measurements. The gaps range from 0.1 to 0.4 mm. with 0.05-mm. intervals. You can print just the columns that you need to save on filament or resin.
For a “torture test” that is a bit more comprehensive, you choose to print this All-in-One 3D Printer Test. This free model combines a basic tolerance test with bridging, overhang features, and holes of various sizes. We recommend this if you’re working with a completely new filament and are tweaking several parameters in your 3D printer or slicer.
How 3D printing tolerance can be improved
If you find that you are not satisfied with the tolerance of your 3D printer, then there are a few methods you can explore to try and improve it. Here are some of our recommendations:
Use a good material
The first step is to make sure that you are using high-quality filament or resin. This is doubly important in filament-based printing because the quality of the filament can have a direct effect on the consistency of extrusion. Impurities, moisture, or inconsistencies in diameter can cause extrusion issues. Any problems in extrusion can reduce tolerance values, not to mention how overall quality also suffers.
Level your bed
If you’re looking for tight tolerance, then almost every aspect of the 3D printing process needs to be perfect. One of the most basic steps in maintaining good 3D printing performance is making sure that your print bed is level before each project.
There are different ways to do this. If your printer has an automatic or guided bed leveling feature, then this task becomes a lot easier. Doing it manually is also fine, but it will take more time if you want to do it as accurately as possible.
Check the conditions of belts
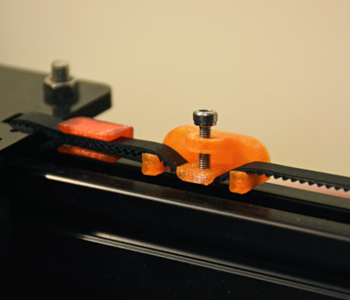
In FDM printers, the movement of the print head is controlled by a series of belts connected to stepper motors. For the rotation of the motors to be fully translated to linear motion, these belts have to be taut and properly lubricated.
One thing to note about these belts is that they are made of flexible material that tends to stretch out over time, so you will have to adjust their tension periodically. Fortunately, you can just 3D print your own belt tensioner. These belt tensioners can be adjusted as needed. Doing a complete belt replacement is, of course, also an option.
Calibrate your extruder
If you really want to fine-tune the performance of your 3D printer, one of the best ways is to calibrate your extruder. This can be quite complex as it involves making a few changes to the G-Code of a model. You don’t have to be highly skilled in coding to do this, but a bit of background helps.
The main goal of this step is to adjust the value of the extrusion multiplier or E-value of your printer. If you look at the G-Code using a slicer, this E-Value is indicated in a line that starts with the M92 command. This value refers to the number of extruder steps that it takes to extrude exactly 100 millimeters of filament.
The process of calibrating an extruder is quite involved, so you can head over to another article we wrote about the topic. It seems like a lot of work, but this step can yield huge improvements in terms of detail accuracy and tolerance.
Reduce travel speed
If you’re using an FDM printer, then the filament being used to build a model is extruded through a moving print head. This print head moves according to the G-Code generated from the sliced model. However, the speed at which this print head moves is still determined by slicer settings that you can adjust.
The issue with a print head that moves too fast is that it tends to overshoot its target location. This is mainly because of the momentum of the print head, exacerbated by the fact that it is a pretty heavy piece of machinery. To keep this from becoming an issue, you can try reducing the travel speed to a value of about 100 mm/s. This can significantly stretch the printing time for your project, but that’s the price you pay for quality.
Post-processing
Despite the best efforts, you may still end up with 3D printed parts that do not quite fit into each other perfectly. If the discrepancies are small, then you might still be able to salvage the part through post-processing.
For shaving off a small amount of excess material, we find that good, old-fashioned sanding provides the best control. Sandpaper is cheap but is easy to use. Perhaps the only downsides of sanding are that it’s a pretty slow method and that you may not be able to access very small gaps or holes.
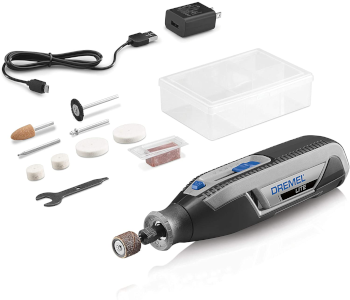
For a finer level of post-processing, you may consider using a Dremel rotary tool. This can help you get into those smaller sections and make more precise adjustments. Using a Dremel tool takes a bit of skill, so it might be a good idea to do a few practice runs first.
Final thoughts
The definition of tolerance in 3D printing does not really differ from how the term is used in engineering. It is simply the range by which measurements can deviate from the ideal values. Not all situations require that you bother with tight tolerances, but it’s a good idea to learn about this concept nevertheless.
Getting a tight tolerance requires more or less achieving perfect conditions for your 3D printer. A well-maintained bed, a calibrated extruder, and high-quality filament go a long way towards achieving small tolerance values. If all else fails, you can still try to make up for discrepancies in post-processing.