How to Unlock No-Fly Zones for Your DJI Drone

Airspace safety has always been a controversial matter and has been the driving force for the creation of almost all drone-related regulations. It’s also quite a complex topic, especially for drone pilots with no aeronautics experience and only want to fly drones for fun.
DJI has sought to simplify distinguishing where drone pilots can or cannot fly by rolling out an automatic geofencing feature for their drones. If you own a DJI drone, what is the significance of these no-fly zones, and what does it take to unlock them? How does it interface with the FAA’s LAANC system?
How the DJI geofencing feature works
Let us preface this by saying that geofencing is NOT a new concept. For years now, GPS-aided devices have been able to receive location-based information, which may or may not affect how they function.
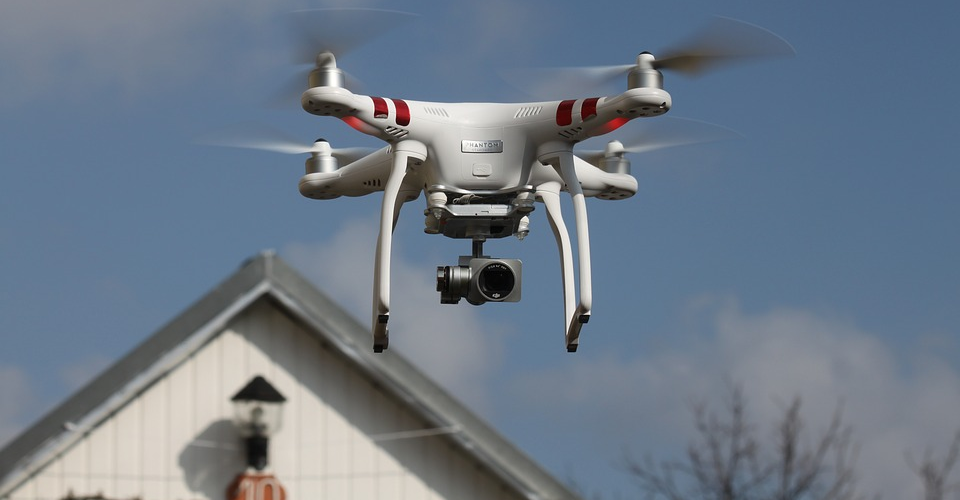
DJI made a huge initiative when they created the Geospatial Environment Online (GEO) technology, a built-in feature in their drones that gave them operational restrictions and real-time guidance on areas with flight capabilities are limited. A further update, called GEO 2.0, improved the system by adding a vertical element to the previously two-dimensional area limitations.
GEO 2.0 is now a staple feature of brand-new DJI drones. For older products, the feature was rolled out via a firmware update.
With the geofencing feature, DJI drones come with a built-in warning system that reacts appropriately when they fly in specific airspace zones. The severity of the warning may vary from one area to the other depending on the airspace restrictions in place – it could be a visual warning in the DJI mobile app, or an outright grounding of the drone until the necessary approvals have been granted.
How do I check if I’m flying in a No-Fly zone?
If you’re going to fly a DJI drone with the GEO 2.0 feature, the first thing you need to do is to check if you’ll be flying in a No-Fly Zone. Although there are about a dozen ways that you can check for the location and scope of controlled and restricted airspace, DJI maintains their own map. The DJI map may vary slightly from other maps or sectional charts, so it’s best to use this for reference is you’re going to fly with a DJI drone.
All you have to do to quickly check for the DJI no-fly zones is to visit the official DJI Flysafe Geo Zone map. You may do a search by location or simply move the map around to check for any controlled or restricted areas near your planned drone flight location. Make sure to check the options for showing the Warning Zones and Enhanced Warning Zones, found at the bottom right portion of the map.
Type of DJI No-Fly zones and how to unlock them
Taking a look at the Flysafe Geo Zone map can be quite overwhelming because of all the different colors, with each one pertaining to a different type of no-fly zone. To make sense of all this clutter, here are the details for all these no-fly zones and the steps you need to take to secure authorization to fly in these zones, if necessary.
1. Restricted Zones

Restricted zones are represented by red markers in the map and are essentially areas where drone flight is prohibited for regulatory or safety considerations. The same marker can be found in Densely Populated Areas, and the same flight restrictions will apply.
When you attempt to fly a DJI drone within a restricted zone, you will be prompted with a warning, and the drone will be unable to take off. If absolutely necessary, you may apply for permission to fly your DJI drone within a Restricted Zone through the Custom Unlock process.
The Custom Unlock process is quite tedious, so we’ll just discuss it in a separate section below. One thing to remember is that the Custom Unlock process doesn’t produce results instantly, so it’s best to do it at home a couple of hours before your planned drone flight.
2. Altitude Zones
Altitude Zones are shown by gray markers and represent areas with established altitude ceilings. These are mostly found near airports or any location with exceptionally high air traffic. These restrictions cannot be turned off due to safety considerations, and DJI drones are automatically limited from flying beyond the altitude ceiling within an Altitude Zone.
3. Authorization Zones
Authorization Zones, shown by blue markers, are areas where drone flight is inherently risky but not necessarily restricted. Thus, drone flight is left entirely to the discretion of the drone pilot. However, DJI drones are still grounded within Authorization Zones unless a Self Unlock process has been completed. While getting approval for Self Unlock is faster than one for Custom Unlock, you’ll still need to have a stable Internet connection to complete the process. For this reason, it’s still best to do a Self Unlock at home before you leave for your planned drone flight mission.
4. Warning Zones
Warning Zones, shown in the Flyspace map by yellow markers, are areas where you may receive a warning message. However, drone flight is not restricted within these areas. The advisories only serve to inform you of potentially hazardous conditions. These areas may also not show up in the map of DJI GO mobile app.
5. Enhanced Warning Zones
Enhanced Warning Zones are represented by orange markers on the map. Within these areas, your DJI drone will also be grounded pending a Self Unlock procedure, as in Authorization Zones. The only difference is that you do not need to have a DJI verified account or an Internet connection to secure this approval.
6. Regulatory Restricted Zones
Represented by light blue markers, flight in Regulatory Restricted Zones is limited by default due to more serious regulatory concerns. By “more serious,” we’re talking about potentially security-sensitive facilities such as prisons or government buildings. Getting approval to fly a drone within these areas is very unlikely and is generally not an option for the public.
How do I unlock an Enhanced Warning Zone?
Out of all the three types of zones that require an authorization, the process of unlocking an Enhanced Warning Zone is the easiest. It’s practically effortless. When you enter an Enhanced Warning Zone, a warning message will pop up on the DJI GO app advising you to exercise caution when flying in the area. You will then need to accept full responsibility for your flight activities, which only takes the press of a button.
How do I do a Self Unlock for an Authorization Zone?
Doing a Self Unlock for flight within an Authorization Zone can be done either on a computer a few hours before your planned drone flight or through the DJI GO mobile app if you’re already in location. However, for the sake of being prudent, we recommend securing the authorization at home before your travel to your planned flight location.
To do a Self Unlock, you must first have a DJI verified account. With this account signed in, go to the DJI Self Unlocking page, where you will be prompted to identify your planned flight location, your drone model, and your flight controller serial number. You will also need to provide the phone number or credit card number that is associated with your DJI account to confirm your identity.
With all the necessary details provided, all you have to do is to pick a date for your desired flight approval. The Self Unlock will take effect on the midnight of that day and will remain active for the next 72 hours.
You then need to download the approval certificate to your remote controller via the DJI GO app. To do this, make sure that your phone is connected to the Internet, click the settings in the DJI GO app, and open the Unlocking List. This should show you any flight licenses that have been downloaded. If your Self Unlock was successful, you should already see the necessary flight license in the list.
If you were not able to secure a Self Unlock before going to the location, then you can still do through the DJI GO app. The process is also quite simple, although you may run into problems if you can’t get any mobile signal reception. To do the app-based Self Unlock, simply wait for the flight restriction warning to appear, and agree to bear responsibility for the flight. You will then need to provide the phone number or credit card number associated with your DJI verified account to proceed.
In either case, you need to import the license to your drone via the “Import to Aircraft” button under the App tab. Again, you will be prompted to bear responsibility for your flight before syncing of the license with your drone proceeds.
What is the Custom Unlock process for Restricted Zones?

There are two crucial characteristics that you need to remember for the Custom Unlock process. The first is that you will need proof of authorization, typically from the FAA, that permits you to fly in the identified Restricted Zone. The second is that it can only be done through a web browser, so it’s best to do it at home and a few hours (or even days) ahead of your planned drone flight.
To do a Custom Unlock, start by heading over to the DJI Custom Unlock page. The initial steps will be very similar to doing a Self Unlock: provide your planned location, drone model, and your flight controller serial number. This time, however, you will also need to upload a proof authorizing you to fly within the Restricted Zone
The proof of authorization that you’ll need to provide will depend on the type of restriction in place at your planned flight location. For airspace-related restrictions, this will be in the form of a LAANC authorization. Other restrictions may require an approved waiver from the FAA.
Once you have provided all the details and documents, simply go over the terms and conditions and submit your application. Approval for your request may not be instant, but you should receive it within an hour. You can also get in touch with [email protected] if there are delays in the approval of your request.
After you’ve received a confirmation that your request has been granted, you need to make sure that the flight license has been downloaded in your remote controller. Keep your DJI GO app connected to the Internet, go to the Unlocking List section, and check for the necessary flight license. You will then have to import the license to your aircraft via the same procedure as that for Self Unlock.
Does getting a LAANC authorization automatically unlock a No-Fly zone?
The Low Altitude Authorization and Notification Capability (LAANC) was introduced by the FAA back in 2017 as a means for drone pilots to request authorization to fly in controlled airspace and receive in approval almost instantly. By eliminating a lot of red tape in the process, the FAA was able to give commercial drone pilots more flexibility and streamline the approval process.
What the LAANC system didn’t do was to ground drones of the drone pilots who have not received the necessary authorization. After all, the output of the LAANC approval process was an actual authorization document, not an electronic license. Currently, it does not directly interface with any existing geofencing technology.
This means that DJI drone owners who wish to fly in controlled airspace must secure LAANC approval first before going through the Custom Unlock process. The inconvenience of having to go through two separate approval steps done through two different software platforms has proven to be a bit of a headache for those who fly DJI drones.
Companies like KittyHawk have claimed that they are working on revisions that should make the process more seamless. We’re not sure how a workaround will be developed, given that LAANC-approved service providers will need to work with both the FAA and DJI to come up with a comprehensive solution. This situation may even become more complicated as the FAA continues to work on a Remote ID system for drones.
Final thoughts
DJI’s move to develop and implement their own geofencing feature, although quite a controversial one, seems representative of the direction that the whole drone industry is moving towards. Drone pilots may feel like they don’t quite have the same freedom as before, but we believe that the community and the federal government can eventually strike a balance that also considers the welfare of national airspace. We expect the landscape of drone-related laws to change by a lot in the coming years – what matters now is that we keep ourselves informed and let our voices be heard.
I speak from experience. Custom unlocks and LAANCE forget it!
LAANCE is a short term approval, 24 hours tops. Its designed to keep local air traffic aware of who is in the sky not place long term locks on airspace.
DJI Custom unlock is a long term system.
Send them a current UAS Map showing you are in a 400 ft auto approval zone. Provide them with a copy of a recent LAANCE approval for your area. They will circle the expiration date and tell you NO.
I live in a place where DJI invented altitude locks are a 60 M. The Documented FAA UAS limit is 121 meters (400 feet.) The trees in my area are about 70M tall.
I can not SET a safe RTH altitude for a flight more than 500 feet from my house!!!
DJI refuses to unlock my drone to the documented limit, because their custom unlock process is obsolete and has no clue about the LAANCE system and altitudes.
Oddly enough I could if I lived near a much busier airport self-unlock in a no fly zone.
The current limits let me fly at 200 feet in a LAANCE area that is set to 0 feet.
So the DJI Geofencing system is so outdated and obsolete that as much as I love the drone, its the last one I will buy from DJI until they tie self unlocks to LAANCE data not outdated blue zones. All they needed to do is have a policy in place that allows you to provide the UAS map for your area and one LAANCE approval so show you are registered and know how to use the system and unlock those areas as requested and within FAA regulations.
BUT NOOO! I have 3 weeks of emails. And the one person who did it correctly was told by his supervisor to undo it and the one unlock license I did get was removed from my account! Now with Chinese New Year and the virus lock downs discussion is stalled out.
Front line support has no training or policy to support the LAANCE rules and management has no interest that I can tell in fixing it. So demands outdated FAA documents.
This is not a hypothetical. This is a real experience of real DJI owner, who is FAA registered and just needs access to safe altitudes over local trees.
My frustration comes when I want to fly no more than 50 ft off the ground. The geese in my area are a bigger danger to air traffic than my Phantom 4. One of the purposes of the drone was to do home inspections which is tough to do when I can’t even get off the ground. Check cutters, the roof, tuckpointing in chimneys, so many things you can see without using a ladder. Home owner can stand right there with me and look at the screen to see what’s happening in real time. What a fantastic grounded tool.
The drone to me is a camera with an infinite tripod. I could take all the same shots by setting up ladders and scaffolding with each step making the process unsafe.
Instead of standing on the ground safely and letting my 4k camera feed me the info I need, I must risk my health climbing, not fun at almost 56 years old. The time savings alone are immeasurable to businessperson.
I have a Phantom 4 Pro 2 and I have had it at 210 feet max and honestly, I don’t think I would ever take it much higher than that because it is already getting tough to see it. Maintain sightline!
If air traffic must maintain an altitude above 400 ft, then the problem isn’t the drone pilot if the helicopter or plane is too low. I’ve flown kites higher than I’ve flown my drone.
This just handcuffs the professional photographer by limiting their access. It’s a great tool to get shots I otherwise would never be able to get but my flying camera is classified as an aircraft. I bring it down when I see buzzards and geese for fear, they will attack it. What a threatening piece of equipment.
What happened to the needs of the many outweighing the dumb of the few? A couple of idiots in the world and responsible people suffer.
What brought me to this site was this, I have a goose nesting in the top of a rotting out tree trunk, in my back yard. I would love to hover a non-disturbing distance from the nest and maybe even get the hatchling appearing for the first time. The nest is approximately 20 ft in the air on my private property. I would take my drone up 30-50 feet tops but I am completely grounded in my huge backyard. NO FLY ZONE. My software cannot override even when I capped my altitude at 100 ft. 30 seconds up the street and it has me take responsibility for my actions and takes off fine. A quarter mile tops.
There needs to be an altitude work around. The DJI’s are more than capable of locking the maximum altitude. That is the solution to this particular type of problem. Even lock the radius of the area you are working in. But the GPS will need to work 100% of the time. Mine seems to work about 10% of the time.
I am an honest person and I’m not going to break rules that put lives in danger. My drone is registered. I’m not going anywhere. I would love to use this tool to its full potential with my only risk being, hitting the customers property and I’m insured for that.