Video Editing Basics – How to Turn Your Videos into Stories Worth Watching

Everyone with a smartphone can share their videos with the world. However, you could have a powerful message, charismatic personality, and quality footage, yet still create a snoozefest that doesn’t engage with your audience at all. A successful video doesn’t have boring filler content or drawn-out scenes; it keeps the audience involved with timely transitions and paints a subtle picture with the right color palette. You can’t rely on quality raw footage alone to make a video people will love – that’s where editing comes in.
Like any worthwhile skill, video editing is hard to master. Fortunately, getting to grips with the basics of video editing is easier than it looks. This guide offers an introduction to everything you’ll need to know to start making polished videos. It covers what hardware you need and gives an overview of the editing workflow. You’ll also learn about some techniques you can use to make your edits more natural and how to speed up the process.
Things to ask yourself before starting to edit
What kind of footage will you be editing?
The content of the video you’re editing has a deciding impact on what the edit should look like. There’s a stark difference between editing an action-packed sports clip and your make up vlog. Both require you to think about how to set your shots up, when to use B roll footage, etc., but both also have different stories to tell. The kind of video you’re creating also determines how many effects you’ll be using. A wedding video needs little in the effects department except for some tasty transitions, while something like a scene from a noir film requires an understanding of color, lighting, and sound editing to portray a gloomy atmosphere.
Is your computer good enough?
The answer to this question depends on the scope of your project and the intricacy of your edits. Beginner editors who want to make their first YouTube videos look presentable don’t need the kind of hardware you’d use to edit a feature film or TV series. Any computer that was made in the last eight years will be good enough to run beginner-friendly video editing programs. That being said, there are specific upgrades you can invest in that will make a huge difference.
The processor and RAM are your computer’s most important editing components. The more RAM your computer has and the faster the processor, the quicker your rendering time. 8GB is the minimum amount of RAM you should be using while 16GB is considered standard Today’s computers support up to 32GB, so fill up those memory slots if you have the money.
The release of AMD’s Ryzen line of processors has made the CPU market competitive again, and the latest processors distinguish themselves with high core counts as well as excellent results for productivity. An Intel i5 or Ryzen r5 processor is good enough for vlogs or tutorial videos while the i7 and r7 lineup will considerably decrease editing times.
Storage space is no less important but often overlooked. Depending on the video’s frames per second (fps) and bitrate, an hour of 1080p footage can take up more than 10GB of space. This doesn’t seem much at first, but your drive will quickly fill up as you create and store more videos. The minimum amount of space you should go for is 1TB. It’s also a good idea to have your primary disk drive be an SSD. These are faster than conventional hard drives and ensure better boot-up times for your operating system and video editor as well as reduce the time it takes to import footage.
A graphics card is generally not as important for speeding up video editing as a good CPU and lots of RAM. However, you’ll need a good graphics card if you plan on using lots of GPU-assisted effects in your videos or want to downscale 4K footage to 1080p. You may already have an adequate graphics card if you use your computer for gaming as well as productivity. A card with 4GB of ram is a good starting point, and you can always upgrade to a better gaming- or production-focused card if the need arises.
What editing program will you use?

There are three main factors to consider when choosing which video editing software to work with – your experience, expectations, and budget.
Inexperienced video editors who aren’t yet familiar with concepts like storyboarding or workflow should use beginner-friendly software like iMovie if they’re on Mac or Adobe Premiere Elements if they’re PC users. Both programs offer a clean, user-friendly interface and plenty of guidance. Premiere Elements, in particular, does a great job of letting the user choose their path and supports everything from fully-automated editing through step-by-step tutorials for effects or transitions to taking the training wheels off and letting you work on your own.
The two programs mentioned above can only do so much, however. You’ll want to use Final Cut Pro X, Adobe Premiere Pro, or Lightworks if you’re looking to make professional edits. These programs assume you’re familiar with basic editing concepts and are much harder to master, but there’s little you won’t be able to accomplish with them.
Lastly, there’s the matter of cost. We must emphasize that free isn’t always bad. Microsoft’s Movie maker and Apple’s iMovie are fantastic programs for beginners while Lightworks rivals industry giants in its complexity yet costs nothing. If you decide you want to use paid software, you can choose between two pricing models. Final Cut Pro X and Premiere Elements have a one-time cost while Premiere Pro requires a monthly subscription that varies based on what kind of user you are, i.e., students and educators pay less than regular users.
The basics of editing a video
In this segment, you’ll familiarize yourself with all the necessary steps to editing your footage into a presentable and engaging video. While each program does things a little differently, the general principle is true for all of them.
Importing & organization
The first thing you need to do before starting to edit is to transfer all the files you intend to use from your camera or smartphone to the computer’s hard drive. Then you can open your editor of choice and start a new project. You need to give the project a name and import the project files. Modern editors recognize hundreds of audio & video input formats, so there’s no need to worry about compatibility issues.
After the files are imported, they need to be organized. The most basic thing you need to do is arrange them by file type. More complex projects may require you to also organize the raw footage by scene to keep clutter to a minimum.
Marking & cutting
Now you need to arrange the footage in a way that tells a coherent story. You do this by placing it onto the timeline one after the other. This is the time to go over everything you’ve recorded and mark the footage you’ll end up using.
Having marked the clips, you can proceed to adjust their length in different ways. Trimming is when you remove excess footage from the beginning or end of a clip. Cutting is the same, but for parts of the video in the middle. You may find that a segment later on in the clip goes better before an earlier one and can create a separate file from it. Play around with clip size adjustment and repositioning until you’re satisfied with the final result.
Adding effects
The effects stage is where you give your movie character. You do this by adding transitions between scenes, sprucing the footage up with visual effects, and adding audio. Editing software comes with lots of preloaded effects and transitions for you to try, but you can also download countless free & paid plugins that expand your options even more.
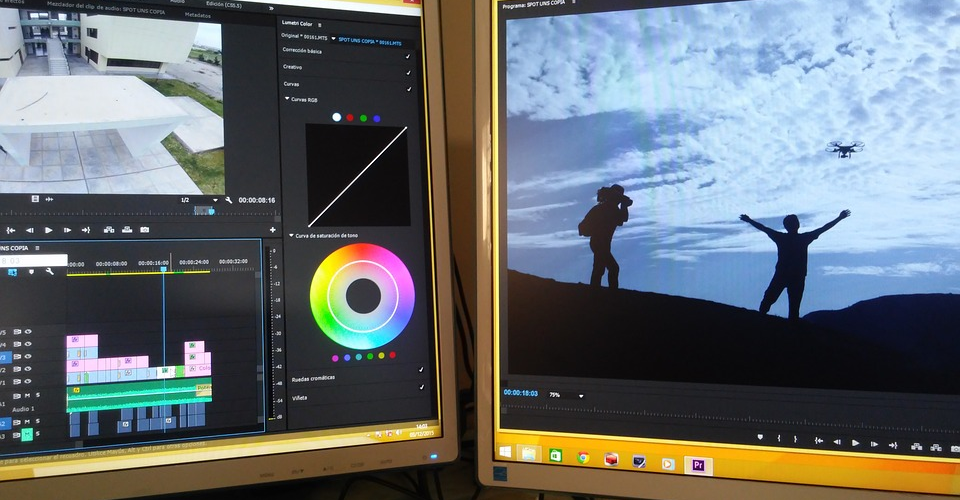
Color correction & grading
With our video assembled, it is time to make it visually pleasing through the processes of color correction and grading. Color correction is used to establish a color baseline and eliminate unnatural-looking and oversaturated colors that result from digital recording and look unnatural to the human eye. When done correctly, color correction makes the video look lifelike without impacting its vibrancy.
Color grading is the second, optional step. It helps establish the tone of your video and conveys its mood. You won’t need to use color grading extensively for realistic videos like travel vlogs or documentaries, but it is indispensable for projects where there’s an emphasis on atmosphere. You can grade the colors manually or choose among presets to save time.
Adding graphics & titles
The video editing process wraps up with titles & graphics. These are used to engage the audience by offering an intriguing first impression or draw their attention to something like a guest’s name & credentials. It’s easy to get carried away with fancy graphics and ornate titles, so finding a balance is key.
Sharing your creation

Keep in mind that once an edit is complete, the resulting video will still be saved as a project that only an editing program can use. You’ll need to either export the video to a format that you can then upload or burn to DVD, or use the share function. Editors like iMovie or Adobe Premiere Elements make it easy to share your content through specific video sites and social media platforms. Just link your account beforehand, select what quality the video should be uploaded at, fill in the details like its name & description, and the program will do the rest.
Popular video hosting sites like YouTube and Vimeo use their own codecs after you’ve uploaded your video to make it smaller and load faster. That’s why you should preview your videos in the given platform’s format to experience what the audience is going to see before going public.
Things to keep in mind when editing
If you should take anything away from his article, it’s that editing’s primary purpose is to tell a story and to make that story pleasant to experience. The following tips will help.
Make more footage than you need
This is actually a pre-editing tip, but following it will greatly simplify the editing process and give you more options. Make sure that you have more footage to work with so you can use the best cuts in your video. Examples include shooting one scene multiple times, having B roll footage to fall back on, and using various camera angles if the budget permits.
The right cut for the job
Cuts are abrupt transitions between scenes with no special effects. They’re an editor’s bread & butter, and knowing which cut to employ is crucial to creating a smooth viewing experience.
The standard cut is the one you see most often. It continues the action where the previous clip left off but from another angle. The J-and L cuts are used to smooth the transition between clips by playing audio from the second clip before the first ends and vice versa. A match cut connects two different clips that have something in common like a specific movement or scenery.
The jump cut is popular among vloggers as it cuts away bloopers and unnecessary pauses, leaving you with a coherent if jerky scene. Action cuts are another tool for creating dynamic scenes, but they focus on abrupt transitions through multiple angles in quick succession to convey urgency and intention.
Cross cuts and montages are useful for presenting a scene’s flow in an engaging way. The former does this by showing two actions being performed at the same time while the latter speeds up time by showing snippets of a prolonged action from beginning to end. Montages are especially popular for tutorial and how-to videos.
The B roll is your friend
B roll refers to the footage that gives context to a scene. It could be a shot of a bar two characters are about to have a conversation in or a collage of the computer parts you’re reviewing. Properly employing B roll footage lets you get away with transitions that would otherwise look unprofessional or have discrepancies since it gives the viewer a buffer that helps them adjust.
A cutaway is similar to the B roll except that it shows something that the characters are doing but the viewer can’t see all the time. For example, a cutaway is a brief close-up of a beer a character is drinking in a bar. Using cutaways gives more context to the story and lets you set up the next shot with more freedom.
Don’t neglect the audio
Your video can have stunning visuals yet be unwatchable because you neglected the sound and music that’s an essential part of it. The most important thing to get right audio-wise are sound levels. These should be adjusted so that dialogues can always be heard over music and background noise. Unless the characters are in an appropriate setting like a club or concert, the music you use should be instrumental only to not clash with their dialogue. It’s also a good idea to spend some money on licensed music to help your videos stand out.
Don’t overdo it
You might be tempted to fill your video with special effects and graphics, but less of these applied tastefully will convey your message better. You need to pay special attention when using graphics and titles as gaudy or unnecessarily complicated ones will make it harder for the viewer to read the text and will break immersion.
How to make video editing faster?
A better computer will help with exporting times, but there’s a lot you can do to optimize your workflow and decrease downtime. Here are a few tips.
Organization is everything
How many times have you started working on a project and forgot where you put that one important file? You need to have a system in place so that this doesn’t happen. Before each new project, you need to create a folder structure that will accommodate all files based on their use. The first folder should contain all the raw footage. Then you need to make an edit folder where you’ll save all the timelines. Next come the folders for graphics and audio, with a folder for image storage being the last.
The above is a typical structure used to organize files within your video editing program. The folder layout on your disk drive should look similar, with the addition of folders for output files and accompanying documentation. Finally, don’t forget to name your files properly! This makes them easier to find and helps you select the ones you need quickly during the editing process.
UI customization & shortcuts

Complete customization is one of the best aspects of Premiere Pro 2019 – every window can be resized and any action tied to either a keyboard shortcut or an icon for instant access. Other programs work in similar ways, so familiarize yourself with their shortcuts and start using them as soon as possible.
Getting a gaming mouse is a good idea. Gaming mouses come with many more buttons to assign to frequently-used actions. You might also consider investing in an editing keyboard. These work like regular keyboards but have better build quality as well as differently-colored keys complete with shortcut names.
Memory optimization
Having a lot of RAM isn’t a guarantee that all of it is being used for video editing. The simplest thing you can do for memory optimization is to make sure that nothing else is running in the background. Close all other programs, and you should see an improvement. While people don’t generally run other demanding programs along with their video editors, they also forget that browsers are notorious memory hogs, especially if there are multiple tabs open.
Another thing you can do is make sure that your editor is actually using all the RAM it can. RAM allocation settings are located in the program’s preferences or equivalent tab. There you can set the maximum allotted memory along with the cache size. The program won’t always use all the allocated memory, but setting the level to maximum will make a difference when it’s called for.