
Essential Video Making Equipment for Beginners

While smartphones are great for getting your feet wet and shooting a few videos, you’ll quickly realize they won’t do for professional-looking results. There’s a lot more to a movie than an exciting plot and a camera, which you know by now if you’ve checked out our guides on movie making and editing.
This guide focuses on the gear you’ll need to realize your movie ideas. It goes over all the essential equipment you’ll need and explains why you need each particular piece. We’ve also included some recommendations to get started. By the time you’re done, you’ll have a comprehensive list of video making equipment. The guide will help you make smart buying choices and end up with gear you can use for countless future projects.
Cameras
Choosing the right camera is instrumental in infusing your movie with a cinematic look. Even if you weren’t aware of the term before, you and anyone you know could quickly tell the difference between a movie scene and a home video. That’s because the cinematic look is carefully constructed. Pulling it off relies on the knowledge of the filming crew as well as the camera’s capabilities. An experienced crew will set the lighting up, take care that the sound is realistic & punchy, and will frame the shots so that they’re logical and artistic.
Your camera contributes to the cinematic look by introducing a shallow depth of field, wide dynamic range, and log gamma curves. A shallow depth of field helps differentiate characters from their background by blurring it while keeping them in focus. A wide dynamic range ensures that details remain preserved in scenes with a lot of contrast and ones where there’s too much or too little light. Finally, using a log gamma curve creates footage that looks flat unedited but has more color information and can be better manipulated in post.
The good news is that you don’t need to buy a massive shoulder-mounted camera to achieve the cinematic look anymore. Modern mirrorless and DSLR cameras are capable of creating stunning movies you’d have needed much more expensive hardware for a decade ago. Even so, prices for the best filmmaking cameras reach well into the thousands, which may be daunting for the first-time filmmaker.
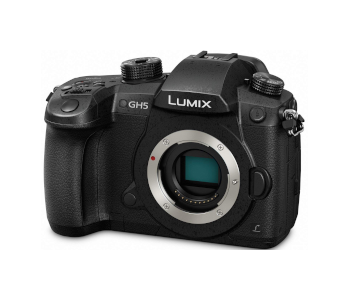
The Panasonic Lumix GH5 is our camera of choice for budding moviemakers. It is among the most robust cameras in its price bracket as it is protected from dust, water, and freezing. Its menus are logically laid out and accompanied by buttons you can map custom commands to you use frequently. The camera is an excellent performer in low light conditions and comes with a powerful battery that keeps it running for 2.5 hours straight. It can shoot 1080p videos at 240fps, meaning you have access to 8x slow-motion! The GH5 is also futureproof since its maximum resolution is 4k at 60 fps.
If the GH5 is too expensive for you, consider the Sony Alpha a6400. It costs half as much bot boasts video-oriented features like Sony’s log profiles, zebra stripes, and focus peaking. It has a flip-out screen which you can tap to track characters and can shoot indefinitely, making it ideal for lengthy interviews. Sony has made progress with its newest chip’s cooling management too, so long days on set won’t cause the camera to overheat.
Lenses
Choosing the right lens for a specific shot is crucial in getting the lighting, colors, and feel right. Filmmakers use two main types of lenses, each with their distinct sub-types. You’ll primarily be using prime lenses if you don’t plan on shooting a documentary or the news.
Prime lenses have a fixed focal length, which determines their viewing angle. The smaller the focal length, the more of a scene your camera will capture. A standard prime lens is great for capturing shots of two people talking while keeping both in focus. A wide-angle lens is suited for establishing shots and scenes where the surroundings take precedence over the characters. Telephoto lenses have a smaller viewing angle and are ideal for close-ups.
Aperture is the second fixed setting on a prime lens. It controls how much light reaches the lens as well as the depth of field. The bigger the aperture, the shallower the depth of field. Letting in more light also means you’re getting better performance in low light but may lead to overexposure.
Zoom lenses are more expensive but can replace multiple prime lenses as they have variable focal lengths. They’re bulkier and scenes shot with zoom lenses aren’t as bright. On the other hand, zoom lenses come with their own image stabilization that makes for smoother footage.
It’s important to note that the same lens will behave differently depending on your camera’s sensor size. Larger sensors require a bigger focal length to achieve close-up shots, so a lens that acts as a standard prime lens on a full-frame camera becomes a telephoto lens on one with a smaller sensor.
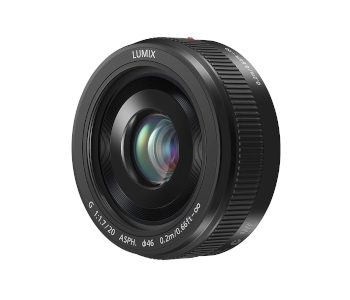
The last thing to note is that cameras don’t support all lenses natively, especially if their competitors make the lenses. There are conversion kits to get around this, however. Assuming you get the Panasonic Lumix G5, we recommend you start with either the G II Lens or the G X Vario. The G II is an inexpensive standard prime lens with excellent specs while the G X Vario replaces a variety of lenses thanks to powerful zoom.
Mounting options
Built-in image stabilization on cameras and lenses has made substantial advances, but there’s still nothing that comes close to a good mount. Mounting the camera on a tripod, monopod, or gimbal eliminates shaking and allows you to pan or tilt the camera smoothly. Whichever mounting option you’re going for, you need to make sure that it supports your camera when it’s decked out with a lens, flash and other accessories.
Tripods
Tripods are the go-to mounting option. They keep the camera firmly in place thanks to three reinforced legs while the fluid head accommodates a wide array of cameras & camcorders. Advances in materials have made it possible to build tripods and monopods from carbon fiber. These are noticeably lighter than their aluminum counterparts yet support as much weight.
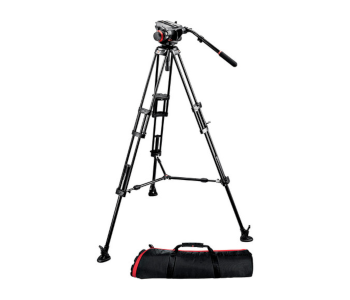
Manfrotto is our recommended tripod manufacturer. Their 504HD Tripod System offers excellent performance at a fair price. The tripod supports 16.5 pounds and extends to 60 inches from 18. It’s made from aluminum but can take a lot of abuse and is ideal for rough shoots. The fluid head has an impressive array of adjustment options, and the tripod’s 4-axis stabilization system makes sure your camera stays in place.
Monopods
Monopods are long-established in the world of photography, but more filmmakers are starting to use them too due to how versatile they are. A monopod takes up less space than a tripod, so you can use one to shoot in tight quarters. Since a lot of video & audio equipment mounts the same way, you can use the monopod instead of a boom pole. Setting up a monopod is also much faster which may come in handy if you’re shooting a documentary and need to reposition the camera to get a closer look.
We recommend you get the Sirui P-204SR P Series if you’re considering a monopod. This robust model can carry 27 pounds, which makes it a good fit for the heaviest DSLRs. It has three small support legs which increase stability, especially if you stand on them. You can remove the legs as well as replace the rubberized foot with a spike when you’re shooting in nature.
Gimbals
Gimbals are an inexpensive replacement for older Steadicam mounts as well as heavy equipment like cranes and dollies. They keep the camera steady while letting you move around and pull off conventional maneuvers as well as move the camera in inventive ways. Their most obvious use is for tracking shots, but you can also employ a gimbal for panning, rolling, and tilting. If you’re feeling experimental, you can use the gimbal to change the camera angle mid-shot or move it up and down by squatting and standing up.
DJI is famous for making the world’s best commercial drones. They’ve put their experience in drone videography to use in designing the Ronin-M 3-axis Gimbal Stabilizer. It features DJI’s SmoothTrack technology which ensures you’re getting smooth shots even after hours of lugging it around. You can limit the gimbal’s stabilization to a single axis or adjust its behavior based on the way you’re carrying it like briefcase or underslung. The gimbal supports up to 8 pounds and runs for 3 hours on interchangeable batteries.
Sound
While your camera comes with a built-in microphone, these aren’t suitable for professional filmmaking for multiple reasons. The microphone needs to be close to the action, which you might not be able to pull off if you’re doing a wide shot from far away. It also needs to hone in on the audio you want to be recorded and exclude everything else.
Audio recorders
Many mirrorless & DSLR cameras have lackluster recording settings on top of bad microphones. That’s why you’ll want to invest in a recorder that captures the audio separately and combine it with the video during post-production.
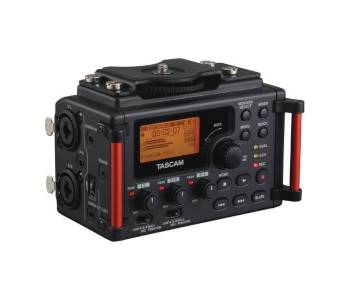
The Tascam DR-60DMKII is a budget-friendly audio recorder. It supports four microphones through as many XLR inputs and lets you control them individually through a physical interface. There’s a bright LCD screen on its side which shows all the mics’ audio levels and statuses. Recordings are crisp & clean and done in mono, stereo, or a combination of the two. The MKII ‘s only shortcoming is that it goes through batteries fast, but that shouldn’t be a problem with the included recharge kit.
Headphones
You need to use headphones to monitor audio as it’s being recorded. That way, you’ll be aware of what the audience will hear and can catch unwanted sounds before they become a problem. Even though they were first made back in 1991, Sony’s MDR7506 are still the budget-conscious professional’s choice today.
The headphones are made from lightweight plastic and have comfortable cups that conform well to your ears. The cable can’t be removed, but it’s sturdy enough to withstand the rigors of a recording studio. Most importantly, the MDR7506 deliver a flat sound profile that serves as the perfect basis for making adjustments. Additionally, they accentuate mids and highs, so they’re great for monitoring dialogue.
Microphones
You can choose between various types of external microphones. Which you should pick will depend on the nature of the movie as well as your budget.
Wireless microphones are the best for recording dialogue or interviews. You can place them near a person or attach them as you would a lavalier mic without having to worry about wires or have someone extra carry a boom pole.
Our choice of wireless microphone is the RodeLink FM Digital Wireless Filmmaker System. It consists of a transmitter and receiver which can record the included lavalier mic’s output from as far away as 300 feet. Recordings are transmitted over two channels simultaneously to avoid degradation. The system has support for eight channels and is beginner-friendly.
Standard lavalier mics are your go-to solution for interviews and for when you want to record a gathering or presentation due to them being omnidirectional. The Rode SmartLav+ plugs into your phone or laptop and uses them for power. It excels at capturing voices clearly whether they’re close or coming from across a hall. The microphone eliminates background noises as well as pronounced Ss and Ps. It even comes with a smartphone app that includes playback speed settings and an equalizer.
Like their name suggests, directional microphones have a polar pattern that captures sound in a specific direction while ignoring ambient noise. That lets you focus on recording relevant audio while filming on location. Rode has the answer once again in the form of the NTG2. The special thing about this microphone is that it can be both phantom-and battery-powered, which puts less strain on your camera. The microphone is very sensitive and has an abundance of gain settings. Best of all, you get above-average audio performance at an acceptable price.
Don’t forget that you need a boom pole to position a directional mic close to what you’re recording.
Lastly, there’s the shotgun mic. Shotgun microphones are similar to directional ones since they record sound in a narrow field in front of them. However, they’re attached to the camera’s shoehorn mount, so you’ll have to take that into account when setting up your shot. The Rode Videomic GO is a prime example. Thanks to its proprietary mount, this shotgun mic won’t record the camera’s mechanical movements. Its audio quality is excellent, and you can use it in windy situations even if you don’t have a deadcat.
Lighting
Your choice of lighting has a crucial impact on a scene’s atmosphere. Use light properly, and you’ll send shivers down viewer’s spines or have them reflect on a particularly meaningful moment in your movie. Unless you’re shooting live footage you have no control over, the last thing you want is for your lighting to be drab and devoid of contrast.
The Three-point Lighting Setup
The three-point lighting setup is a basic yet effective lighting method used extensively in movie making. Its most important component is the key light, a bright light which serves as the primary light source and illuminates the scene from one side at an angle. One light alone would make for harsh shadows, which is why the fill light is added to the other side. It is weaker than the key light so that contrast is preserved. Only two lights would make the scene seem two-dimensional and blend the characters in with the background. That’s why a back light shines on them from behind to give the scene depth.
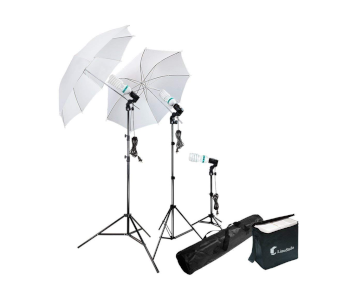
You can achieve a three-point lighting setup by using available conventional light sources. However, you’ll want softboxes & umbrella lights to be able to create it in any condition. Both softboxes and umbrellas diffuse the light and create soft shadows. The difference is that you can move an umbrella farther away or closer to the light source and control the shadows’ harshness.
We recommend the umbrella lights and softboxes from LimoStudio. Their lighting setups easily rival more well-known names whose gear costs considerably more. Whichever kit you choose, you’re getting quality bulbs, adjustable aluminum stands, and carrying cases for easy transportation. The softboxes are 24 inches in diameter and have a reflective interior for maximum coverage as well as white cloth covers to diffuse the light. The umbrella lights come with a smaller stand you can place on a table behind subjects as a back light or use in constrained spaces. The umbrellas are easy to handle and let you quickly adjust shadow intensity.
On-camera Lights
Sometimes you don’t want to go for the traditional cinematic look. Maybe you’re trying to recreate an amateur recording or are shooting a film with an indie vibe. That’s when a single on-camera light will do. These attach to your camera’s hotshoe mount. Some lights have two sets of LEDs for color temperature adjustment too.
If you have the budget for it, we strongly suggest you pick up the Rotolight Neo II. This on-camera light boasts a color rendering index of 96 which makes any color, especially skin tones, look natural on camera. The light has three power sources – batteries, AC power, or your camera’s battery. You can adjust its color temperature from 3,150 to 6,300 Kelvin incrementally and even use it like a flash. The Neo II has a remote control as well as physical controls and an informative LCD on its back. The Genaray LED-7100T is a less versatile but also less expensive alternative that works well too.
Reflectors
A reflector lets you manipulate existing light sources to a greater degree. Take our favorite, the Neewer 5-in-1 Collapsible Multi-Disc Light Reflector, for example. It’s a disc with a 45-inch diameter that comes with two cloth covers. Each cover has two sides and serves a distinct purpose. One sheet is silver & white while the other is black & yellow. Switching to silver softens shadows and enhances highlights while white makes the scene brighter by reflecting light onto it. A golden glow makes the scene warmer while black is useful in eliminating glare. You can also use the reflector without a cover, in which case it acts as a light diffuser.
Other Accessories
Once you’ve covered the essentials, it’s time to turn your attention to smaller odds & ends. While you can make your movie without most mentioned items, having them will optimize the process.
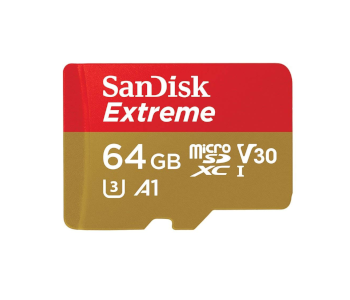
One thing you can’t make a movie without is something to store it on, which is why you need an SD card. Sandisk makes cards in a variety of sizes, so you can pick one according to your budget and expected film length. More importantly, their SD cards have high transfer speeds, which tax the camera’s battery less. While you’re at it, consider investing in an external hard drive for file backup on the go. We like the CalDigit Tuff because of its high capacity and impressive build. The drive is dust-and waterproof, and can even survive a four-foot drop!
You’ll want to invest in a couple of back-up batteries too if you don’t want to rely on AC power. Different cameras have batteries of varying size and capacity, so you’ll need to look at your camera’s specs before making a purchase. Make sure that the replacement batteries have as big a capacity as your camera can handle and that they come with a charger that can fill two or more up quickly.
You can do a lot during post-processing to mitigate drab colors or low light. However, correcting over-exposed footage is much more challenging. If your camera doesn’t have good exposure correction, you can help it by getting neutral density filters. These limit the amount of light that reaches the camera’s sensor and allow you to shoot in situations you’d otherwise avoid because of too much glare.
Your camera needs a secure bag with lots of compartments, but who says that it can’t also be stylish? The vintage canvas messenger bag by S-Zone has room enough for your DSLR and its lens plus separate compartments for two more lenses! It has thick padding, which prevents movement during transport. You can also remove the padding to create room for a tablet or laptop. The bag is waterproof so your equipment won’t get damaged in a downpour. Best of all, it doesn’t look like a typical camera bag, and thieves won’t suspect there’s a valuable camera inside.