3D Printing with Wax: The Process of Lost Wax Casting

We know all about additive manufacturing by 3D printing. A filament is molten by a hot extruder and deposited on a print bed, and layers are built one by one until the design has been completed. It’s a direct, single-step procedure that produces the model in your desired material quickly.
However, there are also other, more indirect methods of additive manufacturing. One of these methods is called lost wax casting – a process that uses wax to create molds, which can then be used to create highly detailed designs out of molten metal. What is lost wax casting and how is wax used in this method? What are the advantages of this method over standard FDM printing?
What is lost wax casting?
Lost wax casting is a very old technique and has been used even before 3D printers came into the picture. Through this technique, a mold can be created from a prototype that was made using wax. For traditional jewelry makers, lost wax casting is a highly useful method for producing a high volume of custom pieces. It is especially suitable for replicating very detailed designs quickly and accurately.
In lost wax casting, a mold is built about an initial prototype made of wax. Before 3D printing, artisanal craftsmen made these prototypes by hand by painstakingly carving details into a solid wax block. A negative mold is then built around this prototype using a more heat-stable material.
The wax prototype can then be easily melted away, leaving a negative mold with a cavity that accurately mimics the prototype. Since the mold itself is heat-stable, it can be used to create pieces out of sturdier materials such as molten metal.
In modern times, the method of lost wax casting isn’t really all that different. However, 3D printing technology has made it easier and faster to create a wax prototype. There are now several wax-like filaments that can be used with FDM printers and can be polished before being used to create negative molds.
What is the procedure for lost wax casting?
Lost wax casting is an interesting, albeit difficult, technique that can help you create multiple copies of a single design quickly. Making the mold could take a lot of work at first, but it’s smooth sailing once you have the mold in hand.
1. Choose a design
As with any standard 3D printing project, creating a wax prototype starts with a 3D design. You can make your own design or simply download a free model from Thingiverse or MyMiniFactory. Lost wax casting is best used for complex designs and jewelry, but you are free to choose any design that you’d like to recreate with metal.
2. Print the design using wax filament
With the 3D design on hand, you can proceed to print it using your FDM printer. The selection of wax filaments for 3D printing is quite limited, but the ones available in the market have pretty good quality. Just keep in mind that printing with a wax-like filament, as with any other flexible material, can get quite tricky. There are a couple rules to follow when printing with flexible filament, such as using a Direct Extruder and setting the printing speed to very low.
If you are unsure about the size or fit of the design you are printing, it is recommended to make a sample print on lower quality settings. Once you’re happy with the size of your test print, go ahead and print it at the highest resolution possible. Remember – you’re only making one prototype, so make it look as good as you can.
3. Create a negative mold
After you have created a mold that you’re satisfied with, you can proceed to create the negative mold. A negative mold is using silicone or polyurethane, materials that can be melted at high-temperature but are heat-stable once they have hardened. Silicone casting has been used for decades in engineering and in special effects, so you shouldn’t have a hard time looking for the appropriate material. You can also use a two-part epoxy that only hardens once the components are put together.
Before you can create the negative mold, you need to have a sealed box to pour the molding material into. In the field of casting, this is referred to as a “sprue.” It doesn’t have to be anything fancy in this case. A simple wooden box with sealed edges will do.
Allow the negative mold to fully cool down and solidify which can take 24 hours or more depending on your material of choice. You can then the wax prototype to heat and allow it to melt and pour out of the negative mold.
4. Use the mold to create metal products
With your negative mold ready, it’s time to create your finished metal product. Make sure the pre-heat the mold so that it doesn’t go through thermal shock when it comes into contact with the molten metal.
Several different metals can be used for lost wax casting, with the most common being brass and silver. You can even make highly valuable pieces using either 14K or 18K gold. Lost wax casting allows for the recreation of designs in metal that cannot be reproduced through more traditional methods. However, metal products made using lost wax casting typically come out with a rough finish, making it necessary to do a lot of post-processing.
How difficult the post-processing step will depend on how hard or soft the metal you used is. In any case, it is a good idea to keep tools for polishing and sanding handy when you do lost wax casting.
The best wax filaments for lost wax casting
There aren’t many wax filaments out in the market that are appropriate for the printing of molds for lost wax casting. Compared to other filaments, wax filaments are highly specialized, and we can imagine that not many people buy them. They are also quite expensive compared to your run-of-the-mill filament materials like ABS or PLA. To help you pick out the best filaments for your lost wax casting project, here are our top three picks:
1. Print2Cast Wax Filament
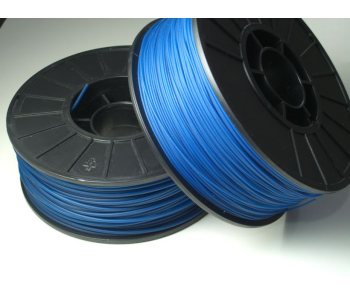
Print2Cast is a simple wax filament that promises a clean burnout, resulting in a negative mold that is extremely clean. It can be used with any 3D printer that can handle flexible filaments, like TPU. Print2Cast is the product of a company called Machinable Wax which specializes in different formulations of wax for various industrial applications.
The manufacturer’s page has a couple of tips on how to best use their wax filament for 3D printing. A glass heated bed treated with a layer of hairspray is recommended for bed adhesion, and a very slow, controlled cooling rate is highly recommended. Printing with the Print2Cast filament is certainly still tricky, but Machinable Wax has provided all the settings you need to ensure success.
The best thing about prints made from Print2Cast is that they can be polished, carved, and machined, allowing you to improve the quality of the resulting negative mold. Should there be slight imperfections caused by the 3D printing process, it’s nice to know that you can still step in to fix these mistakes.
Machinable Wax suggests that you do a complete “burnout” of the wax model in the negative mold instead of just a “melt out.” A burn out ensures that there are no residues left in the negative mold, but it does take a lot of time to finish since you need a slow ramp-up of heat.
2. PolyMaker PolyCast Filament
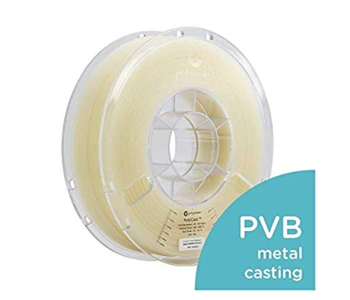
The PolyCast filament from PolyMaker is another specialty filament that was specially made for lost wax casting. The filament burns out cleanly, leaving no residue on your negative mold as long as you do the burning out process correctly.
As with other flexible filaments, getting the right settings to print with the PolyCast filament with no issues can take a bit of trial and error. A glass heated bed is necessary, although customer accounts state that the filament sticks to the bed well enough without any adhesion aids. The finished 3D prints can be sanded and polished to get a smooth finish unless you can make do with the layer lines of an unprocessed print.
The product page does not conveniently provide the recommended printer settings for the PolyCast filament. We recommend getting in touch with the manufacturer directly for this matter.
3. PORO-Lay Mold-Lay 3D Printing Filament
Lastly, we have the Mold-Lay filament, which is a fairly popular choice in the field of lost wax casting. The manufacturer recommends using concrete to create a negative mold with this filament and placing it in an oven to burn out the wax. Should there any residue in the negative mold, it can be easily removed with some citric acid.
In contrast to the other filaments in this list, the Mold-Lay filament prints at quite low temperatures – within the range of 170 to 180 °C. This means that a heated print bed will not be necessary. However, a few customers have reported warping when printing with this filament, so some bed heating is still recommended.
The complexity of printing with the Mold-Lay filament is compounded by the fact that the 0.55 lb. bundle does not come with a spool. As you can imagine, maintaining tension in an unspooled filament is hard enough, but this is even more complicated, considering the flexible nature of this filament. This feeding problem is particularly frustrating because it could so easily have been avoided with a simple spool.
Advantages of lost wax casting
1. Does not require a lot of skill
If your goal is to make a metal object with a complex design, it’s much easier to do lost wax casting than to resort to more traditional ways of working with metal. This is particularly true if you don’t have any experience or skill with crafting jewelry. Since we could be talking about precious metals like gold and silver, this can be a very expensive learning process for you.
2. Cheap
Of course, not everything has to be done the old-fashioned way. You can turn to technology, such as metal laser sintering, to produce highly complex metal objects. The downside is these types of equipment are very expensive. If you already have a 3D printer on hand, why not leverage of its capabilities to make your metal models cheaper?
Limitations of lost wax casting
1. Difficult to learn
This might seem antithetical to what we mentioned above, but it still takes a considerable amount of skill to pull off lost wax casting successfully. There are lots of things that could go wrong in lost wax casting – your negative mold could end up with bubbles due to improper pouring of silicone into the sprue, the molten metal may not fill up all of the void spaces inside the mold, or you may end up damaging your metal product while you are removing it from the mold. You’ll probably need to learn from several mistakes before you get the process perfect.
2. Slower
Lost wax casting is a multi-step process which isn’t suitable for high-volume and short turnover jobs. Even the use of an FDM printer can significantly slow down the process. There are much faster alternatives out there, such as Binder Jetting and Direct Metal Laser Sintering, but they are also much more expensive.
Final thoughts
Lost wax casting is a very old technique, and marrying it with today’s 3D printing technology has really opened up a lot of possibilities. It’s a slow and tedious process, but it will make you work with your hands. For some people, this can be a very fulfilling experience, especially when you’re fully satisfied with how your final products turn out.
3D printing with wax filaments is tricky, but it’s just about challenging as printing with any flexible filament, like TPU. Just be wary of the filament deforming inside the extruder assembly. Flexible filament also takes a long time to solidify, so it’s best to keep your print speed settings very low.
Best filament for casting – Filamentarno! wax3d. I bought it in an Estonian online store. Plastic melts at a temperature of 120 degrees, does not detach from the table. For printing, you need to add gcode with a decrease in the print threshold of the extruder. Thank you for an interesting article