How to Get Great Lighting for YouTube Videos
It takes putting many pieces in their proper place to assemble a jigsaw puzzle, and even if just one piece is missing the whole thing looks incomplete. It’s the same with YouTube videos. You can have a high-end camera, the best microphone, and serious editing skills, yet without good lighting the video will fall flat.
The good news is that the fundamentals of video lighting are easy to learn! Even better, you can find all the lights you’ll need without stepping foot inside a specialty shop and create a setup that almost rivals professionals without breaking the bank.
In this guide, we explain all you need to know to transform the way your videos look. First, we’ll introduce you to your first lighting setup. Afterwards, you’ll learn about various types of lights, what they’re used for, and which models we consider to be the best. Lastly, we offer general tips on what to look for when buying lighting equipment.
How to Create a Basic Lighting Setup
Three well-placed lights are all you need to immediately improve the production quality of your videos!
The technique you need to get familiar with is known as three-point lighting. It uses three light sources to illuminate the subject, achieve a good balance of light and shadow, and give depth to the scene. Each light has a name and a specific role to fill:
The key light is your main light source. It is used to provide enough illumination to make the video bright. It is stronger than the two other lights and dictates how they’ll be adjusted.
The fill light is there to make the shadows left by the key light softer. If you only use a key light, one side of the subject would be illuminated while the other would be completely dark and without detail. Adding a fill light softens those shadows and lights up the subject more evenly. It is always less bright than the key light. Playing around with the brightness further leads to different thematic effects. For example, a brighter fill light creates a happier atmosphere while turning it down simulates the setting of noir movies.
The back light gives the subject a third dimension. Just using the key and fill lights would make the subject appear flat and fused together with the background. The back light adds a back and sideways highlight which gives depth to the scene.
Creating a three-point light setup is easy! With the subject in the center, place the key light in front and to the side at a 45-degree angle. Next, place the fill light at the opposite side while retaining the angle. Finally, place the back light behind the subject at the same angle and on the same side as the key light. Adjust the brightness settings for each light so that shadows are soft and the subject isn’t irritated by too much brightness, and you’re done.
Of course, you can always improvise and adapt. The light from your monitor can act as a replacement for a fill or back light. If the room you’re recording in is bright enough either because of sunlight or standard indoor lighting, you might only need one or two more light sources. Trial & error is the key to success –take your time and see how you can blend the light you already have on hand with your new video lights to create a pleasing result.
What Features Should Good Lights for YouTube Have?
Color Rendering Index
Color Temperature & Brightness
Portability and Ease of Use
Accessories
What Types of Lighting Should You Use?
The great thing about the three-point lighting setup is that it leaves you with a lot of room to experiment. There’s no right or wrong kind of light to use for any of the three positions. However, there are light types which are suitable for different situations and even different kinds of YouTube channels. Here are the most common light types along with our recommendations for exceptional performers for each category.
1. Standalone LED Lights
These are the basic tools needed to create a three-light setup. They can be placed either on a stand or on any horizontal surface. The light they emit is harsh by default, but diffusers often come as part of the packaging. Some models come with two or four-part barn doors which are used to reflect portions of the light in the desired direction. LED lights are inexpensive, offer a range of color temperatures, and don’t require much prior knowledge to operate.
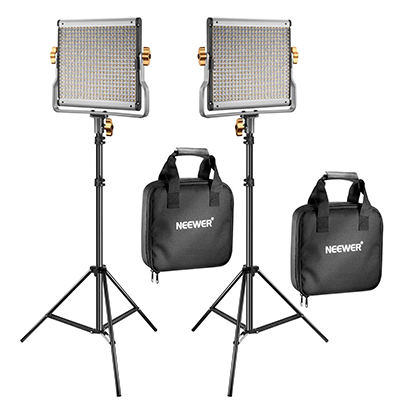
This light pack is a great value since you get two rectangular LED lights, each with 480 bulbs that produce either warm or tungsten color. Both lights have their own stands, power cables, carrying cases, and diffusers. The lights attach easily to their height-adjustable stands and can be tilted for better control. You can also use them without the stands and power them with rechargeable batteries which makes Neewer’s lights portable.
Operating the lights is straightforward – there are control panels on the back of each which let you set color temperature and light intensity incrementally. The diffusers do a good job of softening the glow and creating less pronounced shadows. Since the light is produced by LEDs, you can record continuously for hours and use the lights without heat issues or annoying hums.
2. Camera-Mounted LED Lights
These lights behave similarly to their bigger cousins but are mounted on a camera’s hot shoe. This gives you a direct light source which is useful as a close-up key light in a studio setting. Since they’re lightweight and battery powered, camera-mounted LED lights are perfect for vloggers who do a lot of shooting outdoors. Although it’s best to take advantage of natural light when shooting an outdoor scene, having a portable LED light will let you keep going even if the weather turns sour.
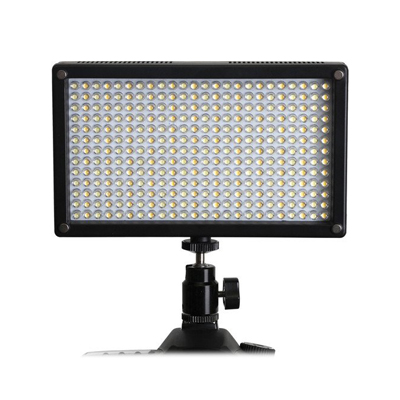
This on-camera light impresses with its versatility and brightness. It has multiple mounting options including a ball head and standard tripod screw. The ball mount is ingenious since it lets you mount the light onto your camera without impeding its movement. In other words, you can freely rotate and even tilt the light to a degree. When used with a tripod, it can act as a standalone light and enhance your setup from a different angle if a key light isn’t needed.
There’s room in the LED-7100T for two rechargeable batteries. Only one needs to be inserted for it to work, but two will double the time you can use it. The batteries can even be recharged from your car battery so you don’t need to depend on civilization to keep your vlog going. The LED-7100T’s back contains battery level indicator LEDs as well as smooth controls for brightness and color temperature adjustment. At 1,400 lumens, the light is bright enough to illuminate a subject at a moderate distance.
3. Softboxes
A softbox is a light source made up of a central light bulb surrounded with reflective material and closed off by a diffusion screen. The light is first evenly distributed thanks to the reflective interior and then completely diffused as it leaves the box. The resulting light is as close as you’ll get to simulating daylight. It also has a wide area and will bathe the space around the subject in soft light, banishing shadows along the way.
This type of light is ideal for when you want to showcase something. Food vloggers, product reviews, and interior design specialists love how it leaves no shadows behind while not creating glare. As part of a three light setup, the softbox will serve well as either a key light or a fill light. If you’re using it on its own, you’ll need to experiment with positioning to get the angle right.
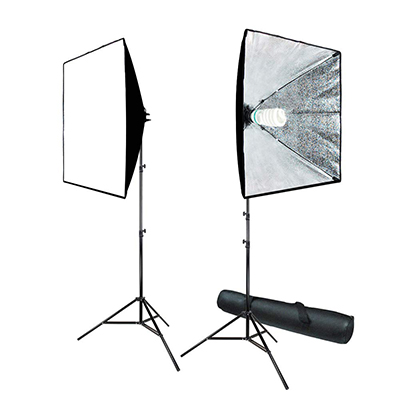
This is another kit that performs far above & beyond what you’d expect from a pair of lights that cost less than $70. You get two softboxes, two bright 85W fluorescent spiral bulbs, adjustable stands, and a carrying case everything folds up into neatly. The lights are supremely stable thanks to widely spaced-out stand legs. The stand height ranges from 50 to 86 inches and can be fixated with a secure locking system.
The softboxes easily attach onto their stands and rotate 270 degrees for easier adjustment. Their bulbs have a color temperature of 6,500K. Coupled with their 700-watt equivalent output and the silver reflective material inside the softboxes, this produces plenty of natural-looking white light for all kinds of video projects.
4. Umbrella Lights
Umbrella lights are made up of a light source and an umbrella that’s placed in front of it. There are umbrellas which reflect the light back and ones which diffuse it. You’ll want to use the latter kind for YouTube videos by directing the light at the subject and placing the umbrella between them. Unlike softboxes where the diffusion screen is always at the same distance from the bulb, this distance can be adjusted on umbrella lights.
Indoor vloggers are the YouTubers who benefit most from umbrella lights. Their adjustability lets you tweak how hard or soft you want the shadows they make to be. The glow umbrella lights emit is also less focused than that of softboxes. This means they’ll cover a greater area in soft light and create more depth in your videos.
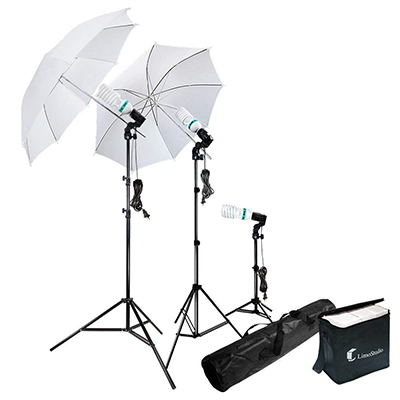
This 600W umbrella lighting kit is the best product and the best deal LimoStudio has on offer. For under $60, you’re getting a fully-realized three-point lighting system which is enough for all of an indoor vlogger’s needs. The two umbrella lights and a single accent light can be set up in various combinations and are enough on their own to light a scene professionally, even at night.
You get two transparent white nylon umbrellas along with two 86-inch stands for the umbrella portion of the setup. The accent light goes onto a smaller 28-inch stand which fits onto a desk. You also get three fluorescent bulbs with a strength of 1,820 lumens each and a neutral white color temperature of 6,000K. Both the umbrellas and the bulbs have their own protective cases.
5. Ring Lights
If you’ve ever watched a makeup tutorial on YouTube, chances are you’ve seen a signature halo reflected in the model’s eyes. That’s a ring light in action! Ring lights are among the smallest and most portable video lights. They’re placed in front of a person’s face at a short distance. The ring shape lets it seem like the light is coming from multiple sources while also preventing too much exposure of any one point.
Ring lights are the beauty YouTuber’s go-to choice since they create a flattering light. This reduces natural facial imperfections and gets rid of shadows that could draw attention to them. Both the light and the camera should be placed directly in front of the subject for best results, which is why many ring lights have a camera mount in the middle.
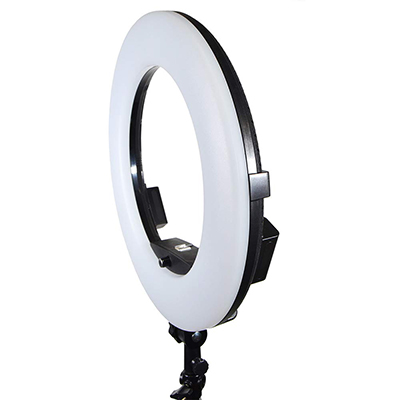
The Pro Plus is an LED ring light with an inner diameter of 17 inches which easily handles both studio and outdoor working conditions. An accompanying tote has compartments for the light and all of its accessories and makes transport a breeze. There are two batteries with a charger each that let the light glow for 2.5 hours if cranked up to 100% brightness.
There’s a ball head in the light’s middle for attaching a camera. You can control the Pro Plus with identical sets of controls on its front and back or use the remote to make on-the-fly-adjustments without moving. The current brightness percentage and color temperature are displayed both on the light’s back and its remote. The glow is soft and its temperature is adjustable from 3,200 to 5,500K.
6. Light Reflectors
Although they don’t create light themselves, light reflectors are an inexpensive and effective tool for manipulating existing light. When properly placed, they can replace a fill light and soften shadows or be used as a catch light to make your eyes sparkle. They’re a fantastic stand-in for more expensive lighting options, and the hardest thing about learning how to use them is folding them up once shooting is done.
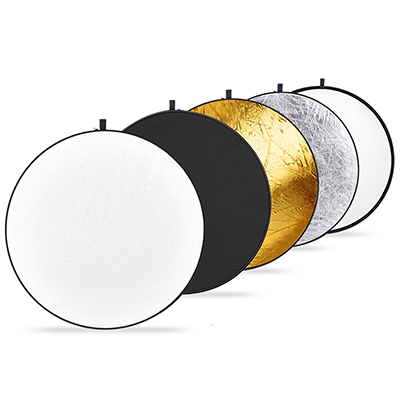
We’re very impressed with the ingenious design and low price of Neewer’s 5-in-1 light reflector! This simple device allows for light manipulation in five ways, giving you nuanced control over how you present yourself on video. It arrives folded in a nylon carrying bag and springs up thanks to a flexible metal frame as soon as you take it out.
The reflector is made out of a central surface and two backdrops that are attached to it with zippers. Each backdrop has two sides – one is black & gold while the other is white & silver. Depending on the desired effect, you can make shadows more pronounced with the black side or less pronounced with the white. The silver side is used to both reduce shadows and emphasize highlights while the golden one imparts a warmer glow to the scene. Used without any covers, the reflector acts as a diffuser and softens naturally-made shadows.
7. Natural light
Harnessing the sun’s natural light can lead to some great-looking videos. Even though travel vloggers and outdoor action-oriented YouTubers have the most advantage from it, content creators who do their work inside can also benefit from natural light. Provided you have a well-lit room, you can use a window as your key light and get all the diffuse light you need.
The bad thing about natural lighting is that it constantly changes and isn’t dependable. The best time to shoot in sunlight alone is a couple of hours before and after noon where shadows are the least pronounced. If you’re looking to capture an inspired travel scene or are going for the warm look, there are only two short time windows after sunrise and before sunset when you’ll achieve the best results. Finally, there’s the chance of a storm rolling in and ruining everything, so always check the weather forecast before filming out in the open!
Contents
- How to Create a Basic Lighting Setup
- What Features Should Good Lights for YouTube Have?
- Color Rendering Index
- Color Temperature & Brightness
- Portability and Ease of Use
- Accessories
- What Types of Lighting Should You Use?
- 1. Standalone LED Lights
- 2. Camera-Mounted LED Lights
- 3. Softboxes
- 4. Umbrella Lights
- 5. Ring Lights
- 6. Light Reflectors
- 7. Natural light

