How to Choose the Right Quadcopter Drone Frame

There are all kinds of frames available for drones, and it can seem overwhelming at first. It’s quite a simple process once you know your basic requirements. This guide explains how to choose the ideal quadcopter frame. There are also links to a few examples at the various sections.
Many brands now compete with low-cost clones from the Far East. That means folks on tighter budgets no longer have to settle for second best. There are still some dirt-cheap models available, but it’s a good idea to avoid those if you can. There’s a distinct difference between cheap and affordable—the former being a false economy.
Buying Quadcopter Frames | The Essentials
Always consider the six areas below before buying any quadcopter airframe. I cover each of these points in more detail further down the page.
- The price: set your maximum budget
- Frame size
- Frame weight
- Frame type, i.e., freestyle or racing
- Frame layout
- The finer details
The Ins & Outs of Drone Frames
You should know what to look for and what to watch out for by the end of this short section. Buying a quadcopter frame is not difficult if you know your specific needs in advance.
1. Price and budget
Not all high-priced quad frames are superior. A more affordable option may serve your needs just as well. The ones you want to avoid most, though, are the ultra-cheap clones from the Far East. It’s like the saying goes: “If something seems too good to be true—it probably is.” Your starting point should be to set a min/max budget. The minimum budget should rule out any dirt-cheap temptations.
Other price considerations may consist of extended warranties and shipping fees. Some frame kits can include extras like tools, adjustable camera mounts, props, and other parts.
2. Frame size and weight
Knowing the rough size and use for your drone is not enough. You don’t want to build an indoor quadcopter only to discover the frame is far too big. Try to keep under 120mm for indoor use. All makers mention the size in the descriptions and refer to it as the wheelbase. The wheelbase is the exact distance between motors (motor-to-motor) and determines the propeller sizes.
The table below simplifies the wheelbase, prop size, and suitable motors:
| FRAME SIZE (WHEELBASE) | PROP SIZE | MOTOR | kilovolt (kV) |
|---|---|---|---|
| 100mm | 2 inches | 1102 – 1104 | 6000+ |
| 120mm | 3 inches | 1104 – 1106 | 4000+ |
| 150mm – 180mm | 4 inches | 1306 – 1408 | 3000+ |
| 200mm – 220mm | 5 inches | 2204 – 2306 | 2100 – 2800 |
| 235mm – 280mm | 6 inches | 2205 – 2308 | 1600 – 2500 |
| 330mm – 350mm | 7–8 inches | 2208 – 2212 | 1500 – 1600 |
| 450mm – 500mm | 9-10 inches | 2212 – 2216 | 800 – 1000 |
Smaller frames equal smaller investments
First-time quadcopter builders often start with smaller frames, that is those under 200mm. Smaller frames need smaller components which are cheaper than larger parts. Keep your frame size under 120mm and preferably less than 100mm if you want an indoor flier. Frame weight is another consideration. Those that weigh less than 250 grams (8.81 oz.) don’t have regulation restrictions.
The only disadvantage with tinier frames and components is that they’re fiddlier to assemble. Soldering can be especially tricky for the inexperienced. The other downside with mini, micro, and nano-sized quads is the restricted flight times. Most are lucky to get 6 minutes on a full charge.
Larger frames mean more of everything
Larger frame sizes have more scope and choices in the components they use. The bigger, powerful motors accelerate quicker and have faster top speeds. The beauty of larger frames is the extra working room. It’s easier to apply the electronics, solder parts, and add extras like an FPV camera mount. The result is a much cleaner, leaner looking bird.
Below are a few frames of various sizes and weights to consider:
3. Frame types—freestyle and racing
The easiest way to classify frame types is to define them as freestyle or racing. Pilots fry drones for the thrill of the flight, to record spectacular aerial footage, and to race. Some camera drones are fast, but they’re not what you might call racing drones. This section defines the frames used for each type.
Freestyle frames
Freestyle is just that. You fly the drone in a way that suits you. Skilled pilots like to perform acrobatics stunts and navigate their way through tight obstacles. Other pilots only want a safe and stable flight so they can record the world from above via the mounted camera. Hand gesture controls, follow me (tracking), and aerial selfies are other freestyle examples.
Freestyle drones tend to have larger, heavier frames than their racing counterparts. They are much easier to build because they have fewer demands than quads made to compete. It’s a good idea to take the freestyle route if this is your first ever drone-building project.
Racing frames
Racing drones is currently one of the fastest growing sports though it’s still a niche hobby.
They call it First Person View (FPV) racing. FPV lets the participants see a live camera stream right from the quadcopters nose. It’s viewed via an external screen or from head-mounted FPV goggles.
Racing frames exist for speed and agility. They are not as aesthetically pleasing as freestyle quads though that’s subjective. The sole purpose of these quadcopters is to go as fast as possible in a race to the finish line. Racing frames must be more aerodynamic and lighter compared to the freestyle ones. The downside is that racing quads are compact and fiddlier to assemble and maintain.
Racing pilots try to shave every gram off their drone without losing its crash-resistance. The stronger the build, the heavier the quad, so it’s quite a balancing act. Fine-tuning the performance is also part of racing and thus needs a different set of skills. There are no autonomous flight modes either, but then it’s not necessary with racing rigs.
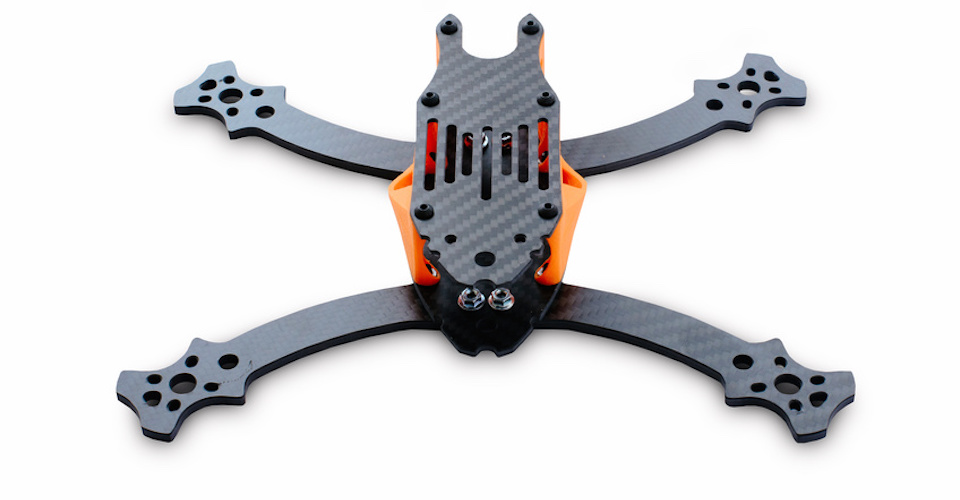
The stretched-X motor layout
A typical racing frame has a stretched-X motor layout with motors further apart front-to-back. Drone pilots usually place the batteries under the frame rather than on top. An underslung battery saves space above and can thus use a smaller, lighter frame. A bottom-mounted drone battery also gives it extra protection against those inevitable crashes.
4. Frame Layout

A quadcopter built for racing must consider the aerodynamics more so than freestyle drones. Think how the contours differ with sports cars and fighter jets to conventional vehicles and planes. Racing drones are no different in this regard.
This section looks at the layout of the following six frame types:
- H Frame vs. H-X
- X Frame
- Stretch X Frame
- Plus Frame
- Stretch Plus Frame
- Z frame
Let’s now look at each of these frame types in turn.
H & HX frames (freestyle)
A true H frame is—as the name suggests—in the shape of an H. It provides the most space and is easier to build on. There’s plenty of room for a top-mounted battery along with extra components. You can attach a lot to these frame types and still end up with a clean, uncluttered layout. It’s for these reasons that H frames are the favorite choice for freestyle drones.
The letters of an HX frame also define its shape. There’s still the familiar H shape for the central body, but the four arms have an X layout.
True X frames (racing)
The X frame design also has a specific purpose, and that is to reduce unnecessary weight. It does this by using less material than a typical H frame design. A small center area (cross) also means there’s less room on top to play with. That usually means compromises and perhaps a bit of cramming depending on the quad. One must consider things like stackable video transmitters and 4-in-1 ESCs.
Stretch X frames (racing)
The stretch X frame is almost the same as the X frame but with stretched arms. The design is such that its wheelbase is closer to an ellipse than a circle. This model provides less turbulence and better stability than the True X on its pitch axis. That makes it easier to control when cornering at higher speeds. It’s a popular choice among racing enthusiasts even though it’s a tad heavier than the True X.
Most quad racers opt for True X and the Stretch X configurations of 180–220mm at 80g or less.
Plus frames
Plus-frames have not caught on too well. They are in the shape of a ‘+’ and have an identical footprint to the X frame. The problem with this style is that they break easier on impact than X frames. Also, the front motor gets in the way of an FPV camera field of view (FOV).
Stretch plus frames
Stretch Plus frames came about to resolve the field of view issue with the Plus frames above. This design extends (stretches) the front arm to prevent the obstruction. They’re still prone to breaking, though, when the front arm crashes into a hard surface.
Z frames
A Z-frame uses a stepped configuration where one base plate sits on top of the other. The stepped geometry reduces turbulent air to the motors at the rear during forward flight.
Sample Quadcopter Frames (Various)
The options below point to various quadcopter frames. They are good examples if you need to get familiar with the specs and terminology. Look out for things like material, shock proofing, durability, and ease-of-assembly in the details.
Name: ALFA Monster Frame Kit | Wheelbase: 215mm (5″) | weight: 95g/103g/110g.
Name: Flame Wheel 330 | Wheelbase: 330mm (12.99″) | weight: 156g
Name: Diatone Q450 Frame Kit | Wheelbase: 450mm| weight: 295g:
Name: iFlight iX2 Tiny Whoop Micro FPV Frame | Wheelbase: 100mm | weight: 19.6g
Name: FPVDrone Racing Quadcopter Frame | Wheelbase: 225mm (5″) | weight: 125g
Name: FPVKing FPV Racing Drone Frame for Mini QAV250 | Wheelbase: 250mm | weight: 140g
OK, the final section underlines a few of the smaller yet still significant details.
The Finer Details
There are a few other essentials to think about once you’ve decided on a frame. You should now know the size and configuration and what parts you intend to use. This section looks at the other things to consider before building your quad. Here’s a quick breakdown of the six essential items:
- The Power Distribution Board (PDB)
- Standoff hole spacing
- Vibration dampening pads
- First Person View or FPV camera mount
- VTX mount
- Motor Mount
1. Power Distribution Board (PDB)
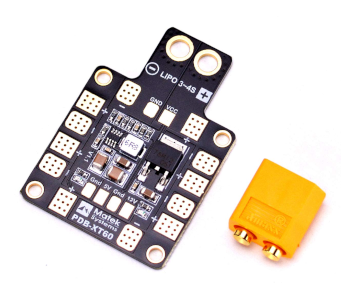
Think carefully about the PDB as it’s a vital component and the centerpiece of your build. These tiny printed circuit boards provide all your quad’s electrical systems with power. Some flight controllers and Electronic Speed Controller (ESC) stacks work as PDBs. That’s good news for drone racers as it helps to keep the weight down. Get familiar with PDBs if you’re not sure what you need or why.
These examples point to Power Distribution Boards with full product descriptions:
- Matek PDB-XT60 Power Distribution Board for FPV Racing Quads
- HOBBYMATE 5-in-1 QAV Quadcopter PDB-Board
- ARRIS® CC3D Naze32 Flight Controller Mini Power Distribution Board
- HOBBYMATE XT60 PDB Power Distribution Board
- RJXHOBBY F3 F3EVO PDB Power Distribution Board for Racing Quads
- QWinOut PDB Power Distribution Board
2. Standoff Holes
Standoff holes are a vital part of every frame needed to mount all the hardware components. You must know the size and configuration of the standoffs so that your parts can fit the model. It’s a common newbie error to buy incompatible parts like stackable electronics and flight controllers.
3. Vibration Dampening Pads
You don’t need vibration dampening pads to fly, but there’s every reason to get them anyway. They guarantee better flight controller performance. These simple pads enhance the flying experience. They reduce noise, vibrations, and make tuning PIDs much easier. The PID is a function from within the flight controller responsible for flight stabilization. Shockproof pads are also popular for landing skids.
Here are a few various examples of antivibration options for multirotor drones:
- FPV Black Sponge Anti-Vibration Shockproof Landing Skid Pads
- 40pcs Anti Vibration Rubber Damper Balls for FPV F4 F7 Flight Controller
- Heavy Duty Shock Absorption Dampening Balls for Camera Gimbals
- TYPHEERX RC rubber ring washers for RC F3 F4 F7 flight controllers
4. First Person View (FPV) Camera Mount
Not all quad frames of equal size can accommodate the same First Person View cameras. Make sure you check the FPV compatibility before you choose a camera. FPV mounts and brackets often come with frame kits which list the various camera options.
Some drone makers produce camera gimbals for use with the popular GoPro Hero action cameras. The good thing about GoPro’s and other action cameras is their multiple uses.
Below are a few examples of drone FPV camera possibilities:
- GoPro HERO4 BLACK Action Camera
- GoPro Fusion W/GoPro Plus Action Camera
- FPV Camera HD Cam 2.5mm Lens 120 for Multicopter Quadcopter
- Caddx Mini 160° Wide Angle FPV Action Camera for Racing Drone
- Wolfwhoop WT05 Micro Quadcopter Camera
- FALCORC FOXEER Predator V3 Standard FPV Camera
5. VTX Mount
VTX is short for video transmitter and a crucial part of any quadcopter FPV system. It works by sending video from the drone’s FPV camera to a receiver. These receivers can display the live feed on a mobile device screen or via FPV goggles.
You must create a dedicated place for the antenna if the frame doesn’t already have one. Antennas are the second most breakable/replaceable parts on any quadcopter after propellers. Flexible antenna mounts are an excellent way to protect them from a hard impact. You also need to figure out how to enclose the electronics. More exposure increases the risk of damage in a crash.
6. Motor Mount
The frame must be able to support the motor size you choose. Refer to the table toward the top of this page if you need guidance. You may also want to consider some protection for the motors though it will add to the weight. Always check and cross-check the components when building a drone from scratch. There’s nothing more frustrating than buying parts that are incompatible for your frame.