Stringing in 3D Printing – Everything You Need to Know

The ultimate goal of any 3D printing project is to create an output that is free of any blemishes. Getting there is rarely a straightforward process. Lots of potential problems can be stumbled upon along the way, one of which is stringing.
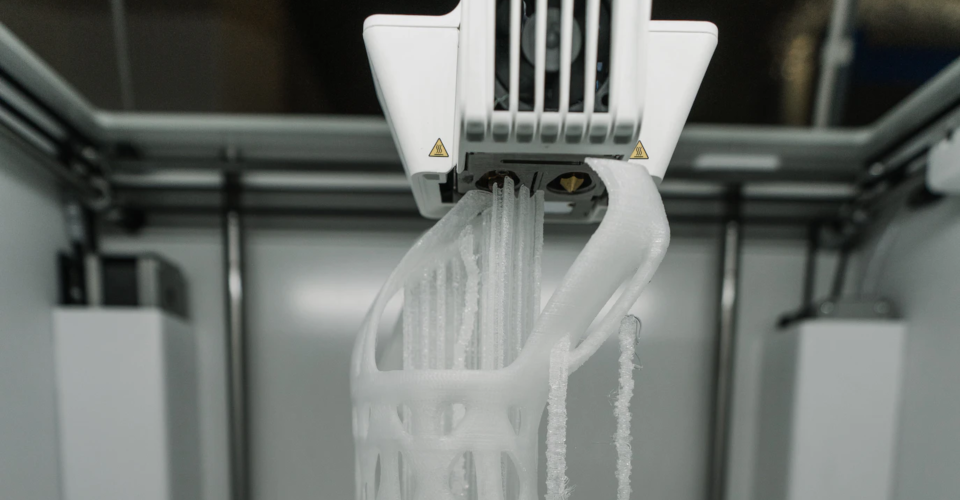
Stringing or oozing is a 3D printing issue characterized by the presence of very thin strands of plastic or “strings” in the final print. This is often caused by uncontrolled extrusion, particularly while the extruder is moving from one location to another. There are several methods to address stringing depending on the root cause of the problem.
Stringing is one of the more common problems you can encounter in 3D printing. Understanding all the possible causes of stringing will come in handy eventually. Check out this detailed guide on stringing how it can be addressed.
What is stringing?

Stringing is one of the more visually distinct issues you can encounter in 3D printing. When your output comes out with a large density of very thin plastic strands, then you definitely have a stringing problem.
Stringing is also known as “oozing” because it is caused by undesired oozing out of excess filament from the nozzle. This often happens while the nozzle is traveling from one point of the model to another. These are sections when no extrusion should be taking place, thereby ruining the entire aesthetics of the project.
If you’re lucky, the stringing problem may be minor and can be remedied in post-processing. However, it’s more common to encounter heavy stringing which is almost impossible to clean up. In this case, you have no choice but to make the necessary corrections and start over.
Causes of stringing
As with any problem, understanding the cause of stringing is the key to coming up with a solution. It’s easy to say that the cause of stringing is uncontrolled extrusion, but this does not exactly help us as this is not the root cause. Based on the cumulative experience of thousands of 3D printing enthusiasts, the cause of stringing can be narrowed down to a few possible factors.
Excessive moisture in the filament
Moisture is a common culprit whenever 3D printing issues related to quality are encountered. In this case, excess moisture in the filament can expand and evaporate inside the hot end. The pressure buildup caused by this expansion can cause the filament to ooze out of the nozzle uncontrollably.
Stringing is only one of several potential problems that can be caused by excess moisture. You may also end up with small holes or gaps in the 3D printed layers. In any case, moisture is easily diagnosed by the characteristic fizzing, hissing, or popping sounds from the extruder.
Nozzle temperature is too high

Oozing of the filament out of the nozzle can happen because of excessively low viscosity. While a drop in viscosity is beneficial in 3D printing, excessively low viscosity can cause over-extrusion problems that can manifest as stringing.
Nozzle temperature is the biggest factor that influences the viscosity of a material. What qualifies as excessively high temperatures can vary from one filament to the next. Some filaments are more prone to stringing than others. For instance, flexible filament like TPE more readily takes on fluid-like characteristics when exposed to very high temperatures.
Travel paths are too long
If the nozzle were extruding filament continuously, then oozing would not be an issue. However, a problem comes up when extrusion has to be paused while the nozzle is traveling. For the purpose of this discussion, traveling refers to the movement of the print head from one point of the model to another while no extrusion is happening.
It can be argued that oozing out of the filament will inevitably happen given enough time. After all, there is no way that we can work around gravity. The solution then lies in reducing any opportunity for stringing to manifest. Reducing the travel path of the nozzle is one of the smartest solutions to stringing.
How can you avoid stringing?
There is only a handful of possible root causes of stringing, but there are multiple ways that they can be addressed. The good news is that none of the solutions will require you to take apart your printer’s extruder assembly – just making a few adjustments in your slicer settings may just do the job.
Use dry filament
Let’s tackle one of the first rules of 3D printing – if you find that your filament has excess moisture, then stop using it immediately. You can either dry it in an oven or dehumidifier or use another filament spool.
We’re not going to do a long discussion on how to keep your filaments dry, but proper filament storage may be the single most important SOP you can practice. The solution is rather simple – place your filament spools in airtight containers along with a few packets of desiccant.
Doing this does not only ensure that you do not experience moisture-related problems during 3D printing, but this also helps you avoid irreversible damage to the filaments during storage. When exposed to excessive moisture for long periods, filaments tend to lose elasticity and become brittle to the point of being unusable.
Lower printing temperature
Do you still have room to lower your printing temperature according to the recommended range of your filament? If you’re currently experiencing stringing, then try to lower the temperature in small increments – even a 5 °C change could make a huge difference.
If you’re going this route, then keep an eye out for potential problems associated with excessively low printing temperatures. This is quite a long list that includes poor bed and layer adhesion, under-extrusion, or a clicking sound in the extruder. If you observe any of these signs, you may want to increase the nozzle temperature again and consider other solutions.
Enable retraction
3D printers actually have a built-in mechanism that can help avoid stringing. This feature, called retraction, rotates the extruder in the opposite direction to pull back the filament from the nozzle. This reduces the pressure on the melt zone.
Take note that enabling retraction only delays the oozing of filament. The filament at the tip of the nozzle is already melted and cannot be pulled back – it will drip eventually. However, enabling retraction can delay oozing just enough for the nozzle to travel from one point to the next.
When enabling retraction, you will need to take note of three factors – the minimum travel distance, retraction speed, and retraction distance. We recommend setting the retraction speed and distance at the minimum values and increasing by increments of 5 mm/s and 1 mm, respectively, if needed. For printers with Bowden extruders, retraction distance and speed usually have to be set at higher values.
The minimum travel distance refers to the distance that the nozzle will travel before retraction kicks in. Lowering this value will ensure that no stringing will occur, even when the nozzle travels across small distances.
Increase travel speed

That period where the nozzle travels from one point to another is the time when it is vulnerable to stringing. It makes sense, then, that one possible solution is to reduce this time as much as possible.
One way to do this is to increase the travel speed on your slicer settings. This can go as high as 300 mm/s depending on the type of printer you are using. Printers with Bowden extruders can usually be set at higher travel speed settings without negative consequences.
A danger of setting the print head to travel too quickly is that it can potentially overshoot its destination. Printers with direct extruders are especially prone to this, as the added weight on the print head also increases its momentum while moving. It’s easy to spot a print head that is overshooting – you will end up with layers that have shifted out of place.
Reduce travel path distance
Another option to reduce the travel time of the print head is to reduce the distance of the travel path. Some slicers have this feature that can automatically minimize movement over open spaces.
When this option is enabled, the slicer will attempt to create a movement path that will avoid moving over open spaces as much as possible. A possible consequence of enabling this option is that it may result in a longer printing time on account of the print head having to go around a model instead of through it.
We advise taking a methodical approach to solving stringing. Try one solution first and just move on to the next if the first solution does not work. This is a method that will help you more systematically understand the root cause for any 3D printing issue. When a similar problem pops up, you will be more equipped to solve it with less need to do trial runs.
Testing your settings
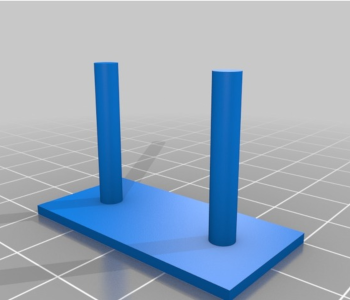
Fine-tuning your printer settings to avoid stringing can take multiple trial prints. To minimize filament waste, we suggest printing a small stringing test instead of the actual model you’re trying to print. This free model from Thingiverse is an excellent option.
The test model simply consists of two columns that are separated by a small but ample distance. Without any retraction, the model will almost certainly have some stringing. This is a good opportunity to fine-tune your retraction settings, although other factors that can induce stringing can also be checked.
Final thoughts
Stringing is one of the more common problems encountered in stringing. It can be bad enough to ruin the appearance of a 3D print that you can no longer salvage it in post-processing.
The good news is that the potential solutions to stringing are a lot simpler compared to other common 3D printing issues. Most of the solutions can be done by just adjusting a few settings in your slicer software.